This is the multi-page printable view of this section. Click here to print.

Return to the regular view of this page.

Manage access to Endor Labs

Learn how to manage access user and machine access to Endor Labs.

This is the multi-page printable view of this section. Click here to print.

Return to the regular view of this page.

Learn how to manage access user and machine access to Endor Labs.

Endor Labs comes with a built-in attribute based access control system. Attribute-based access control (ABAC) is an authorization model that evaluates attributes (or the characteristics of an identity), rather than roles, to determine access. See Authorization policies for more information on managing authorization policies.

Endor Labs uses external identity providers to authenticate all users and the attributes associated with the identity to authorize them.

The following sections provide information on authentication providers and how you can configure them.

After you configure authentication and authorization policies, you can invite users. See Invitations for more information.

Authentication providers

Authentication through Endor Labs is done through an external identity provider. Some authentication mechanisms are generally designed for human users, while others are designed for machine identities.

Endor Labs supports the following authentication mechanisms for human users.

  • Google - Authentication is provided through a user’s Google Workspace account.
  • GitHub - Authentication is provided through a user’s GitHub account.
  • GitLab - Authentication is provided through a user’s GitLab account.
  • Email - Authentication is provided through an email link sent to a user.
  • Custom Identity Providers - An enterprise identity provider such as Okta or VMware One, which uses SAML or OIDC protocol. See Custom identity providers for more information.

The following authentication mechanisms designed for machine identities, such as continuous integration or automation systems, are supported.

  • Google Cloud - With Google Cloud workload identity federation service accounts may be used to federate identity to Endor Labs. See Keyless authentication for more information.
  • GitHub Action OIDC - With GitHub Action OIDC you can federate the identity of your workloads to Endor Labs. See Keyless authentication for more information.
  • AWS Role - With AWS identity federation your can use the AWS ARN of the role acts as the identity of a machine user. See Keyless authentication for more information.

Session duration

The duration of the session token determines how long a user stays authorized in Endor Labs. At the end of the session duration, the user authentication is invalidated and requires reauthentication.

The following table provides the session duration for various authentication providers.

Authentication provider Session duration
Google 1 hour
GitHub 4 hours
GitLab 2 hours
Email 4 hours
Custom IdP Depends on the session duration set by the IdP
API Keys 4 hours

The default session token duration for Custom Identity Providers (IdPs) is 4 hours, provided no specific session duration is configured in your IdP. Endor Labs respects the session duration defined in your IdP, after which users must reauthenticate.

For SAML-based integrations, you can set the session duration using the SessionNotOnOrAfter attribute. In OIDC, the token expiration claims (exp) control the session duration.

The maximum allowed session duration is 4 hours. If your IdP is configured with a session duration exceeding 4 hours, the session will automatically default to a 4-hour limit.

Set up SSO with Endor Labs

Single Sign-On (SSO) provides a seamless sign-in by enabling users to access external applications and services without re-entering the credentials. Endor Labs supports SAML or OIDC-based identity providers.

SAML is an XML-based protocol used for exchanging authentication and authorization data between applications.

OpenID Connect (OIDC) is an identity layer on top of the OAuth 2.0 framework that allows applications to verify the identity and claims of users.

Using Endor Labs, you can integrate using an Identity Provider (IdP) that supports SAML or OIDC, such as Okta, Microsoft Active Directory Federation Services (AD FS), Azure Active Directory (AD), Google, or OneLogin.

The default duration of a user session is four hours, if you have not set the session duration in your IdP. Endor Labs honors the session duration set in the IdP, after which the user needs to reauthenticate. You can set the session duration in the SessionNotOnOrAfter attribute for SAML. The token expiration claims (exp) control the session duration in OIDC.

Session duration cannot be more than four hours. If you set a session duration for more than four hours at the IdP, the session duration defaults to four hours.

Complete the following tasks to integrate an SSO-based identity provider with Endor Labs.

Keep Service Provider (Endor Labs) details handy

To configure Endor Labs as a SAML 2.0 app, you must have the following service provider details:

  • Single sign-on URL: This is the API endpoint of the application, where your identity provider redirects the user after successful authentication. You have to enter https://api.endorlabs.com/v1/auth/saml-callback?tenant=yourtenant. Replace yourtenant with your actual tenant name.
  • Audience URI: This is a globally unique name for the service provider. You have to enter https://api.endorlabs.com/v1/auth/sso.

To configure Endor Labs as an OIDC app, you must have the following service provider details:

  • Sign-in redirect URIs: This is the API endpoint of the application, where your identity provider redirects the user after successful authentication. You have to enter: https://api.endorlabs.com/v1/auth/oidc/callback.
  • Sign-out redirect URIs: This is the API endpoint of the application, where your identity provider redirects the user after successful logout. You have to enter: https://api.endorlabs.com/v1/auth/oidc/logout.

Retrieve Setup information from your IdP

The following information is needed for SAML and OIDC configuration setup in Endor Labs.

Setup information for SAML Authentication

To set up SAML SSO with Endor Labs you will need the following information from your IdP:

  • Sign-On URL: The SAML SSO remote sign-in URL of IdP.
  • Issuer: The unique ID of IdP for Endor Labs.
  • Signing Certificate: The public key certificate of your IdP.

Setup Information for OIDC Authentication

To set up OIDC SSO with Endor Labs you will need the following information from your IdP:

  • Identity Provider Discovery URL: The OIDC discovery URL of your identity provider.
  • Client Key: The unique key of IdP for Endor Labs.
  • Client Secret: The secret key of your IdP for Endor Labs.
  • Required Claims and Scopes: The required claims and scopes if non-standard for your OIDC connection.

Configure SAML in Endor Labs

Provide the Identity Provider SSO details in Endor Labs and allow users to seamlessly and securely sign in to Endor Labs.

  1. Sign in to Endor Labs.

  2. From the sidebar, navigate to Settings and click CUSTOM IDENTITY PROVIDER.

  3. Select the TYPE OF IDENTITY PROVIDER as SAML.

  4. Enter a name for your IDENTITY PROVIDER NAME.

  5. From METADATA DEFINITION, select Metadata URL and enter the SAML Identity provider metadata URL or Discovery URL from your IdP.

  6. If you want to enter the identity provider details manually, choose METADATA DEFINITION as Manual and enter the following details that you saved from IdP.

    • DISCOVERY URL: Enter Sign-On URL from IdP.
    • ISSUER: Enter Issuer from IdP.
    • ATTRIBUTES: Enter your attributes such as email and groups. Type the values and press enter.
    • CERTIFICATE: Enter the Signing Certificate from IdP.
  7. Click Save Configuration.

Configure OIDC in Endor Labs

Provide the following Identity Provider SSO details to configure OIDC SSO in Endor Labs and allow users to seamlessly and securely sign in to Endor Labs.

  1. Sign in to Endor Labs.
  2. From the sidebar, navigate to Settings and click CUSTOM IDENTITY PROVIDER.
  3. Select the TYPE OF IDENTITY PROVIDER as OIDC.
  4. Enter the IDENTITY PROVIDER NAME for your selected identity provider.
  5. Under DISCOVERY URL enter your discovery URL. This is usually your Okta domain followed by /.well-known/ openid-configuration. For example, https://endorlabs.okta.com/.well-known/openid-configuration.
  6. Enter your Client ID and Client Secret from your IdP.
  7. Under Advanced Configuration enter the following scopes in the scopes section: email, groups, profile. Make sure to hit enter after each to add each attribute.
  8. If you are configuring group-based authentication ensure to add groups in the Claim Names section.
  9. Click Save Configuration.

Note: Based on your IdP configuration you may need additional claim names or scopes. Consult your IdP administrator for additional guidance.

Configure your Authorization Policy

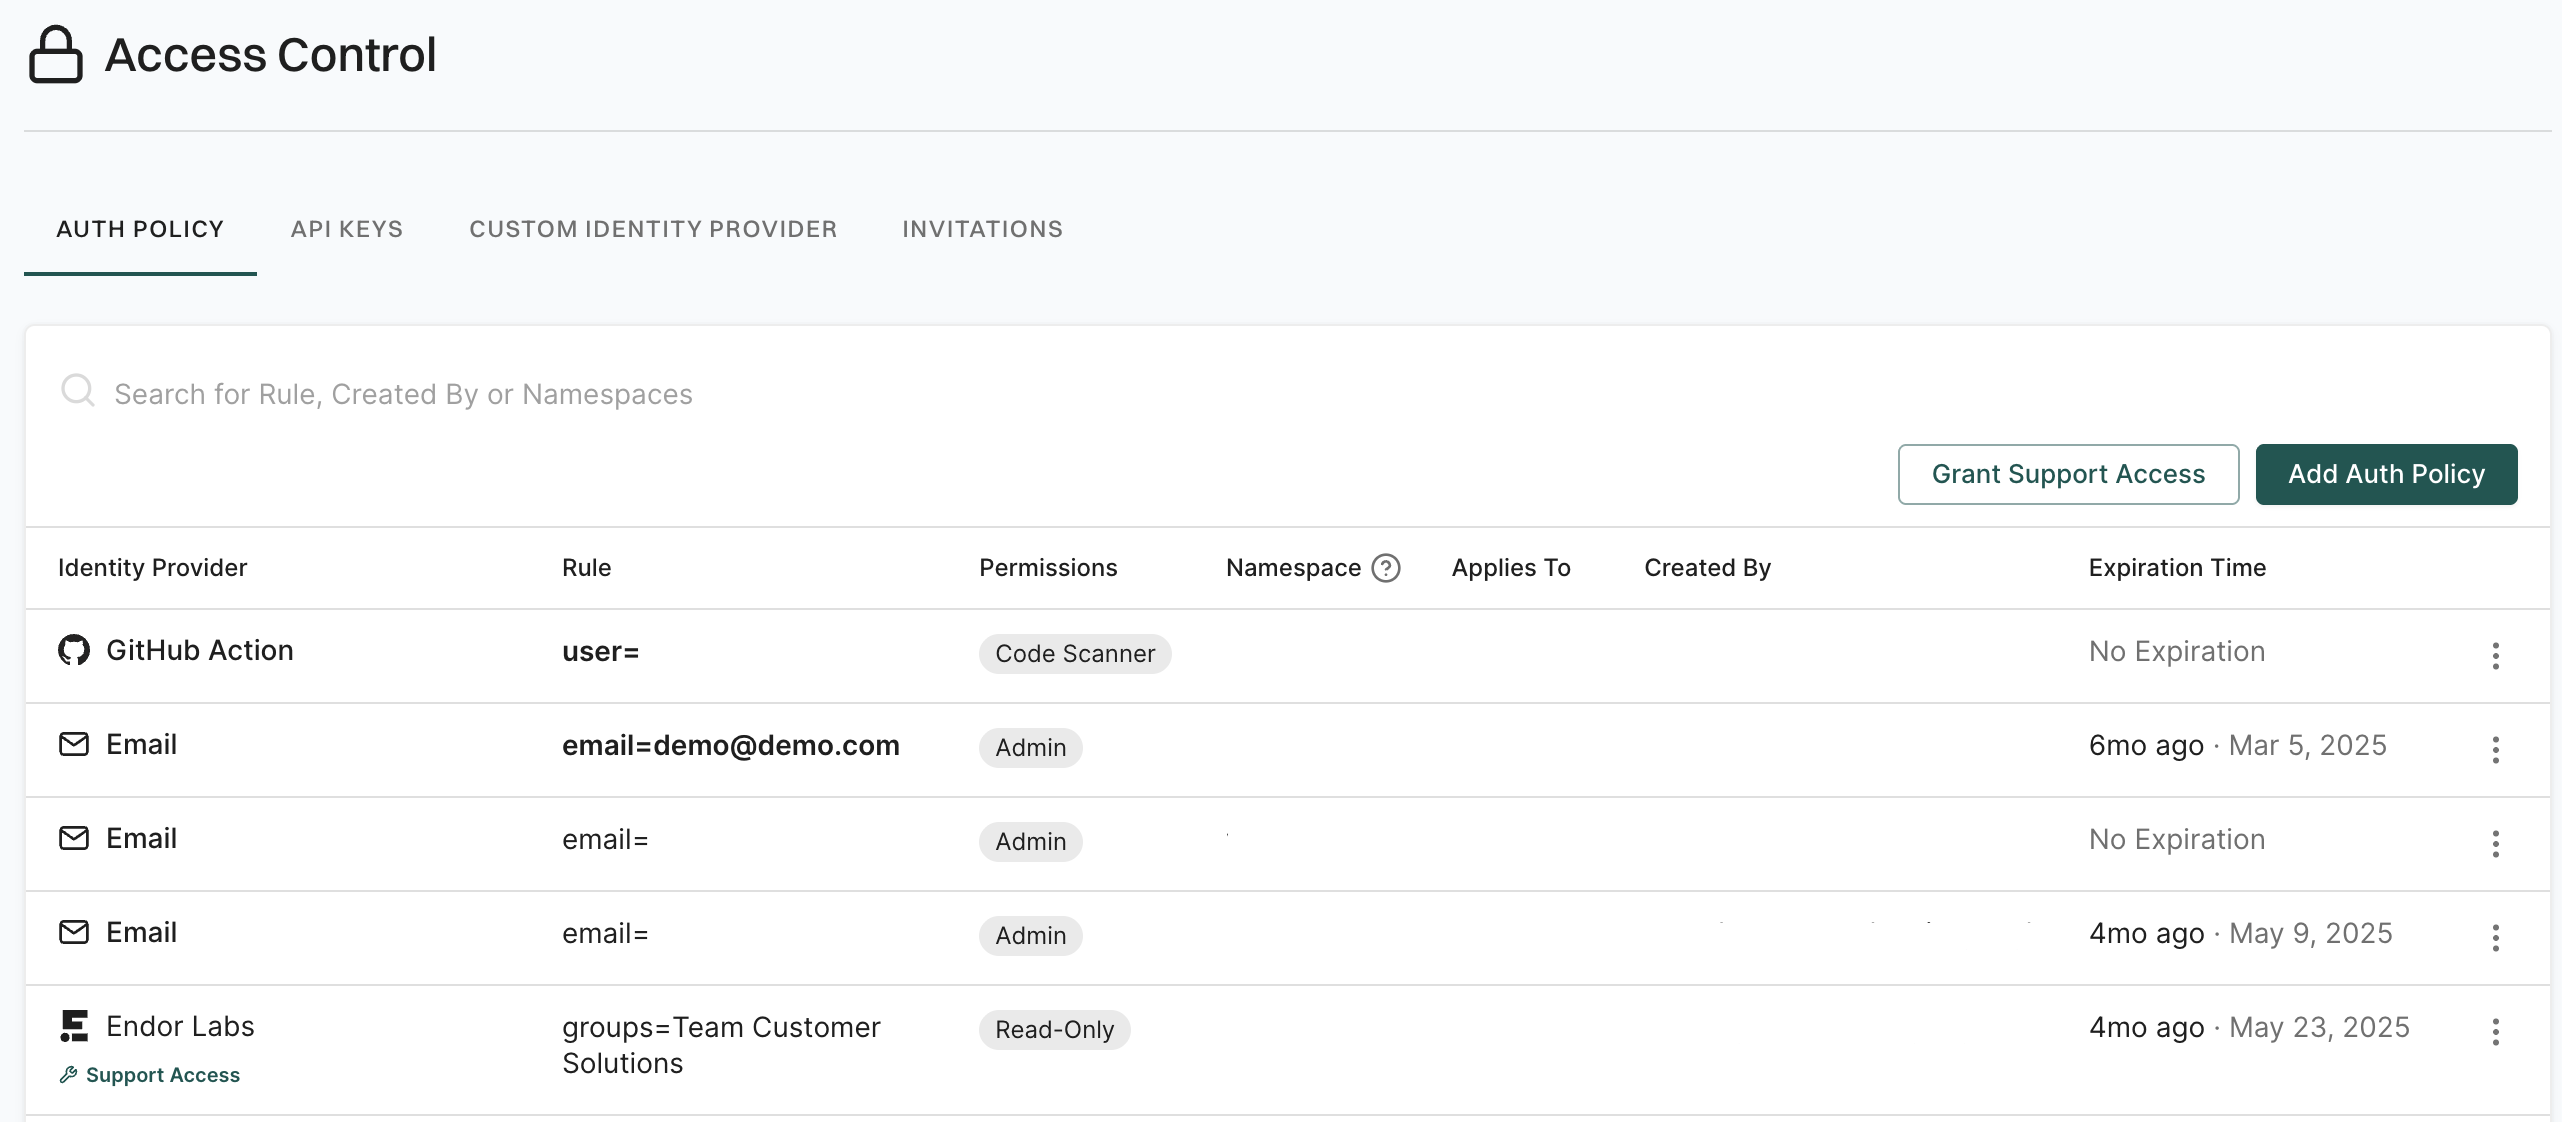
Once you’ve configured your custom identity provider in Endor Labs you must set up an authorization policy for your users and groups.

To configure an authorization policy:

  1. Sign in to Endor Labs.
  2. From the sidebar, navigate to Settings and click Auth Policy.
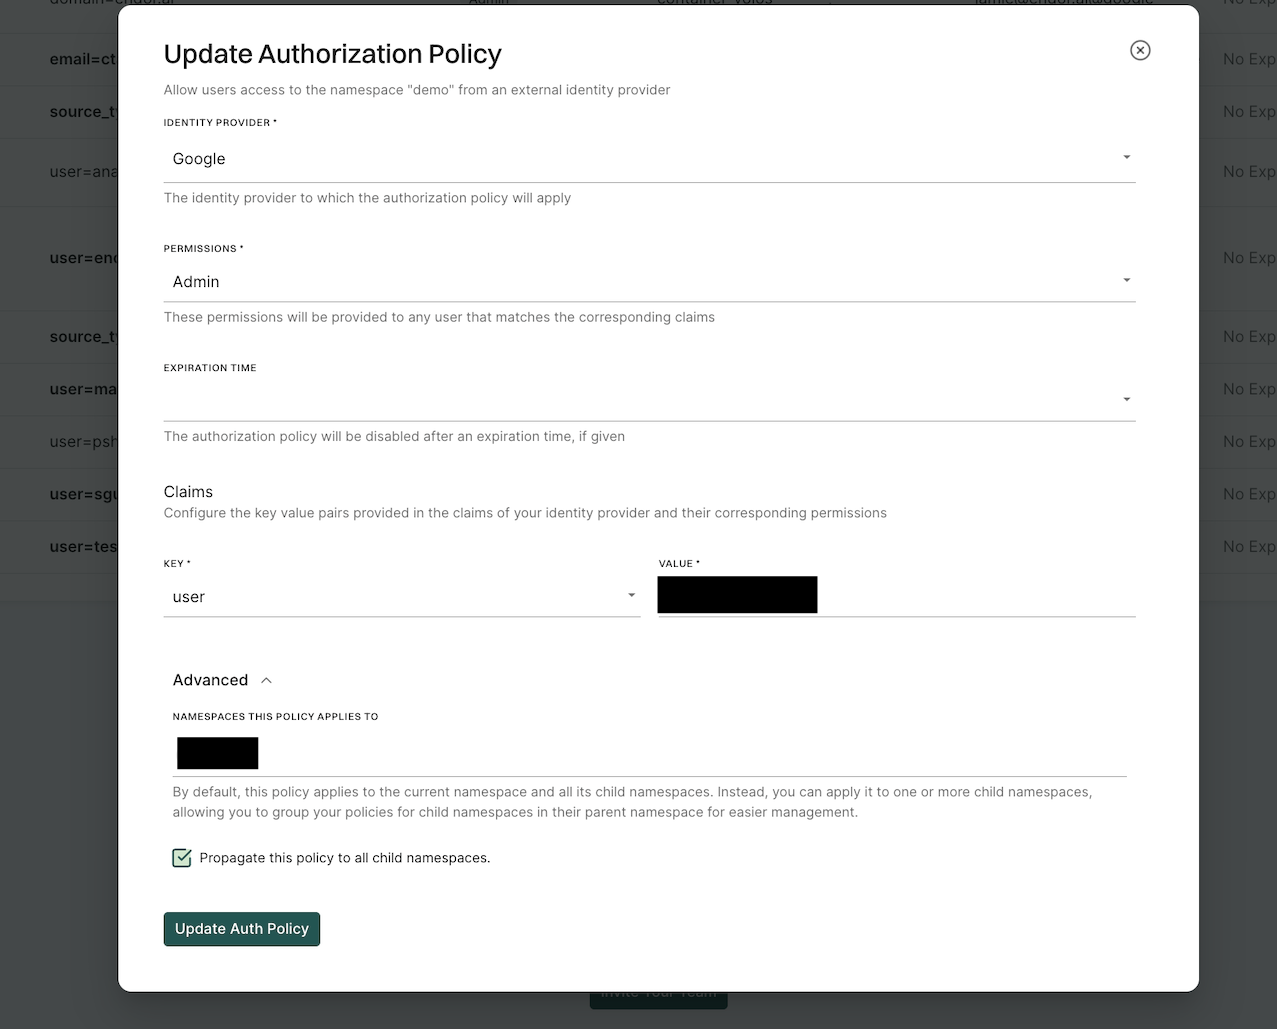
  3. Click the Add Auth Policy button.
  4. Enter the name you selected for your custom identity provider as your identity provider.
  5. Select the permissions you’d like to assign your user or group.
  6. Under claims update your Key. Use email to assign individual users through email or groups to assign a user by group.
  7. Assign the value to the key as the email of the user or group you would like to authorize. This value is case-sensitive.
  8. Repeat as needed for any additional users or groups.

Verify Sign-in

Use the user account to sign in to Endor Labs from your IdP and validate the SSO integration.

  1. Sign in to IdP as a user.
  2. Navigate to https://app.endorlabs.com
  3. Click Login with Enterprise SSO
  4. Enter the namespace you’d like to sign in to within Endor Labs.

For Okta-specific instructions, see SSO using Okta

Authorization roles

Authorization roles define the permissions on accessing and using Endor Labs and its features. Each authorization role has a set of associated permissions that determine the extent of access to Endor Labs. Ensure that you assign the right role for the right situation and follow the principle of least privilege (PoLP).

You need to assign an authorization role when you create authorization policies and API keys.

The following roles are available:

Role Description Intended Use Access
Admin Grants full administrative access to all resources. System administrators Read and write for all resources
Read-Only Grants read-only access to all resources. Users who need to view data but not make changes Read-only for all resources
Code Scanner Grants necessary access to scan a project using endorctl. Users or CI/CD-based service accounts that run scans Read and write for Projects, Repositories, Findings, etc. (Read-only for all other resources)
Policy Editor Grants necessary access to manage policies. Security team members who define and maintain security policies Read and write for Policies, Policy templates, etc. (Read-only for all other resources)
On-Prem Scheduler Grants necessary access to run Outpost and to use monitoring scans on supported platforms. On-premises deployment service accounts Read and write for Installations, Projects, Namespaces, Scan Requests, etc. (Read-only for all other resources)

Authorization policies

Authorization in Endor Labs is defined by a set of authorization policies. Authorization policies define the permissions provided to an identity authenticated by a supported identity provider when that identity meets specific rule criteria defined as attributes or claims about the identity.

Authorization policies must contain the following information:

  • The supported identity provider through which a given identity comes from.
  • The role provided to an identity.
  • An optional expiration time for the policy.
  • The rule criteria or claims for which the identity must have to be authorized to access Endor Labs.

After setting up the authorization policy, you can invite users to Endor Labs.

Set up authorization policies

To set up an authorization policy to your Endor Labs tenant:

  1. Sign in to Endor Labs and select Access Control from the left sidebar.
  2. Select Auth Policy and click Add Auth Policy.
  3. Select the identity provider for which you want to configure an authorization policy.
  4. Select the role to be granted to a matching identity.
  5. Select an expiration time for the authorization rule.
    • This may be either No expiration, 24 hours, 72 hours, one week, two weeks, or 30 days.
  6. Select the claims for which the authorization rule will provide access.
    • For GitHub and GitLab this may be the user’s platform handle.
    • For Google, this may be the user’s email address or the domain of the email address.
    • For a custom identity provider, this may be set to a key value pair associated with the claims provided by your external identity provider.
    • For Email this may be the email address an authentication link is sent to.
    • For GitHub Action OIDC this may be the organization or repository for which a workload runs under.
    • For AWS Role this may be the AWS ARN of the role the machine is set to impersonate.
    • For Google Cloud this may be the principal email of a service account the workload is set to impersonate.
    • For Azure these may be the user’s tenant ID, app ID, object ID and subscription ID.
  7. Under Advanced, select a set of namespaces for which the authorization policy applies. If you choose to propagate this policy to all child namespaces, then the authorization policy will apply to any selected namespaces and their children.
  8. Click Add Auth Policy to save your authorization policy.

After adding the authorization policy, a user with the corresponding authorization claims can sign in to Endor Labs with their configured permissions.

See Invite users to Endor Labs.

Edit authorization policies

To edit an authorization policy:

  1. Navigate to Manage > Access Control.
  2. Select Auth Policy.
  3. Click the vertical three dots on the right side of the policy you want to edit and click Edit Auth Policy.
  4. You can update the identity provider, permission, expiration time, claims of key and value, and namespaces the policy applies to.
  5. Click Propagate this policy to all child namespaces to apply this policy to all child namespaces within the hierarchy.
  6. Click Update Auth Policy.

Edit authorization policy

Delete authorization policies

To delete an authorization policy:

  1. Navigate to Manage > Access Control.
  2. Select Auth Policy.
  3. Click the vertical three dots on the right side of the policy you want to delete and click Delete Auth Policy.
  4. Click Confirm in Delete Authorization Policy.

Grant support access

You can give the Endor Labs team read-only access to your namespaces for a limited time, allowing them to offer technical support and resolve issues.

You can revoke access and delete these policies at any time. See delete authorization policy for more information.

To grant support access to your namespace:

  1. Navigate to Manage > Access Control.
  2. Select Auth Policy and click Grant Support Access.
  3. Select an expiration time for the access from the drop down menu.
  4. Click Grant Access.

Manage user invitations

Endor Labs provides attribute based access control to manage users across tenants. Provision User access to Endor Labs through one of the following methods:

  1. Send user invitations - Specifically invite a user through email to sign in using their own selected identity provider.
  2. Configure authorization policies - Define specific identities or attributes for a given identity to provide necessary access to Endor Labs. See Authorization policies for more information.

Invite users to Endor Labs

Invite specific users to access your Endor Labs tenant using their preferred external identity provider. When a user is sent an invitation to your tenant, they receive an invitation to sign in to Endor Labs with the identity provider of their choice. When a user accepts an invitation an authorization policy is created for them using their selected identity provider.

To invite a new user to Endor Labs:

  1. Select Manage > Settings on the left sidebar.
  2. Ensure you are on the Invitations top navigation tab.
  3. Click Invite your team.
  4. Enter the email address of the user that you would like to collaborate with. If you would like to invite multiple users enter their email addresses as a comma separated list.
  5. Click Invite Users.

An email will be sent to the email address inviting the user to your tenant namespace. The email will provide a link for them to access your tenant namespace, and they can start collaborating on your projects.

Invalidate a user invitation

To delete a user invitation:

  1. Select Manage > Settings on the left sidebar.
  2. Ensure you are on the Invitations tab.
  3. Choose an invitation that you would like to delete and click Delete.

AI access

The following features in the Endor Labs application access Artificial Intelligence (AI) services to enhance security analysis, code insights, and developer assistance. You can check whether AI access is currently enabled or disabled for these features.

  • LLM code processing Detects AI models from HuggingFace used in Python projects and lists them as dependencies. See View AI model findings.

  • DroidGPT Retrieves data from third-party AI tools and correlates it with Endor Labs’ proprietary risk data to identify open source software packages. See Use DroidGPT.

  • C/C++ embeddings Enhances detection capabilities of C and C++ software composition analysis (SCA) by using AI-generated embeddings. See Scan C and C++ projects.

Modify AI access

To modify AI feature settings:

  1. Select Settings > AI Access from the left sidebar.
  2. Click Contact us to submit a request to the support team.
  3. The support team will assist you with enabling or disabling AI features based on your organization’s needs.