This is the multi-page printable view of this section. Click here to print.

Return to the regular view of this page.

Deploy Endor Labs GitHub App

Learn how to continuously monitor your environment with the Endor Labs GitHub App.

This is the multi-page printable view of this section. Click here to print.

Return to the regular view of this page.

Learn how to continuously monitor your environment with the Endor Labs GitHub App.

Endor Labs provides a GitHub App that continuously monitors users’ projects for security and operational risk. You can use the GitHub App to selectively scan your repositories for SCA, secrets, RSPM, or CI/CD tools. GitHub App scans also establish baselines that are subsequently used during CI scans.

The Endor Labs GitHub App scans your repositories every 24 hours and reports new findings or changes to your code’s release versions. It also performs RSPM scans weekly on Sundays to manage your repository’s posture. See Scan with GitHub App for more information. You can also manually trigger scans for your repositories. See Re-scan projects for more information. After you install the GitHub App, you can make further changes to the settings. See Manage GitHub App for more information. You may need to review the technical limitations of the GitHub App so that you can use the GitHub App to its full potential. See Technical limitations of the Endor Labs GitHub App for more information.

If you want to use PR remediations as part of your monitoring scan or need to export your findings to GitHub Advanced Security, you need to use GitHub App (Pro).

If you are using GitHub Enterprise Server, you can use the GitHub Enterprise Server App to continuously monitor your environment.

Warning
You cannot have both GitHub App and GitHub App (Pro) simultaneously in your environment. If you are currently using the standard GitHub App, you can migrate to GitHub App (Pro). When migrating from one app to the other, ensure you select the same set of repositories as before to preserve your currently scanned projects and findings after the migration.

When Endor Labs scans a repository for the first time, it detects the default branch of the repository. The findings that are created in the scan are associated with the default branch.

When you change the default branch in your source control system (for example, from main to dev):

  • Endor Labs automatically detects the new default branch and sets that as the default reference
  • The previous default branch becomes a reference branch
  • Scans continue on the new default branch and the reference branch

The findings associated with the previous default branch are no longer associated with the default context reference. You can view them in the reference context.

When you rename the default branch in your source control system:

  • Endor Labs automatically switches to the renamed branch
  • Scans continue without disruption

When you add a new repository version (for example, a dev branch), both the default branch and the new version are scanned by the Endor Labs App.

You can control the default branch detection by setting the ENDOR_SCAN_TRACK_DEFAULT_BRANCH environment variable in a scan profile. You need to configure the project to use the scan profile. See Configure scan profiles for more information.

By default, the environment variable is set to true. When set to true, the default branch detection is enabled, and the first branch you scan is automatically considered as the default branch.

Before installing and scanning projects with Endor Labs GitHub App, make sure you have:

  • A GitHub cloud account and organization. If you don’t have one, create one at GitHub.
  • Administrative permissions to your GitHub organization. Installing the Endor Labs GitHub App in your organization requires approval or permissions from your GitHub organizational administrator. If you don’t have the permissions, use the command line utility, endorctl, while you wait for the approval.
  • Endor Labs GitHub App requires:
    • Read permissions to Dependabot alerts, actions, administration, code, commit statuses, issues, metadata, packages, repository hooks, and security events.
    • Write permissions to checks and pull requests to check the pull requests automatically and surface policy violations to developers as pull request comments.
    • Subscribe to check run, check suite, and pull request events.

To automatically scan repositories using the GitHub App:

  1. Sign in to Endor Labs.

  2. Choose Projects and click Add Project.

  3. From GitHub, choose GitHub App.

    Install Endor Labs GitHub App

  4. Click Install GitHub App.

    You will be redirected to GitHub to install the GitHub App.

    Endor Labs GitHub App

  5. Click Install.

  6. Select a user to authorize the app.

  7. Select the organization in which you want to install the app.

  8. Select whether to install and authorize Endor Labs on all your repositories or select the specific repositories that you wish to scan.

    Choose Repositories
  9. Review the permissions required for Endor Labs and click Install and Authorize.

Note
If the button to install says Install and Request instead of Install and Authorize, you don’t have permission to install the GitHub App. Use the endorctl command line interface or select Install and Request to notify your organizational administrator of your request to install. If you select Install and Request your installation will not be active unless your organizational administrator approves the request to install GitHub App.
  1. Choose a namespace and click Next.

    Choose namespace
  2. Based on your license, select and enable the scanners.

    • SCA: Perform software composition analysis and discover AI models used in your repository.
    • RSPM: Scan the repository for misconfigurations. RSPM scans run every week on Sundays.
    • Secret: Scan the repository for exposed secrets.
    • CI/CD: Scan the repository and identify all the CI/CD tools used in the repository.
    • SAST: Scan your source code for weakness and generate SAST findings.
  3. Select Include Archived Repositories to scan your archived repositories. By default, the GitHub archived repositories aren’t scanned.

  4. Select PULL REQUEST SCANS to set preferences for scanning pull requests submitted by users.

    Choose PR options
    • Select Pull Request Comments to enable GitHub Actions to comment on PRs for policy violations.

    • In Define Scanning Preferences, select either:

      • Quick Scan to gain rapid visibility into your software composition. It performs dependency resolution but does not conduct reachability analysis to prioritize vulnerabilities. The quick scan enables users to swiftly identify potential vulnerabilities in dependencies, ensuring a smoother and more secure merge into the main branch.

      • Full Scan to perform dependency resolution, reachability analysis, and generate call graphs for supported languages and ecosystems. This scan enables users to get complete visibility and identifies all issues dependencies, call graph generation before merging into the main branch. Full scans may take longer to complete, potentially delaying PR merges.

      See GitHub scan options for more information on the scans that you can do with the GitHub App.

  5. Click Continue.

You have successfully installed the GitHub App.

You can improve your experience with the GitHub App by setting up package repositories. This will help you create a complete bill of materials and perform static analysis. Without setting package repositories, you may not be able to get an accurate bill of materials. See Set up package manager integration for more information.

Scan capabilities of the Endor Labs GitHub Apps

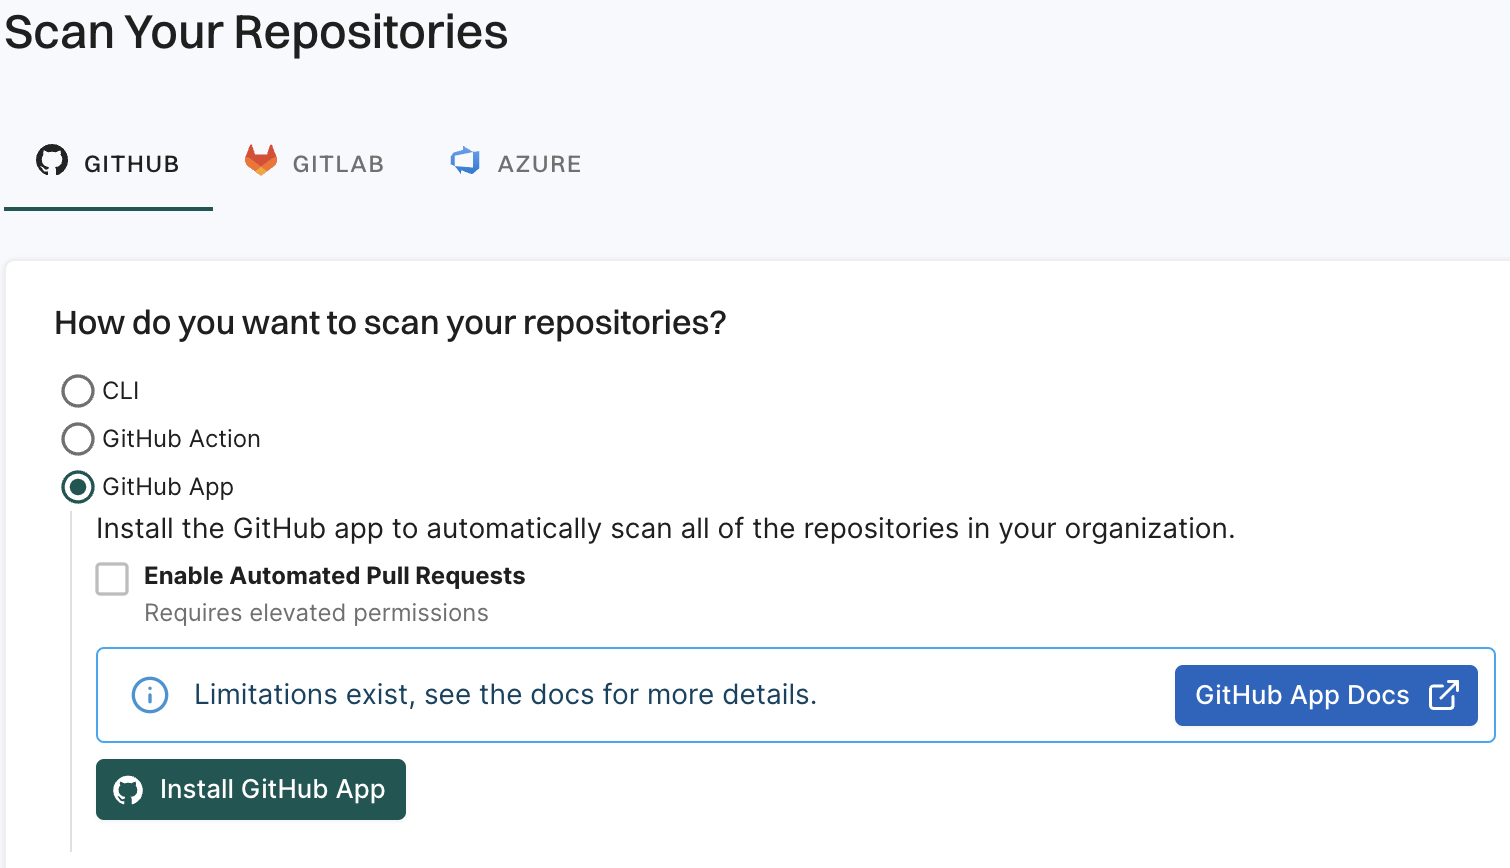
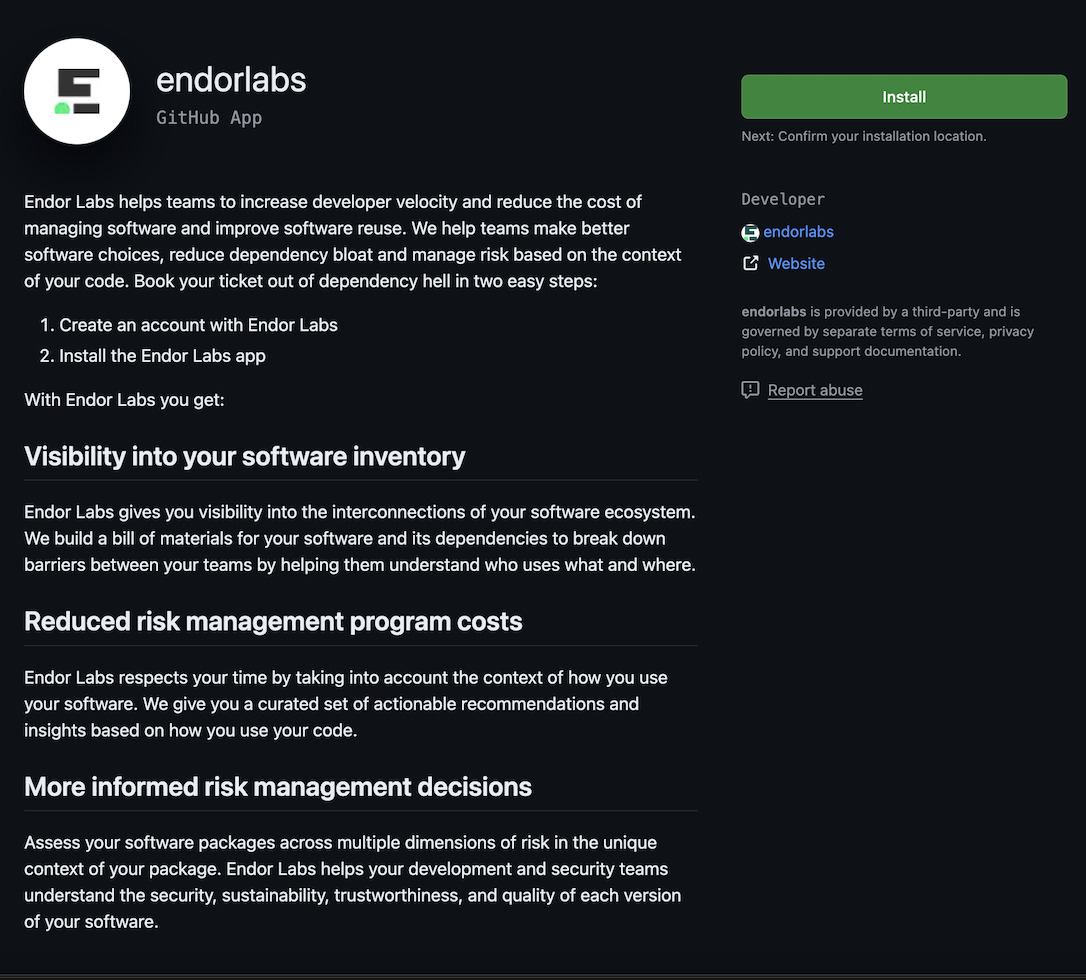
With the Endor Labs GitHub App or the Endor Labs GitHub Enterprise Server App you can enhance the security of your repository through the following types of scans.

Note
GitHub App refers to both the Endor Labs GitHub App and the Endor Labs GitHub Enterprise Server App unless otherwise specified.

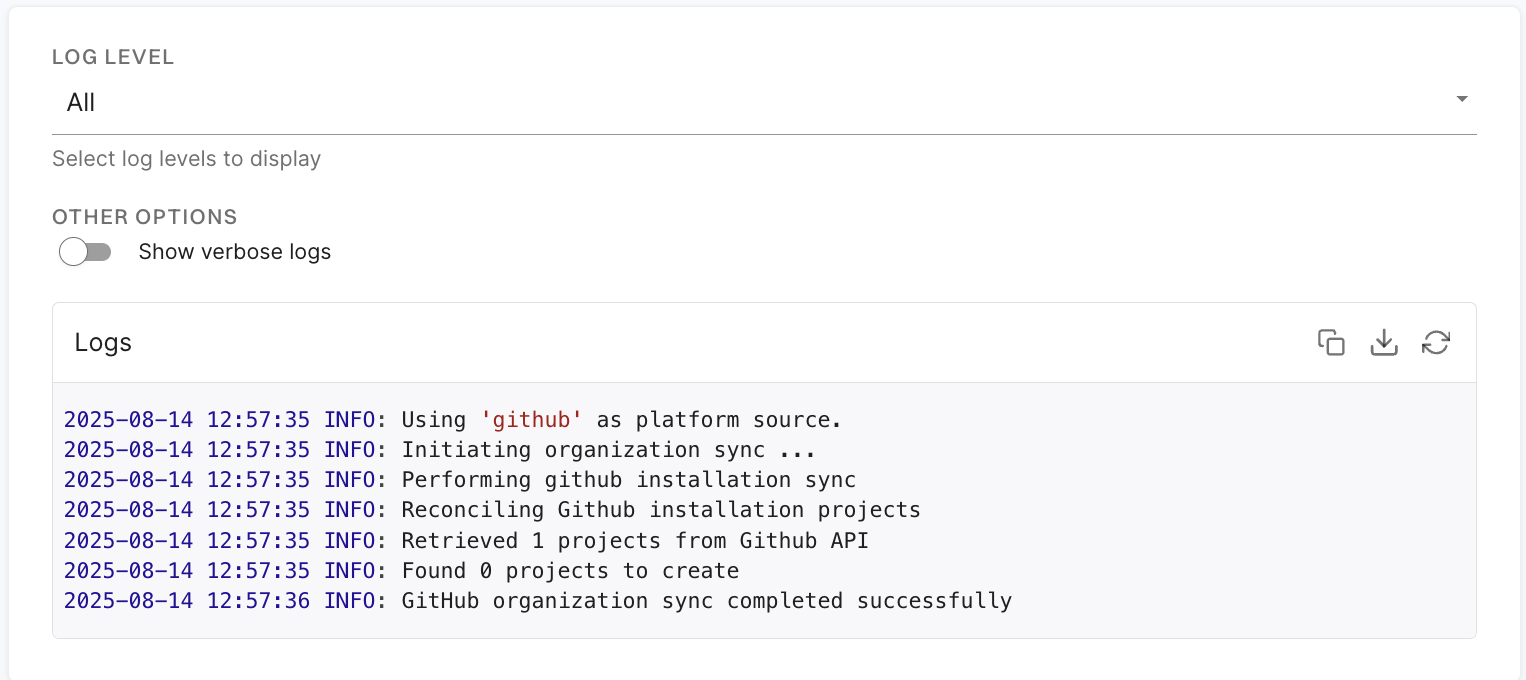
The Endor Labs App automatically scans your repositories every 24 hours for potential security issues and operational risks, providing up-to-date information about your projects’ security posture.

  • You can use the GitHub App to selectively scan your repositories for Software Composition Analysis (SCA), secrets, Repository Security Posture Management (RSPM), or CI/CD tools.
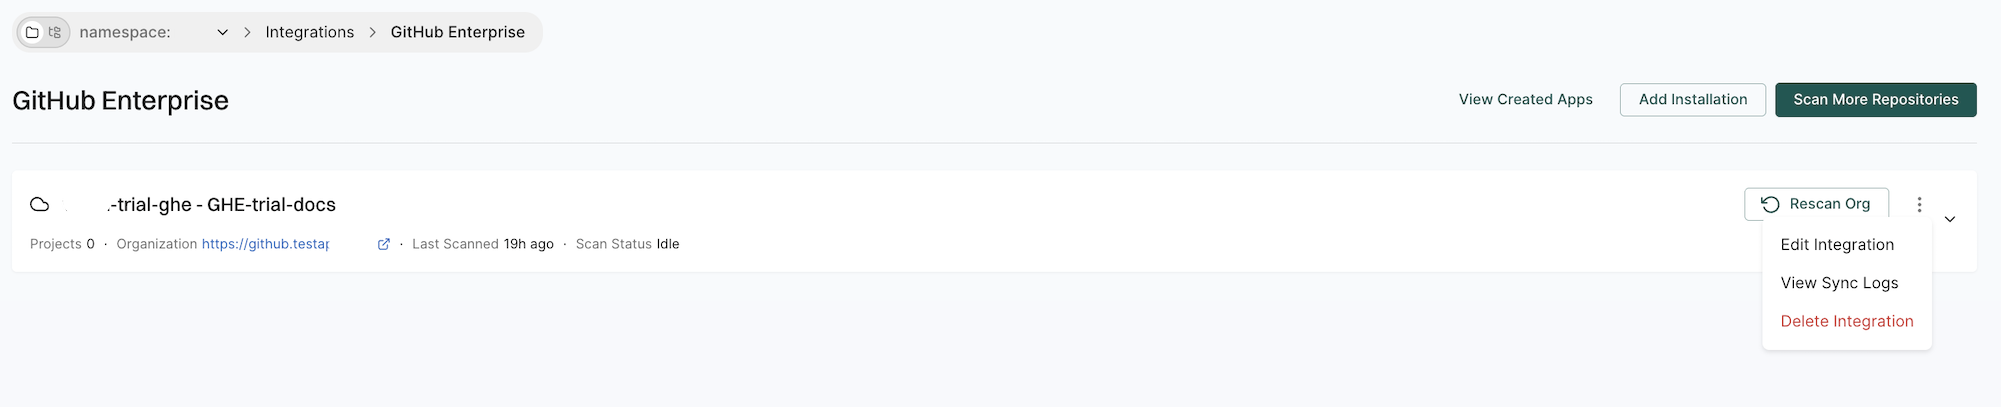
  • While the automated scan happens every 24 hours, you can manually trigger a rescan outside this schedule from the Endor Labs user interface. See Rescan projects.
  • After each scan, the GitHub App reports any new findings or changes to release versions of your code. Review the scan results from the Endor Labs user interface.

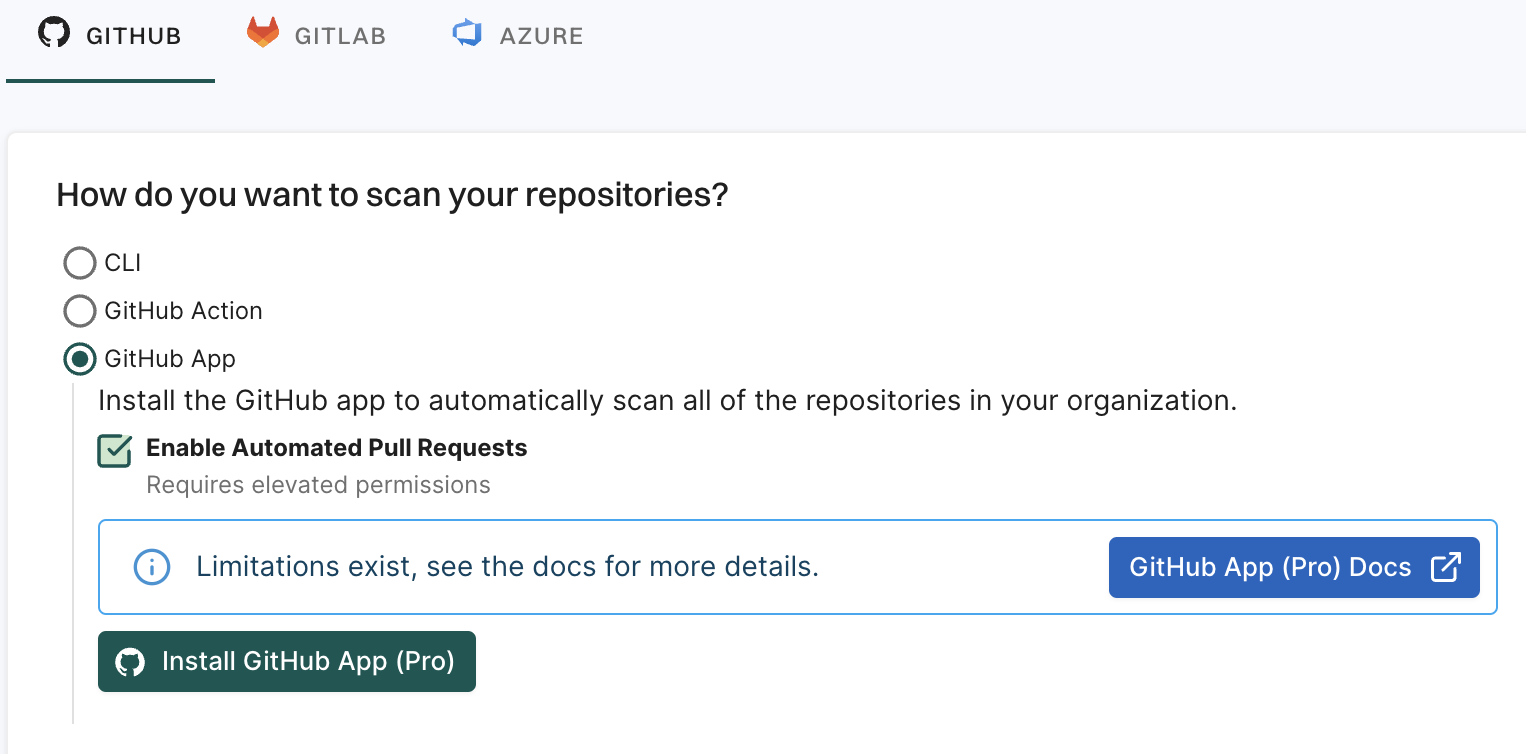
After scanning the complete repository, it’s important to address the pull requests submitted by users. Administrators can enable a fully automated scanning process for all pull requests and merges initiated into the main branch.

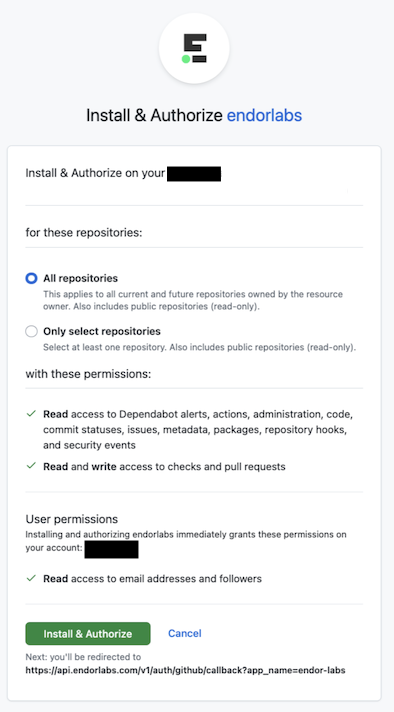
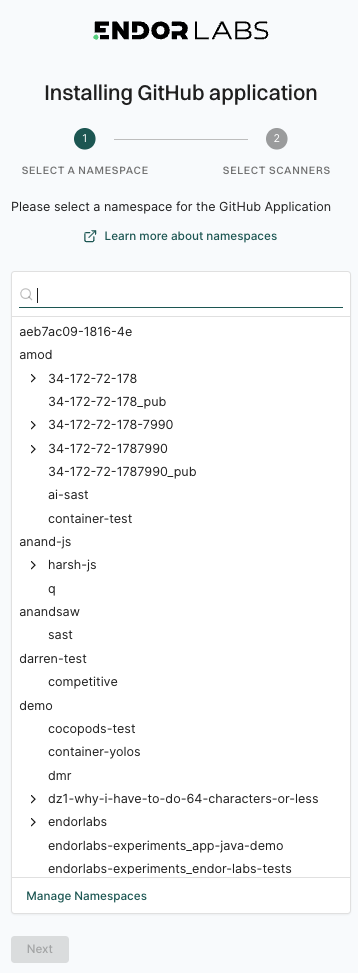
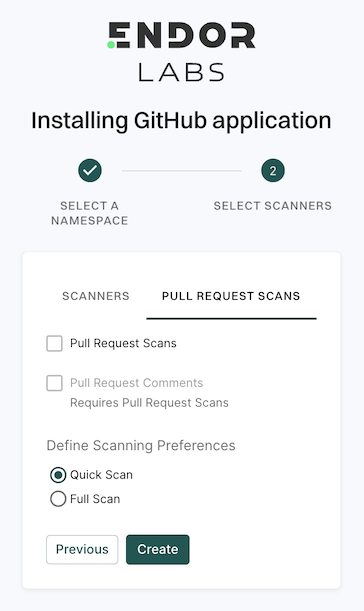
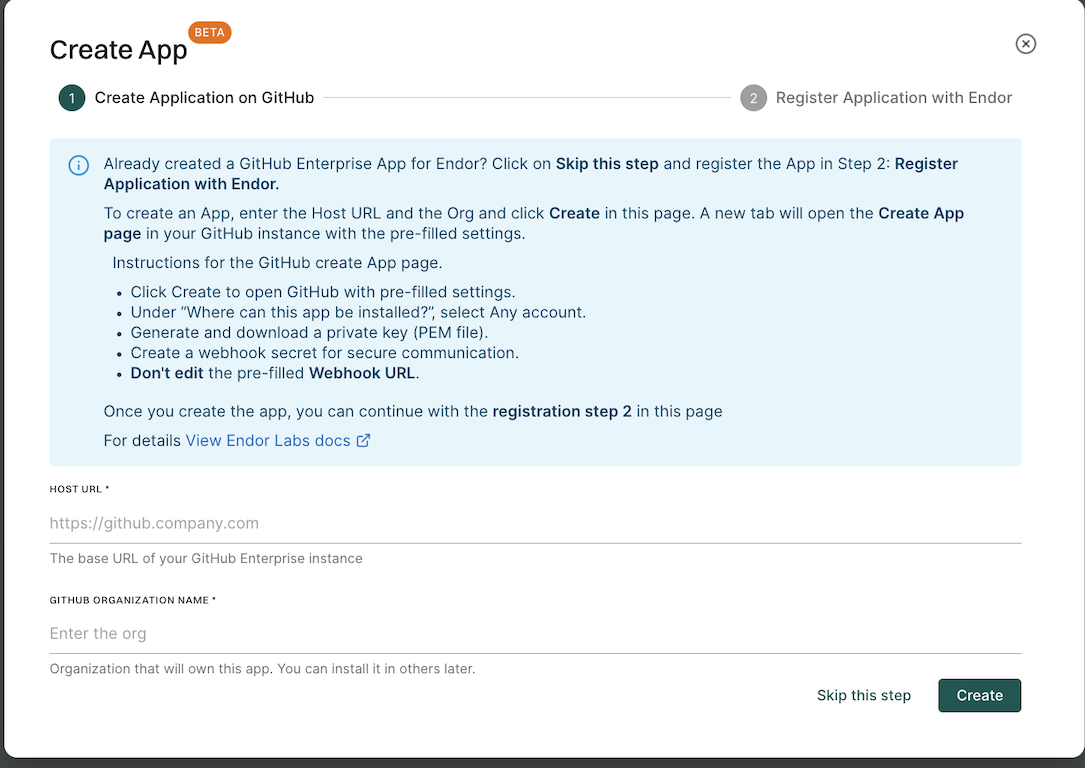
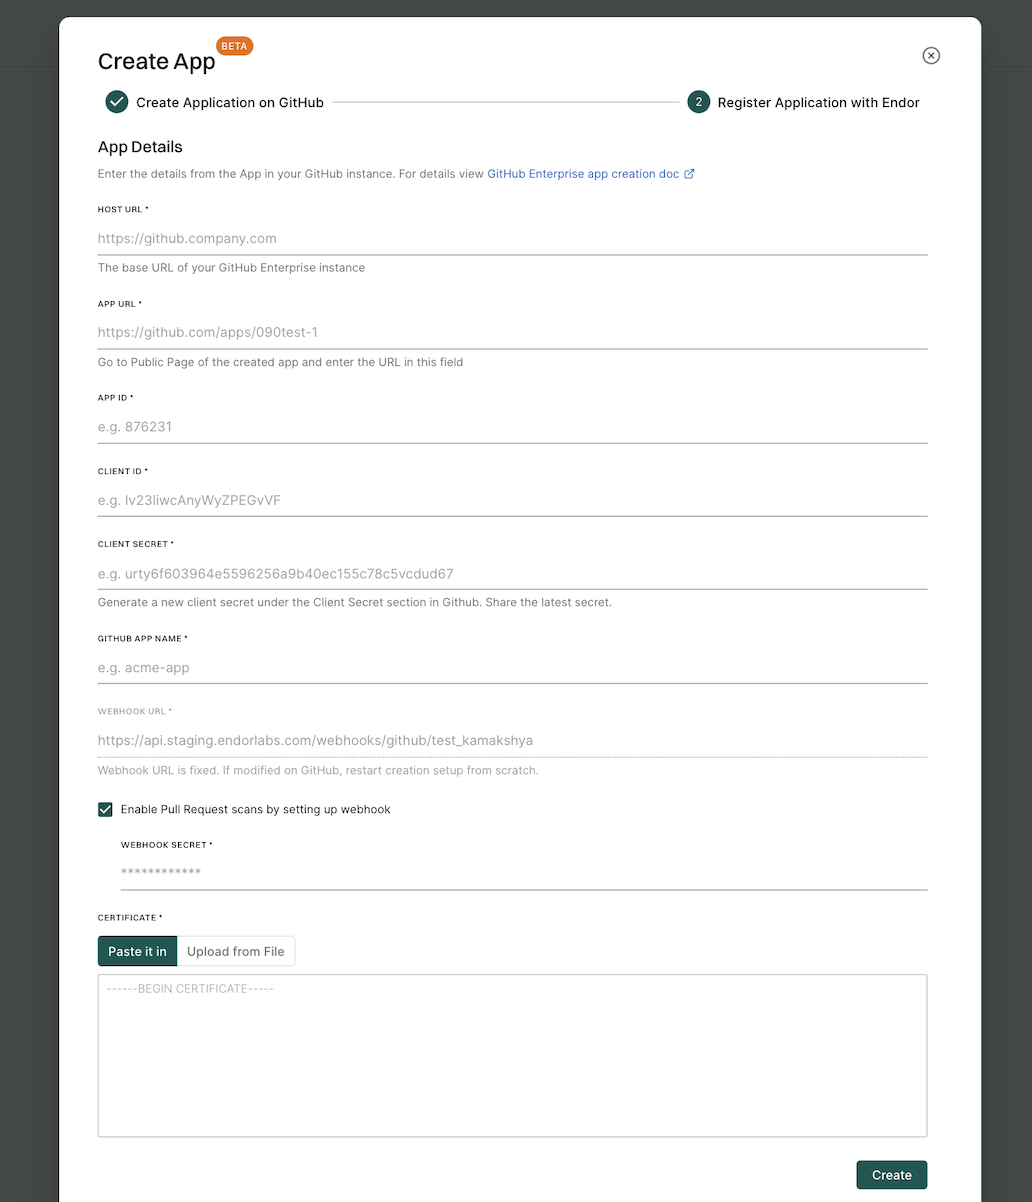
To automatically scan the PRs, set the pull request preferences during the GitHub App installation or edit the integration preferences afterward. For GitHub Enterprise Server App, set the preferences during installation or edit the integration preferences afterward.

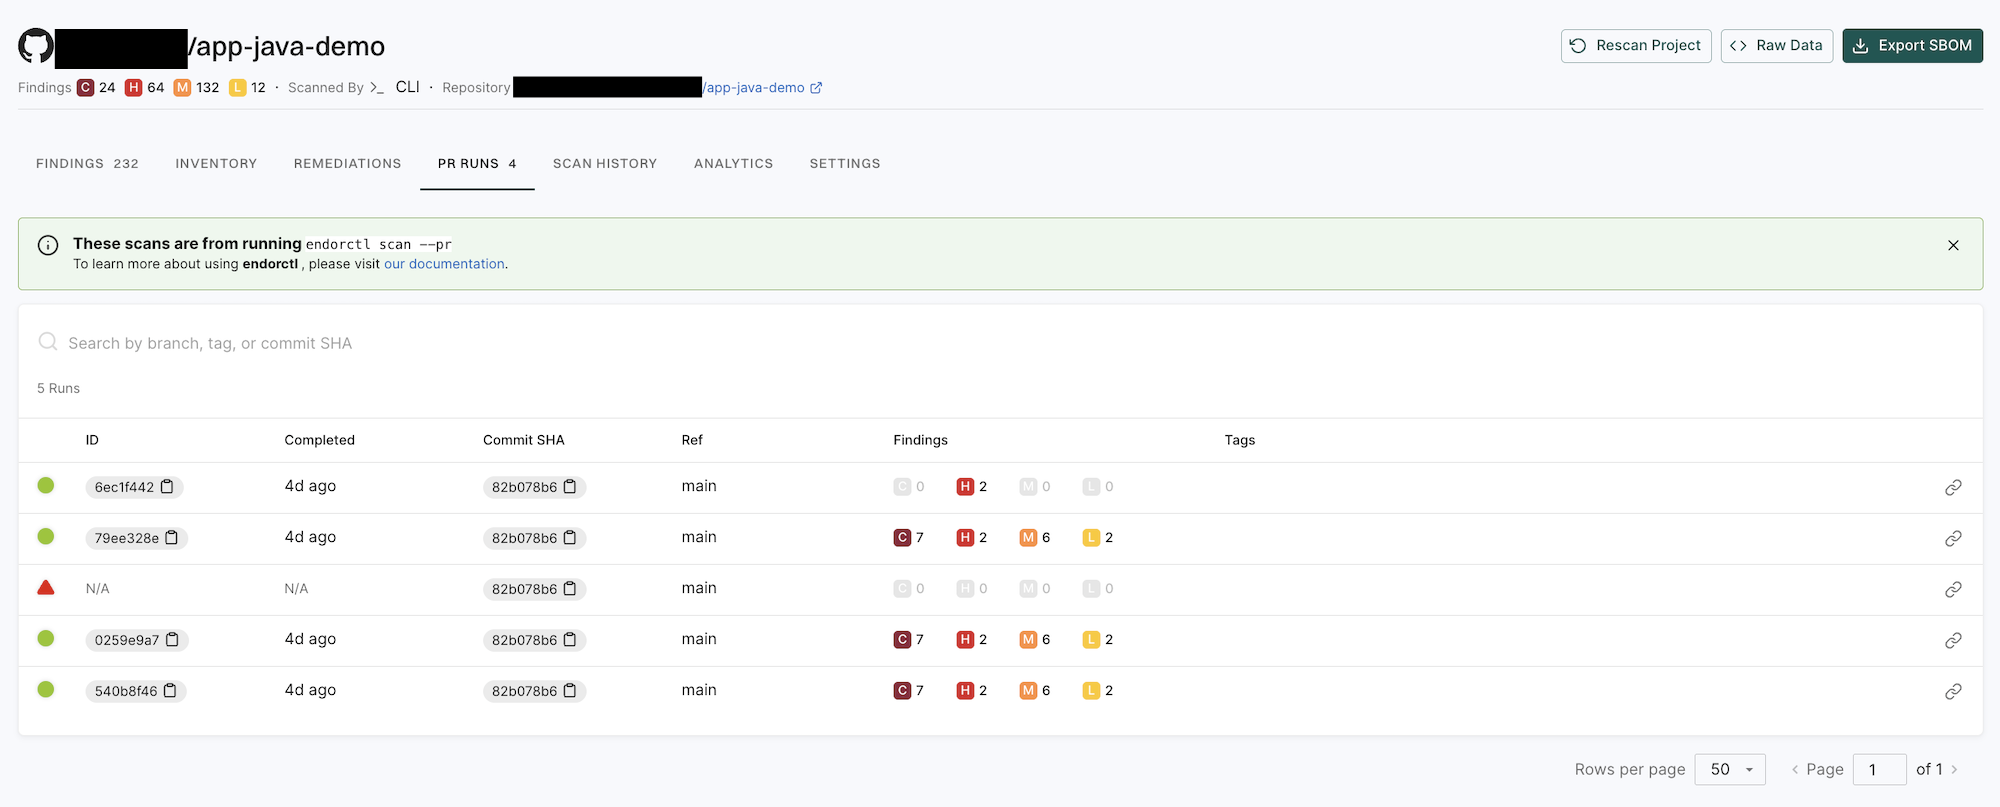
Whenever a PR is created against a repository, the Endor Labs GitHub App performs an incremental scan to detect any changes in resolved dependencies that may introduce new vulnerabilities. These incremental scans are CI runs and are not monitored. You can see the results of the scan on GitHub.

Based on your preferences, it performs a quick scan or a full scan before merging the PRs into the main branch.

  • Quick Scan performs dependency resolution but does not conduct reachability analysis to prioritize vulnerabilities. The quick scan enables users to swiftly identify potential vulnerabilities in dependencies, ensuring a smoother and more secure merge into the main branch.
  • Full Scan performs dependency resolution, reachability analysis, and generate call graphs for supported languages and ecosystems. This scan enables users to get complete visibility and identifies all issues related to dependencies and call graph generation, before merging into the main branch. Full scans may take longer to complete, potentially delaying PR merges.

Pull request comments are automated comments added to pull requests when Endor Labs detects policy violations or security issues during scans. When a PR is raised or updated, Endor Labs runs scans on the proposed changes and adds a comment if any violations are detected based on the configured action policies.

You can enable PR comments during the initial setup of the GitHub App or GitHub App (Pro), or by editing an existing integration. Once enabled, Endor Labs automatically adds comments to pull requests when policy violations are detected after you configure an action policy. See Configure Action policy for PR comments for more information.

Endor Labs generates the following types of PR comments based on the nature of the findings in a scan:

  • PR comments for Secrets: For findings of type FINDING_CATEGORY_SECRETS, Endor Labs adds a comment directly on the specific line where the secret is detected, using the line number provided in the finding object. These comments remain visible even if the secret is removed in a later scan.
  • PR comments for SCA: For SCA findings, Endor Labs adds a single comment that applies to the entire PR. It summarizes all findings from the policy evaluation results. The comment is updated with each scan run to reflect only the latest findings.
  • PR comments for SAST: For findings of type FINDING_CATEGORY_SAST, Endor Labs adds a single comment that applies to the entire PR. It summarizes all SAST-related policy violations detected during the scan. The comment is updated with each run and reflects only the latest findings.

You must create an Action policy to receive comments on your pull request after enabling PR comments.

  1. Create an Action policy.
  2. Set the Branch Type to Pull Request so the policy applies specifically to pull request scans.
  3. Under Action, select Enforce Policy, then choose:
    • Warn to post a comment without breaking the build.
    • Break the Build to fail the build and block the pull request.
  4. Define the scope of the policy using tags. Only projects that match the specified tags will receive PR comments.

Endor Labs provides a default template with standard information that will be included in your pull requests as comments. You can use the default template, or you can choose to edit and customize this template to fit your organization’s specific requirements. You can also create custom templates using Go Templates.

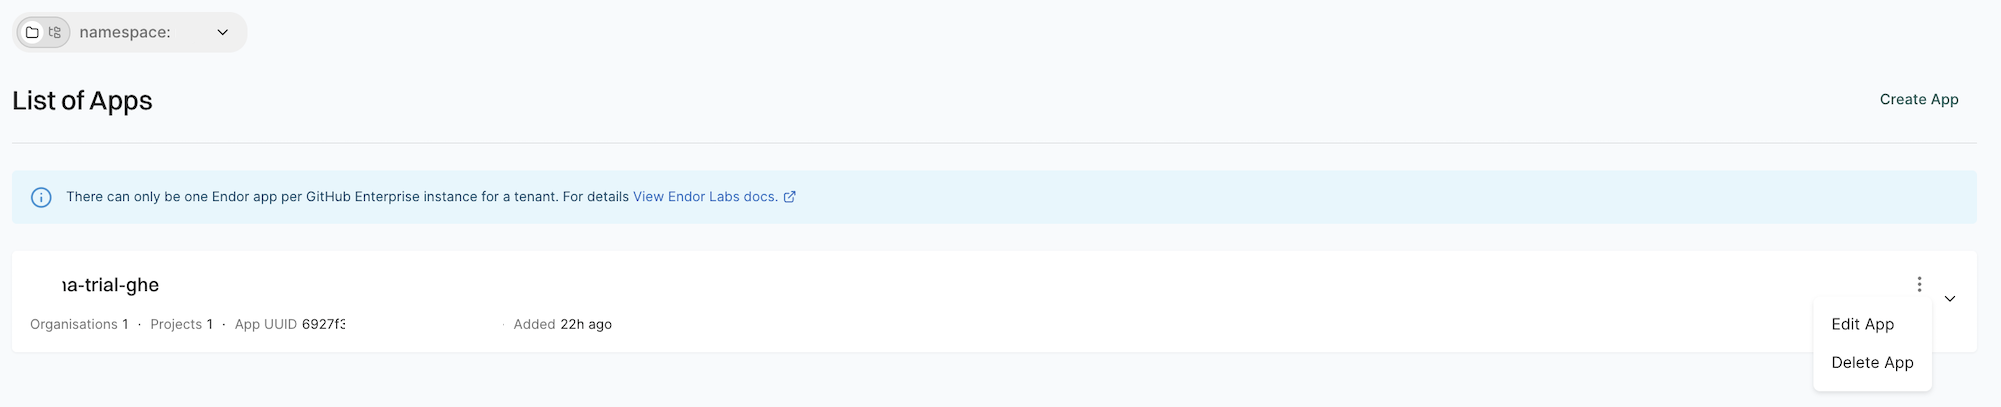
  1. Select Manage > Integrations from the left sidebar.
  2. Click Edit Template next to GitHub PR comments under Notifications.
  3. Make the required changes and click Save Template.

To create custom templates for PR comments, you must understand the data supplied to the template.

See the following protobuf specification for the GithubCommentData message that this template uses.

syntax = "proto3";

package internal.endor.ai.endor.v1;

import "google/protobuf/wrappers.proto";
import "protoc-gen-openapiv2/options/annotations.proto";
import "spec/internal/endor/v1/common.proto";
import "spec/internal/endor/v1/finding.proto";
import "spec/internal/endor/v1/package_version.proto";
import "spec/internal/endor/v1/security_review_pull_request.proto";

option go_package = "github.com/endorlabs/monorepo/src/golang/spec/internal.endor.ai/endor/v1";
option java_package = "ai.endor.internal.spec";

// The list of finding UUIDs.
message FindingUuids {
  repeated string uuids = 1;
}

// The map of dependency name to findings.
message DependencyToFindings {
  map<string, FindingUuids> dependency_to_findings = 1;
}

// The map of PackageVersion UUID to DependencyToFindings.
message PackageToDependencies {
  map<string, DependencyToFindings> package_to_dependencies = 1;
}

message GithubCommentData {
  // The header of the PR comment. Identifies the PR comment published by Endor Labs.
  // It should always be at top of the template.
  google.protobuf.StringValue comment_header = 1;

  // The footer of the PR comment.
  google.protobuf.StringValue comment_footer = 2;

  // The map of finding UUID to finding object.
  map<string, internal.endor.ai.endor.v1.Finding> findings_map = 3;

  // The map of policy UUID to policy name.
  // This will contain only the policies that are triggered or violated.
  map<string, string> policies_map = 4;

  // The map of policy UUID to the list of finding UUIDs.
  map<string, FindingUuids> policy_findings_map = 5;

  // The map of PackageVersion UUID to PackageVersion object.
  map<string, internal.endor.ai.endor.v1.PackageVersion> package_versions_map = 6;

  // The data needs to be grouped as follows:
  //
  // - Policy 1
  // 		- Package 1
  //			- Dependency Package 1
  //				- Finding 1
  //				- Finding 2
  //			- Dependency Package 2
  //				- Finding 3
  //				- Finding 4
  // 		- Package 2
  //			- Dependency Package 1
  //				- Finding 1
  //				- Finding 5
  // - Policy 2
  //		....
  //
  //		Map 0[PolicyUUID]/Map 1[PkgVerUUID]/Map 2 [Dep Names]/Finding UUID
  map<string, PackageToDependencies> data_map = 7;

  google.protobuf.StringValue api_endpoint = 8;
}

// Data structure for security review comments on pull requests.
message SecurityReviewCommentData {
  option (internal.endor.ai.endor.v1.parent_kinds) = {};
  option (grpc.gateway.protoc_gen_openapiv2.options.openapiv2_schema) = {
    json_schema: {
      extensions: {
        key: "x-internal";
        value {bool_value: true}
      }
    }
  };

  // Represents a specific security risk identified in the code review.
  message SecurityRisk {
    // Icon representing the severity level of the risk.
    google.protobuf.StringValue severity_icon = 1;

    // The category or type of the security risk.
    google.protobuf.StringValue category = 2;

    // The title or name of the security risk.
    google.protobuf.StringValue title = 3;

    // Link to the specific code location where the risk was identified.
    google.protobuf.StringValue code_link = 4;

    // Detailed description of the security risk and potential impact.
    google.protobuf.StringValue description = 5;

    // The level of the security risk.
    google.protobuf.StringValue level = 6;

    // The type of impact (improvement or regression).
    google.protobuf.StringValue impact_type = 7;
  }

  // Represents an issue that occurred during the security analysis.
  message AnalysisIssue {
    // The type of the issue.
    SecurityReviewPullRequest.Spec.IssueType type = 1;

    // A descriptive message about the issue.
    google.protobuf.StringValue message = 2;

    // List of error messages encountered during analysis.
    repeated string errors = 3;

    // List of files that were skipped during analysis.
    repeated string skipped_files = 4;

    // List of files that were summarized instead of fully analyzed.
    repeated string summarized_files = 5;
  }

  // The header of the security review comment.
  // It should always be at the top of the template.
  google.protobuf.StringValue comment_header = 1;

  // The footer of the security review comment.
  google.protobuf.StringValue comment_footer = 2;

  // A description of the changes made in the pull request.
  google.protobuf.StringValue changes_description = 3;

  // A general security assessment description.
  google.protobuf.StringValue security_description = 4;

  // The list of identified security risks in the pull request.
  repeated SecurityRisk security_risks = 5;

  // The list of issues encountered during analysis.
  repeated AnalysisIssue analysis_issues = 6;
}

See the following sections to understand the Finding and PackageVersion definitions that are used in this protobuf specification:

See the following specification to understand the additional functions that are also available. You can access these functions by using their corresponding keys.


// FuncMap contains the additional functions that are available to CommentTemplate.
var FuncMap = template.FuncMap{
	"now": utils.ToTime, // 'now' gives the current time

	// 'enumToString' coverts the enums for finding level, finding category and finding tags to string
	"enumToString": utils.EnumToString,

	// 'getPackageVersionURL' returns the URL for a given PackageVersion
	"getPackageVersionURL": utils.GetPackageVersionURL,

	// 'getFindingURL' returns the URL for a given Finding
	"getFindingURL": utils.GetFindingURL,

	// 'add' returns the sum of two integers
	"add": func(n int, incr int) int {
		return n + incr
	},

	// 'getOtherFindingsPackageMarker' returns the key for _findingsWithNoPackages for lookup in DataMap
	// Not all findings are associated with a PackageVersion, such findings are grouped under this key
	// in the DataMap
	"getOtherFindingsPackageMarker": func() string { return _findingsWithNoPackages },

	// 'getOtherFindingsDependencyMarker' returns the key for _findingsWithNoDeps for lookup in DataMap
	// Not all findings are associated with a dependency, such findings are grouped under this key
	// in the DataMap
	"getOtherFindingsDependencyMarker": func() string { return _findingsWithNoDeps },

	// 'getFindingsCountString' returns a string with number of findings, example - "5 findings"
	"getFindingsCountString": utils.GetFindingsCountString,

	// 'hasFindingCategory' checks if a finding has a specific category
	"hasFindingCategory": utils.HasFindingCategory,

	// 'isNotEmptyString' checks if a string is not empty
	"isNotEmptyString": utils.IsNotEmptyString,

	// 'getCustomLocation' extracts the location from Custom field
	"getCustomLocation": func(finding *endorpb.Finding) string {
		return utils.GetCustomFieldValue(finding, "location")
	},

	// 'getCustomCodeSnippet' extracts the code snippet from Custom field
	"getCustomCodeSnippet": func(finding *endorpb.Finding) string {
		return utils.GetCustomFieldValue(finding, "code_snippet")
	},

	"fixBackticks": utils.FixUnclosedBackticks,

	// 'getFirstPartyReachableFunctions' extracts first-party functions from reachable paths
	"getFirstPartyReachableFunctions": utils.GetFirstPartyReachableFunctions,

	// 'groupFindingsByRemediation' groups findings by their remediation value
	// Returns a slice of GroupedRemediation where findings with the same remediation are grouped together
	"groupFindingsByRemediation": utils.GroupFindingsByRemediation,
}

If you use merge queues, Endor Labs scans the PR in the same way it would for any other PR until they are added to the merge queue. Once a PR enters the merge queue, Endor Labs does not scan the merge queue again and avoids duplicate scans and PR comments.

Rescan projects

Endor Labs enables you to rescan your GitHub projects. When you make a code change or upgrade a dependency, rescanning your GitHub projects ensures the integrity and security of your software. If a project scan appears stalled or isn’t progressing, manually triggering a rescan can help restore normal scan activity.

To enable periodic scanning of your GitHub projects, install the GitHub App from Endor Labs. For more information, see Install the GitHub App.

Endor Labs automatically triggers a rescan of your GitHub projects every 24 hours. However, you can manually trigger a rescan. Follow these steps:

  1. Sign in to Endor Labs and select Projects from the left sidebar.
  2. Select a project configured for automated scanning using the GitHub App.
  3. Click Rescan Project to start rescanning.

Rescan Project


Manage GitHub App on Endor Labs

You can make changes to the GitHub App integrations or delete them. You can view the activity logs for the GitHub App and rescan your GitHub repositories on demand.

  1. Sign in to Endor Labs and select Manage > Integrations from the left sidebar.

  2. Click Manage next to GitHub under Source Control Managers.

    Manage GitHub App

  3. Click the three vertical dots next to the integration.

    You can choose from the following options:

To edit the GitHub App integration:

  1. Click the three vertical dots next to the integration, and select Edit Integration.
  2. Update your personal access token and choose the scanners.
  3. Choose Pull Request Scans to set preferences for scanning pull requests submitted by users:
    • Enable Automatic Pull Request Scanning to automatically scan PRs submitted by users.
    • Enable Pull Request Comments to allow GitHub Actions to comment on PRs for policy violations.
    • Set the Scanning Preferences to:
      • Quick Scan for dependency resolution without reachability analysis. This provides rapid visibility into potential vulnerabilities for faster merges.
      • Full Scan for dependency resolution, reachability analysis, and call graph generation for supported languages. This provides full visibility but may take longer to complete.
  4. Click Save. The changes are applied from the next scanning cycle.

To delete a GitHub App integration, click the three vertical dots next to the integration, and select Delete Integration.

When you delete the integration, it also deletes all child namespaces, projects, and references associated with the auto-generated root group namespace, as well as any manually created namespaces and projects under that namespace.

To view sync logs, click the three vertical dots next to the integration, and select View Sync Logs.

The sync logs display details of synchronization attempts, including timestamps, error types, and diagnostic messages. These logs help identify issues such as authentication failures or configuration problems.

sync logs

Warning
You cannot have both GitHub App and GitHub App (Pro) simultaneously in your environment. When you migrate from one app to the other, select the same set of repositories as before to preserve the currently scanned projects and findings after the migration.

To migrate from standard GitHub App to GitHub App (Pro):

  1. Click the three vertical dots on the right side of the integration that you want to edit, and select Migrate to Pro App.

  2. Click Migrate.

    You will be redirected to GitHub.

  3. Click Configure.

  4. Select a user to authorize the app.

  5. Select Configure in the organization in which you want to migrate the app.

  6. Select whether to install and authorize Endor Labs on all your repositories or select the specific repositories that you wish to scan.

  7. Choose the namespace and click Next.

Warning
You must choose the same namespace as your existing GitHub App installation.
  1. Select and enable the scanners you require.
  2. Select the preferences for scanning pull requests, if required.
  3. Click Continue.
Old installation cleanup
After migration is successful, delete the old installation from your GitHub organization.
Branch protection rules
When you migrate from one app to another, you must manually update your branch protection rules in GitHub. Branch protection rules that reference the old GitHub App ID will become inactive and will not function until reconfigured with the new app. Refer to Branch protection rules to learn more.

The GitHub App scans your repositories every 24 hours. Click Rescan Org to manually trigger a scan outside the 24-hour period.

Click Scan More Repositories to go to Projects, where you can add more repositories to scan through the GitHub App.

Technical limitations of the Endor Labs GitHub App

The Endor Labs GitHub App provides visibility across a GitHub organization, but it has technical limitations that do not account for the unique requirements of your application.

Endor Labs requires executing custom build steps outside of standard package manager commands to build software packages and get an accurate bill of materials and perform static analysis. Sometimes, a complete bill of materials may not be generated, or static analysis may not be performed if custom steps are required for your software to build. Applications that require custom build steps may need to be implemented in a CI environment to successfully get an accurate bill of materials.

Large applications may require significant memory allocations to perform static analysis on a package. The services scanning the GitHub App use 16 GB of memory by default. Applications that require more memory may not obtain vulnerability prioritization information using the GitHub App. Scan large applications in a CI environment using a runner with sufficient resource allocations.

Private software components hosted in an internal package repository may require authentication credentials to create a complete bill of materials or perform static analysis.

If your authentication information to your private package repository is hosted outside the repository, you will need to configure a package manager integration. See Set up package manager integration for more details. If your package repository is inaccessible from the public internet, you can work with Endor Labs to evaluate options.

Deploy Endor Labs GitHub App (Pro)

Endor Labs GitHub App (Pro) is an enhanced version of the Endor Labs GitHub App that supports PR remediation to fix vulnerabilities. See PR remediation for more information.

Warning
You cannot have both GitHub App and GitHub App (Pro) simultaneously in your environment. When migrating from one app to the other, ensure you select the same set of repositories as before to preserve your currently scanned projects and findings after the migration.

You can also make the findings generated by Endor Labs available to GitHub Advanced Security so that you can view the findings in the GitHub Advanced Security. Endor Labs exports the findings in the SARIF format and uploads them to GitHub. You can view the findings under Security > Vulnerability Alerts > Code Scanning in GitHub. See Export findings to GitHub Advanced Security for more information.

When Endor Labs scans a repository for the first time, it detects the default branch of the repository. The findings that are created in the scan are associated with the default branch.

When you change the default branch in your source control system (for example, from main to dev):

  • Endor Labs automatically detects the new default branch and sets that as the default reference
  • The previous default branch becomes a reference branch
  • Scans continue on the new default branch and the reference branch

The findings associated with the previous default branch are no longer associated with the default context reference. You can view them in the reference context.

When you rename the default branch in your source control system:

  • Endor Labs automatically switches to the renamed branch
  • Scans continue without disruption

When you add a new repository version (for example, a dev branch), both the default branch and the new version are scanned by the Endor Labs App.

You can control the default branch detection by setting the ENDOR_SCAN_TRACK_DEFAULT_BRANCH environment variable in a scan profile. You need to configure the project to use the scan profile. See Configure scan profiles for more information.

By default, the environment variable is set to true. When set to true, the default branch detection is enabled, and the first branch you scan is automatically considered as the default branch.

Before installing and scanning projects with Endor Labs GitHub App (Pro), make sure you have:

  • Administrative permissions to your GitHub organization. Installing the Endor Labs GitHub App (Pro) in your organization requires approval or permissions from your GitHub organizational administrator. If you don’t have the permissions, use the command line utility, endorctl, while you wait for the approval.
  • Endor Labs GitHub App (Pro) requires the following permissions:
    • Read access to Dependabot alerts, actions, administration, checks, code, commit statuses, issues, metadata, packages, pull requests, repository hooks, and security events.
    • Read and write access to checks, contents, and pull requests.
    • Write access to code scanning alerts to upload findings to GitHub Advanced Security as SARIF files.

To automatically scan repositories using the GitHub App and create automatic PRs to fix vulnerabilities:

  1. Sign in to Endor Labs.

  2. From the left sidebar, choose Projects and click Add Project.

  3. From GitHub, choose GitHub App

  4. Select Enable Automated Pull Requests.

    Endor Labs GitHub App (Pro)
  5. Click Install GitHub App (Pro).

    You will be redirected to GitHub to install the Endor Labs App (Pro).

  6. Click Install.

  7. Select a user to authorize the app.

  8. Select the organization in which you want to install the app.

  9. Select whether to install and authorize Endor Labs on all your repositories or select the specific repositories that you wish to scan.

  10. Review the permissions required for Endor Labs and click Install and Authorize.

Note
If the button to install says Install and Request instead of Install and Authorize, you don’t have permission to install the GitHub App. Use the endorctl command line interface or select Install and Request to notify your organizational administrator of your request to install. If you select Install and Request your installation will not be active unless your organizational administrator approves the request to install GitHub App.
  1. Choose a namespace and click Next.

    Choose namespace
  2. Based on your license, select and enable the scanners.

    The following scanners are available:

    • SCA: Perform software composition analysis and discover AI models used in your repository.
    • RSPM: Scan the repository for misconfigurations. RSPM scans run every week on Sundays.
    • Secret: Scan the repository for exposed secrets.
    • CI/CD: Scan the repository and identify all the CI/CD tools used in the repository.
    • SAST: Scan your source code for weakness and generate SAST findings.
  3. Select PULL REQUEST SCANS to set preferences for scanning pull requests submitted by users.

    Choose PR options
    • Select Pull Request Comments to enable GitHub Actions to comment on PRs for policy violations.

    • Select Include Archived Repositories to scan your archived repositories. By default, the GitHub archived repositories aren’t scanned.

    • In Define Scanning Preferences, select either:

      • Quick Scan to gain rapid visibility into your software composition. It performs dependency resolution but does not conduct reachability analysis to prioritize vulnerabilities. The quick scan enables users to swiftly identify potential vulnerabilities in dependencies, ensuring a smoother and more secure merge into the main branch.

      • Full Scan to perform dependency resolution, reachability analysis, and generate call graphs for supported languages and ecosystems. This scan enables users to get complete visibility and identifies all issues dependencies, call graph generation before merging into the main branch. Full scans may take longer to complete, potentially delaying PR merges.

      See GitHub scan options for more information on the scans that you can do with the GitHub App.

  4. Click Continue. You have successfully installed the GitHub App (Pro).

Endor Labs GitHub App (Pro) scans your repositories every 24 hours and reports any new findings or changes to release versions of your code. It can also raise a PR with a fix based on your remediation policy. Ensure that you configure automated PR scans in your environment. See Automated PR scans for more information.

You can improve your experience with the GitHub App by setting up package repositories. This will help you create a complete bill of materials and perform static analysis. Without setting package repositories, you may not be able to get an accurate bill of materials. See Set up package manager integration for more information.

The Endor Labs GitHub App (Pro) has the same limitations as the GitHub App. See Limitations for more information.

Export findings to GitHub Advanced Security

You can export the findings generated by Endor Labs to GitHub Advanced Security so that you can view the findings in the GitHub. Endor Labs exports the findings in the SARIF format and uploads them to GitHub. You can view the findings under Security > Vulnerability Alerts > Code Scanning in GitHub.

Warning
GitHub have several limitations for SARIF files, so you may not be able to experience the full benefits on Endor Labs. For example, GitHub limits the number of results in a SARIF file. It allows a maximum of 25000 results per file but displays the first 5000 results ranked by severity. Refer to GitHub SARIF support for code scanning for the complete list of limitations with respect to SARIF files in GitHub Advanced Security.

Ensure that you meet the following prerequisites before exporting findings to GitHub Advanced Security:

GHAS SARIF exporter allows you to export the findings generated by Endor Labs in the SARIF format. See Understanding SARIF files for more information on the SARIF format and Endor-specific extensions.

You can create a GHAS SARIF exporter using the Endor Labs API.

Run the following command to create a GHAS SARIF exporter.

endorctl api create -n <namespace> -r Exporter -d '{
  "meta": {
    "name": "<exporter-name>"
  },
  "tenant_meta": {
    "namespace": "<namespace>"
  },
  "spec": {
    "exporter_type": "EXPORTER_TYPE_GHAS",
    "message_type_configs": [
      {
        "message_type": "MESSAGE_TYPE_FINDING",
        "message_export_format": "MESSAGE_EXPORT_FORMAT_SARIF"
      }
    ]
  },
  "propagate": true
}'

For example, to create a GHAS SARIF exporter named ghas-exporter in the namespace doe.deer, run the following command.

endorctl api create -n doe.deer -r Exporter -d '{
  "meta": {
    "name": "ghas-exporter"
  },
  "tenant_meta": {
    "namespace": "doe.deer"
  },
  "spec": {
    "exporter_type": "EXPORTER_TYPE_GHAS",
    "message_type_configs": [
      {
        "message_type": "MESSAGE_TYPE_FINDING",
        "message_export_format": "MESSAGE_EXPORT_FORMAT_SARIF"
      }
    ]
  },
  "propagate": true
}'

You can configure the scan profile to use the GHAS SARIF exporter and associate it with your project. You can also set the scan profile as the default scan profile so that all the projects in the namespace use the scan profile by default. See Scan profiles for more information.

Ensure that you select the GHAS SARIF exporter in the Export section of the scan profile.

  1. Select Settings from the left sidebar.

  2. Select Scan Profiles.

  3. Select the scan profile you want to configure and click Edit Scan Profile.

  4. Select the GHAS SARIF exporter under Exporters and click Save Scan Profile.

    Scan profile

Ensure that you choose the scan profile with the GHAS SARIF exporter for the project.

  1. Go to the Projects page and select the project you want to configure.

  2. Select Settings and select the scan profile you want to use under Scan Profile.

    Scan profile for project

After the configuration is complete, your subsequent scans will export the findings in the SARIF format and upload them to GitHub. You can use the rescan ability to scan the project immediately instead of waiting for the next scheduled scan. See Rescan projects for more information.

If you have enabled pull request scans in your GitHub App, the GHAS SARIF exporter exports the findings for each pull request.

  1. Navigate to your GitHub repository.

  2. Select Security.

  3. Select Code scanning under Vulnerability Alerts.

    View findings in GitHub

    You can use the search bar to filter the findings. You can also view findings for a specific branch and other filter criteria. You can also view the findings specific to a pull request if you have enabled pull request scans. You can filter the findings by the pull request number and view findings associated with the pull request. You can select a finding and view the commit history behind the finding.

    Filter findings in GitHub

  4. Select Campaigns to view and create security campaigns that coordinate remediation efforts across multiple repositories. See GitHub security campaign for more information.

You can control which findings are exported to GHAS by using action policies. Only findings from projects within the scope of your configured action policies will be exported to GitHub Advanced Security.

To filter findings using action policies:

  1. Create an action policy that defines the criteria for findings you want to export, or use an existing action policy.
  2. Assign specific projects to the scope of the action policy you want to use.
  3. Run the following command to create a GHAS SARIF exporter that exports only findings from projects in the scope of your action policies.
Note
Use MESSAGE_TYPE_ADMISSION_POLICY_FINDING as the message_type to filter findings based on your action policies.
endorctl api create -n <namespace> -r Exporter -d '{
   "meta": {
     "name": "<exporter-name>"
   },
   "tenant_meta": {
     "namespace": "<namespace>"
   },
   "spec": {
     "exporter_type": "EXPORTER_TYPE_GHAS",
     "message_type_configs": [
       {
         "message_type": "MESSAGE_TYPE_ADMISSION_POLICY_FINDING",
         "message_export_format": "MESSAGE_EXPORT_FORMAT_SARIF"
       }
     ]
   },
   "propagate": true
 }'

Manage GitHub App (Pro) on Endor Labs

You can make changes to the GitHub App integrations or delete them. You can view the activity logs for the GitHub App and rescan your GitHub repositories on demand.

  1. Sign in to Endor Labs and select Manage > Integrations from the left sidebar.

  2. Click Manage next to GitHub under Source Control Managers.

    Manage GitHub App

  3. Click the three vertical dots next to the integration.

    You can choose from the following options:

To edit the GitHub App integration:

  1. Click the three vertical dots next to the integration, and select Edit Integration.
  2. Update your personal access token and choose the scanners.
  3. Choose Pull Request Scans to set preferences for scanning pull requests submitted by users:
    • Enable Automatic Pull Request Scanning to automatically scan PRs submitted by users.
    • Enable Pull Request Comments to allow GitHub Actions to comment on PRs for policy violations.
    • Set the Scanning Preferences to:
      • Quick Scan for dependency resolution without reachability analysis. This provides rapid visibility into potential vulnerabilities for faster merges.
      • Full Scan for dependency resolution, reachability analysis, and call graph generation for supported languages. This provides full visibility but may take longer to complete.
  4. Click Save. The changes are applied from the next scanning cycle.

To delete a GitHub App integration, click the three vertical dots next to the integration, and select Delete Integration.

When you delete the integration, it also deletes all child namespaces, projects, and references associated with the auto-generated root group namespace, as well as any manually created namespaces and projects under that namespace.

To view sync logs, click the three vertical dots next to the integration, and select View Sync Logs.

The sync logs display details of synchronization attempts, including timestamps, error types, and diagnostic messages. These logs help identify issues such as authentication failures or configuration problems.

sync logs

Warning
You cannot have both GitHub App and GitHub App (Pro) simultaneously in your environment. When you migrate from one app to the other, select the same set of repositories as before to preserve the currently scanned projects and findings after the migration.

To migrate from GitHub App (Pro) to standard GitHub App:

  1. Click the three vertical dots on the right side of the integration that you want to edit, and select Migrate to Standard App.

  2. Click Migrate.

    You will be redirected to GitHub.

  3. Click Configure.

  4. Select a user to authorize the app.

  5. Select Configure in the organization in which you want to migrate the app.

  6. Select whether to install and authorize Endor Labs on all your repositories or select the specific repositories that you wish to scan.

  7. Choose the namespace and click Next.

Warning
You must choose the same namespace as your existing GitHub App installation.
  1. Select and enable the scanners you require.
  2. Select the preferences for scanning pull requests, if required.
  3. Click Continue.
Old installation cleanup
After migration is successful, delete the old installation from your GitHub organization.
Branch protection rules
When you migrate from one app to another, you must manually update your branch protection rules in GitHub. Branch protection rules that reference the old GitHub App (Pro) ID will become inactive and will not function until reconfigured with the new app. Refer to Branch protection rules to learn more.

GitHub App scans your repositories every 24 hours. Click Rescan Org to manually trigger a scan outside the 24-hour period.

Click Scan More Repositories to go to Projects, where you can add more repositories to scan through the GitHub App.

Deploy Endor Labs GitHub Enterprise Server App

Beta

Endor Labs GitHub Enterprise Server App is specifically designed for GitHub Enterprise Server (GHES) - the self-hosted, on-premise version of GitHub. This app allows you to continuously monitor your repositories hosted on your own GitHub Enterprise Server instance for security and operational risks.

Availability
Currently, the GitHub Enterprise Server App does not support the Endor Labs cloud scheduler. You need to configure Endor Outpost in your environment to use the GitHub Enterprise Server App. See Endor Outpost for more information.
Important
You can create only one Endor Labs app per GitHub Enterprise Server instance for a tenant. Once you create the app, you need to uninstall it from all organizations where it is installed to delete the app.

When Endor Labs scans a repository for the first time, it detects the default branch of the repository. The findings that are created in the scan are associated with the default branch.

When you change the default branch in your source control system (for example, from main to dev):

  • Endor Labs automatically detects the new default branch and sets that as the default reference
  • The previous default branch becomes a reference branch
  • Scans continue on the new default branch and the reference branch

The findings associated with the previous default branch are no longer associated with the default context reference. You can view them in the reference context.

When you rename the default branch in your source control system:

  • Endor Labs automatically switches to the renamed branch
  • Scans continue without disruption

When you add a new repository version (for example, a dev branch), both the default branch and the new version are scanned by the Endor Labs App.

You can control the default branch detection by setting the ENDOR_SCAN_TRACK_DEFAULT_BRANCH environment variable in a scan profile. You need to configure the project to use the scan profile. See Configure scan profiles for more information.

By default, the environment variable is set to true. When set to true, the default branch detection is enabled, and the first branch you scan is automatically considered as the default branch.

Before installing and scanning projects with Endor Labs GitHub Enterprise Server App, make sure you have:

  • Outpost Setup: A Kubernetes cluster to deploy the Endor scheduler, with network egress configured from the cluster to Endor Labs. See Endor Outpost for setup instructions.
  • GitHub Enterprise Server (GHES) instance: A running GitHub Enterprise Server instance.
  • Administrative permissions: Administrative permissions to your organization’s GitHub Enterprise Server to install and authorize the Endor Labs GitHub Enterprise Server App.
  • Organization owner permissions: You must be an owner of the GitHub Enterprise Server organization where you plan to install the app.
  • Administrative access in Endor Labs: Administrative access in Endor Labs to create and manage the GitHub Enterprise Server App.

Setting up the GitHub Enterprise Server App involves the following steps:

  1. Set up Outpost

    You can skip Outpost setup if you want your projects to be scanned in Endor Labs Cloud and if your network firewall rules allow Endor Labs to access your GitHub Enterprise Server instance directly. See Firewall rules for more information.

  2. Create the App in Endor Labs

  3. Install the App in your organization

  4. Scan more repositories

Set up Outpost to deploy the Endor scheduler to your Kubernetes cluster. See Endor Outpost for more information.

Add the following environment variable under the endorctl section in your values.yaml file to enable communication with your GitHub Enterprise Server instance.

endorctl:
  additionalEnvs:
    - name: "GITHUB_USE_APP_TRANSPORT"
      value: "true"

The following is an example values.yaml file with the required configuration.

endorAPI: "https://api.endorlabs.com"
endorNamespace: "<Endor Labs namespace>"
auth:
  apiKey: "<apiKey>"
  apiSecret: "<apiSecret>"
scheduler:
  image:
    repository: "endorcipublic.azurecr.io/scheduler"
    tag: "latest"
    pullPolicy: "Always"
endorctl:
  image:
    repository: "endorcipublic.azurecr.io/endorctl_bare"
    tag: "latest"
    pullPolicy: "Always"
  additionalEnvs:
    - name: "GITHUB_USE_APP_TRANSPORT"
      value: "true"

To define the application in Endor Labs, first set up an app within your GitHub Enterprise Server organization. You can create and register the GitHub Enterprise Server App only in the root tenant namespace in Endor Labs. You can then install it to any namespace including child namespaces.

If you have already created a GitHub App for Endor Labs, skip to register application in Endor Labs.

  1. Sign in to Endor Labs.

  2. Select Integrations from the left sidebar.

  3. Click Create App next to GitHub Enterprise Server under Source Control Managers.

  4. Enter the Host URL of your GitHub Enterprise Server instance.

  5. Enter the GitHub Organization Name that will be the owner of this app.

  6. Click Create to launch a GitHub app registration form in a new tab.

    Create app in GitHub

  7. Complete the registration form and continue the configuration in Endor Labs.

You need to create a GitHub App for Endor Labs in your GitHub Enterprise Server instance. Refer to Register a GitHub app for more information.

Important

While you create the GitHub App in GitHub Enterprise Server, keep the following in mind:

  • Ensure that SSL is enabled for webhooks in your GitHub app.
  • Provide a Webhook secret during app registration to enable pull request scanning and PR comment features.
  • Review the Repository Permissions.
  • Choose Any account under Where can this GitHub App be installed? to allow installing the GitHub App on any organization or user account.

After creating the GitHub app, collect the following credentials from GitHub Enterprise to complete registration in Endor Labs:

  • GitHub App name: The name of the GitHub app you created in your GitHub Enterprise Server instance.
  • App URL: The URL of the GitHub app you created in your GitHub Enterprise Server instance.
  • App ID: The ID of the GitHub app you created in your GitHub Enterprise Server instance.
  • Client ID: The client ID of the GitHub app you created in your GitHub Enterprise Server instance.
  1. Navigate to your organization in GitHub Enterprise and select Settings > Developer settings > GitHub Apps.

  2. Select the app you created.

    Copy the GitHub App name, App URL, App ID, and Client ID. App details in GitHub to copy

  3. Click Generate a new client secret and copy the generated value.

  4. Generate and download the Private key (PEM file).

    Refer to manage private keys for GitHub Apps for more details.

  5. Copy the Webhook Secret you provided during GitHub app creation to enable pull request scanning features.

    See Validating webhook deliveries for more details.

Once you create the app in your GitHub Enterprise instance, register it in Endor Labs to establish the connection between Endor Labs and your GitHub Enterprise Server. Enter the app details to register the app.

  1. Enter the base URL of your GitHub Enterprise instance in Host URL.

  2. Enter the App URL.

  3. Enter the App ID.

  4. Enter the Client ID and Client Secret from your GitHub application’s configuration page.

  5. Enter the GitHub App name.

  6. The Webhook URL is pre-configured. Do not modify it in your GitHub app.

  7. Select Enable Pull Request scans by setting up webhook and enter the Webhook Secret to enable PR scan and PR comments features.

  8. Paste or upload the Private key (PEM file) in Certificate.

  9. Click Create.

    Register app in Endor Labs

Note
You can only create one Endor Labs app per GitHub Enterprise Server instance per tenant.

After creating and registering the app, install it in one or more organizations in your GitHub Enterprise Server instance. Installing the app grants it access to your repositories and enables scanning.

  1. Select Integrations from the left sidebar.

  2. Click Manage next to GitHub Enterprise Server under Source Control Managers.

  3. Click Install App next to the app you want to install. You will be redirected to GitHub Enterprise Server. If the app is already installed in some organizations, you’ll see a Configure option instead.

  4. Select the organization where you want to install the app.

  5. Select whether to install and authorize Endor Labs on all your repositories or select the specific repositories that you want to scan.

  6. Review the permissions required for Endor Labs and click Install and Authorize.

    Choose repositories

Note
If you don’t have permission to install the GitHub Enterprise Server App, you may need to request approval from your organizational administrator. If you select Install and Request, your installation will not be active unless your organizational administrator approves the request.
  1. Collect the Installation ID and the name of the organization from your GitHub Enterprise Server and provide them to Endor Labs.

    • Navigate to your organization’s settings in GitHub and select Application from the left sidebar.
    • Click Configure next to your app.
    • Copy the browser URL. The installation ID is the number at the end of the URL. In the following example, 12345678 is the installation ID and GHE-trial is the organization’s name.
    https://github.com/organizations/GHE-trial/settings/installations/12345678
    
  2. Return to the Endor Labs tab and enter the GitHub organization where you installed the app in Name of the organization and the Installation ID collected in the previous step.

    Scanner options

Note
You need the Installation ID for Endor Labs to identify and communicate with your specific app installation in the GitHub Enterprise Server organization.
  1. Based on your license, select and enable the scanners.

    The following scanners are available:

    • SCA: Perform software composition analysis and discover AI models used in your repository.
    • RSPM: Scan the repository for misconfigurations. RSPM scans run every week on Sundays.
    • Secret: Scan the repository for exposed secrets.
    • CI/CD: Scan the repository and identify all the CI/CD tools used in the repository.
    • SAST: Scan your source code for weaknesses and generate SAST findings.
  2. Select Include Archived Repositories to scan your archived repositories. By default, the GitHub archived repositories aren’t scanned.

  3. Select PULL REQUEST SCANS to set preferences for scanning pull requests submitted by users.

    • Select Pull Request Comments to enable GitHub Actions to comment on PRs for policy violations.

    • In Define Scanning Preferences, select either:

      • Quick Scan to gain rapid visibility into your software composition. It performs dependency resolution but does not conduct reachability analysis to prioritize vulnerabilities. The quick scan enables users to swiftly identify potential vulnerabilities in dependencies, ensuring a smoother and more secure merge into the main branch.

      • Full Scan to perform dependency resolution, reachability analysis, and generate call graphs for supported languages and ecosystems. This scan enables users to get complete visibility and identifies all issues related to dependencies and call graph generation before merging into the main branch. Full scans may take longer to complete, potentially delaying PR merges.

      See GitHub scan options for more information on the scans that you can do with the GitHub Enterprise Server.

Note
You can perform pull request scans only if you have configured a webhook URL and webhook secret when creating your GitHub Enterprise Server app.
  1. Click Create.

You have successfully installed Endor Labs GitHub App Enterprise on your GitHub Enterprise Server instance.

After successfully installing the app, Endor Labs starts scanning your repositories every 24 hours and reports any new findings or changes to release versions of your code.

To add more repositories to scan:

  1. Select Projects from the left sidebar and click Add Project.
  2. Select GitHub Enterprise.
  3. Select the app you want to use for scanning. If you haven’t created an app in your GitHub Enterprise account, create an app and install it before you scan the repositories.
  4. Click Scan.
  5. You’ll be redirected to GitHub Enterprise Server. Select the organization where the app is installed.
  6. Select the app.
  7. Choose the repositories you want to include and click Save.
  8. Return to the Endor Labs tab and select Integrations from the left sidebar.
  9. Click Rescan Org to view results.

Endor Labs GitHub App Enterprise scans your repositories every 24 hours and reports any new findings or changes to release versions of your code. It can also raise a PR with a fix based on your remediation policy. Ensure that you configure automated PR scans in your environment. See Automated PR scans for more information.

Note
Configure branch protection rules to ensure the Endor Labs Automated Scan check runs before merging your PR.

You can improve your experience with the GitHub App Enterprise by setting up package repositories. This will help you create a complete bill of materials and perform static analysis. Without setting package repositories, you may not be able to get an accurate bill of materials. See Set up package manager integration for more information.

The Endor Labs GitHub App Enterprise has similar limitations as the GitHub App for cloud. See Limitations for more information. Additional considerations for GitHub Enterprise Server:

  • GitHub Enterprise Server must support GitHub Apps functionality.
  • Network connectivity between Endor Labs and GitHub Enterprise Server is required for continuous monitoring.
  • Firewall rules must allow egress communication from your environment to Endor Labs.

Manage GitHub Enterprise Server App on Endor Labs

Beta

You can make changes to the GitHub Enterprise Server App integrations or delete them. You can view the activity logs for the GitHub Enterprise Server App and rescan your GitHub Enterprise repositories on demand.

  1. Sign in to Endor Labs and select Manage > Integrations from the left sidebar.

  2. Click Manage next to GitHub Enterprise Server under Source Control Managers.

    Manage GitHub Enterprise Server App

  3. Click the three vertical dots next to the integration.

    You can choose from the following options:

To edit the GitHub Enterprise Server App integration:

  1. Click the three vertical dots next to the integration, and select Edit Integration.
  2. Update your personal access token and choose the scanners.
  3. Choose Pull Request Scans to set preferences for scanning pull requests submitted by users:
    • Enable Automatic Pull Request Scanning to automatically scan PRs submitted by users.
    • Enable Pull Request Comments to allow GitHub Actions to comment on PRs for policy violations.
    • Set the Scanning Preferences to:
      • Quick Scan for dependency resolution without reachability analysis. This provides rapid visibility into potential vulnerabilities for faster merges.
      • Full Scan for dependency resolution, reachability analysis, and call graph generation for supported languages. This provides full visibility but may take longer to complete.
  4. Click Save. The changes are applied from the next scanning cycle.

To delete a GitHub Enterprise Server App integration, click the three vertical dots next to the integration, and select Delete Integration.

Deleting the integration also deletes all child namespaces, projects, and references associated with the auto-generated root group namespace, as well as any manually created namespaces and projects under that namespace.

You can modify the app configuration or remove the app from your GitHub Enterprise Server instance.

  1. Sign in to Endor Labs and select Manage > Integrations from the left sidebar.

  2. Click Manage next to GitHub Enterprise Server under Source Control Managers.

  3. Click View Created Apps.

  4. Click the three vertical dots next to the app and select Edit to edit the app details or Delete to delete the app.

    Manage GitHub Enterprise Server App

Note
You cannot delete the app unless you uninstall it from all organizations where it is installed.

To view sync logs, click the three vertical dots next to the integration, and select View Sync Logs.

The sync logs display details of synchronization attempts, including timestamps, error types, and diagnostic messages. These logs help identify issues such as authentication failures or configuration problems.

GitHub Enterprise Server App scans your repositories every 24 hours. Click Rescan Org to manually trigger a scan outside the 24-hour period.

Click Scan More Repositories to go to Projects, where you can add more repositories to scan through the GitHub Enterprise Server App. See scan repositories to learn more.

Scan PRs using the Endor Labs GitHub app

To automatically scan the PRs when they are raised, set the pull request preferences during the installation of the GitHub App or GitHub App (Pro). You can also edit the integration preferences afterward to enable PR scanning.

The Endor Labs GitHub App provides a scan report with details about scan failures. The report includes warning and error logs, recommended actions when available, and a link to the full scan history for additional context.

To view the scan report:

  1. Open the pull request where the scan failed.
  2. Click on the three vertical dots and select View Details from the Endor Labs Automated Scan to view the scan report.

To view the PR scan findings:

  1. Sign in to Endor Labs.
  2. Select Projects from the left sidebar.
  3. Search for and select the project.
  4. Select PR runs to view the PR scan findings.

PR Runs captures the commit ID, Commit SHA, the referenced branch, its findings, and the tags added to the scan as configured in the policies. Select the specific PR scan to view its findings in detail.

PR scan results in PR Runs

You can enable GitHub PR comments during the initial setup of the GitHub App or GitHub App (Pro), or by editing an existing integration. Once enabled, Endor Labs automatically adds comments to pull requests when policy violations are detected in the PR scans. See Pull Request comments for more information.