This is the multi-page printable view of this section. Click here to print.

Return to the regular view of this page.

Container Scanning

Scan container images for vulnerabilities and secure your deployments.

This is the multi-page printable view of this section. Click here to print.

Return to the regular view of this page.

Scan container images for vulnerabilities and secure your deployments.
Important

Container scanning now has its own dedicated command: endorctl container scan.

The endorctl scan --container commands are deprecated and will be removed after a three-month deprecation period.

Migrate to endorctl container scan command to ensure continued compatibility. For more details, see Container scan commands migration guide.

Containers help developers create, test, and deploy applications in a consistent environment. Container images include standalone or executable files encompassing files, libraries, and dependencies needed to run a container. They include several open-source software, making them vulnerable to open-source risks.

Gaining visibility into container images is essential to identify and prioritize risks or maintain compliance obligations.

Endor Labs container scan detects and reports known vulnerabilities and other risks in:

  • Operating system packages: Identifies packages installed through the container’s base operating system package manager.
  • Programming language packages: Identifies packages installed through language-specific package managers.
  • Libraries and dependencies: Identifies static and dynamic libraries, and runtime dependencies required by the application.

Additionally, it generates an SBOM (Software Bill of Materials) that details all components, their versions, and associated metadata, providing a complete inventory of the container’s contents.

Upgrade to endorctl version 1.6.734 or higher to ensure accurate container scan results. Sometimes, container scans performed with older endorctl versions may yield different or no results.

If the container image is in a private Docker registry, you must authenticate the container client before the scan.

Here are a few commands to authenticate the container client.

Authenticate to a Docker registry
docker login <host> -u <user_name> -p <password>

Learn more

Authenticate to a Podman registry
podman login -u <user_name> -p <password> <host>

Learn more

Endor Labs Podman troubleshooting for more information.

Authenticate with containerd

You must configure the containerd config file to authenticate with the container registry.

Learn more

Endor Labs supports the following methods of scanning container images:

Run the following command to scan a container image built in a specific repository. Specify the project path using the --path argument and the container image name using the --image argument. This associates the container with the Git repository and branch of the project.

endorctl container scan --image=<image_name:tag> --path=users/janedoe/endorlabs/npm/exampleproject

You can also scan multiple container images as part of a single repository.

endorctl container scan --image=<image_name1:tag> --path=users/janedoe/endorlabs/npm/exampleproject
endorctl container scan --image=<image_name2:tag> --path=users/janedoe/endorlabs/npm/exampleproject
endorctl container scan --image=<image_name3:tag> --path=users/janedoe/endorlabs/npm/exampleproject

You can tag findings with the corresponding container image name and tag. This lets you filter container-related findings in the user interface or through the API.

endorctl container scan --image=<image_name:tag> --path=users/janedoe/endorlabs/npm/exampleproject --finding-tags=<image_name:tag>

Run the following command to scan a container image from a registry. Specify the project name using the --project-name argument, and the container image name and tag using the --image argument.

endorctl container scan --image=<image_name:tag> --project-name=<endor_project_name>

To keep multiple versions of a container image in a container-only project, include the --as-ref flag.

endorctl container scan --image=<image_name:tag> --project-name=<endor_project_name> --as-ref

You can tag findings with the corresponding container image name and tag. This lets you filter container-related findings in the user interface or through the API.

endorctl container scan --project-name=<endor_project_name> --image=<image_name:tag> --as-ref --finding-tags=<image_name:tag>
Important
To associate a container scan with an existing SCA scan for a project, you must use the --path argument specifying the same project path used for the SCA scan. You cannot associate a container scan with an SCA scan for a project using the --project-name parameter.

You can save a container image as a tarball and scan it with endorctl to generate a report containing dependencies, SBOM details, and security findings.

  1. Ensure that you have the container image available locally.

    docker pull alpine:latest
    
  2. Export the image to a tarball file.

    docker save alpine:latest -o alpine-latest.tar
    
  3. Perform the endorctl scan.

    endorctl container scan --image=alpine:latest --project-name=<endor_project_name> --image-tar=/absolute/path/to/alpine-latest.tar
    
Note
  • --image-tar must point to the absolute path of the tarball file.
  • --image=<name:tag> is optional but recommended. It explicitly identifies the container image inside the tarball.

You can integrate container scanning into CI pipelines to automatically detect vulnerabilities and ensure the security of container images during the build and deployment process.

To perform container scanning in CI pipelines using GitHub Actions, set the scan_container parameter to true in the GitHub Actions script. Additionally, you must provide the image parameter with the container image you want to scan.

See Performing scans in CI/CD pipelines for more information.

Endor Labs fetches the container image from a container registry or loads it from a local file to scan containers. It then proceeds to extract the layers of the container image. It traverses the filesystem of each layer to identify files and directories. It looks for known package manager and metadata files to gather information about installed packages and their versions. It identifies various components and dependencies within the image and presents the findings in CLI and the Endor Labs user interface.

A container image is often built upon a base image that is a foundational layer including an operating system and other essential components. It’s crucial to understand what’s in the base image for a thorough security assessment.

You can distinguish the base image related vulnerabilities from the application layer using any of the following methods:

  • Scan Sequence - First, scan the base image. Then, scan any subsequent images built on that base image to distinguish vulnerabilities specific to the base image from those introduced by the other layers.
  • Docker file label - Set the label directly in your Dockerfile with a command such as LABEL org.opencontainers.image.base.name="openjdk:17-slim".
  • Build time label - Include the base image label during the build process with the --label flag, specifying both the base image and, optionally, its exact version via SHA256 hash. For example:
   docker build -t tictactoe:latest --label "org.opencontainers.image.base.name=openjdk@sha256:eddacbc7e24bf8799a4ed3cdcfa50d4b88a323695ad80f317b6629883b2c2a78" .

base image

Container base images from untrusted sources may lack proper security audits or fail to comply with organizational standards, increasing the risk of vulnerabilities being exploited. To address this, you can configure a finding policy to detect unauthorised base images and raise a critical finding.

For example, to allow only base images that start with gcp or ghcr, use the Container policy template and Specify Base Image Name Regex as ^gcp, ^ghcr.

See also Create a finding policy from template.

finding policy template

The dependencies associated with the following list of components are identified in the endorctl scan.

OS / Language Package Manager Packaging Version Support
Alpine apk 3.20, 3.19, 3.18, 3.17, 3.16, 3.15, 3.14, 3.12, 3.11, 3.10
Debian dpkg 8, 9, 10, 11, 12
Ubuntu dpkg 18.04, 20.04, 22.04, 24.04, 24.10
Red Hat RPM 5, 6, 7, 8, 9
Fedora RPM 40, 39
Amazon Linux RPM 1, 2, 2022, 2023
Oracle Linux RPM 7, 8, 9
.NET *.dll, *.exe
Objective-C CocoaPods
Go Go binaries
Java jar, ear, war, native-image
JavaScript package.json
PHP Composer
Python wheel, egg
Ruby gem
Rust Cargo

Endor Labs recognizes only the installed dependencies. Declared but uninstalled dependencies in the container image are not recognized.

To view findings from the container scan:

  1. Select Projects from the left sidebar.

  2. Select the project for which you want to view the container findings. container overview

  3. Select Containers from the preset filters.

  4. To view and filter dependencies based on the container images, click Container Layers and select to view All Layers, Base Image Layers Only, or Application Layers Only.

    Filter container findings

Endor Labs’ container scanning results rely on OVAL feeds from distributions, which provide accurate, vetted vulnerability data, excluding disputed or irrelevant entries. OS dependency results are based on data from distribution developers, while for language package dependencies, we complement published data with our proprietary research.

Endor Labs categorizes the severity of vulnerabilities detected in container scans as follows:

  • Use the severity assigned by the distribution, if it exists.
  • Use the NVD severity if the distribution does not provide the severity.
  • Report the vulnerability as Medium if there is no severity assigned by the distribution, or the NVD severity is not known or can’t be matched.

Endor Labs doesn’t report the following vulnerabilities:

  • Minor vulnerabilities in Debian and Ubuntu.
  • Disputed vulnerabilities withdrawn from NVD.
  • Scanning Windows containers is not supported.
  • Docker file scans are not currently supported.
  • Support for scanning binary files inside a container is limited.
  • Endor scores are not calculated for findings reported in the container scan.

For securing your container images with cryptographic signatures, see Artifact Signing.

Container reachability

Beta

Endor Labs allows you to determine whether the OS packages present in a container image are actually used by your application at runtime. Use container reachability to distinguish dependencies that are merely installed from those that are actively exercised during execution, helping security teams prioritize the most critical security issues for remediation.

Note
Run the container scan using the new endorctl container scan command. The endorctl scan --container command does not support container reachability.

Endor Labs supports the following two container reachability modes. Choose the mode that aligns with how your workload executes and what dependencies it requires at runtime.

  • Basic Reachability: Endor Labs executes and profiles the container image in a local environment during the scan. Select this method when the application can run without relying on external services.
  • Instrumented Reachability: Endor Labs integrates a sensor into the container image and deploys it in the environment where the application normally runs. The sensor captures runtime behavior and produces a profiling report, which is analyzed. Select this method for workloads that rely on external services or interactions that cannot be triggered in a brief local execution.

To perform container reachability analysis, ensure you meet the following system requirements:

  • The container must have sufficient CPU and memory resources to run successfully.

  • The container must be runnable.

  • The container must have network access if its startup process requires external communication.

  • Docker daemon dockerd must be installed on the host, must be runnable and accessible to the current user without elevated privileges. For example, docker images should work without sudo.

  • The negotiated Docker API version between the client and server must be 1.48 or higher.

  • The scan must be run on either a Linux or macOS host machine. Container reachability is supported for both amd64 and arm64 architectures.

Endor Labs determines container reachability by extracting OS packages from the container image, profiling the container’s runtime behavior, and correlating the results to identify which dependencies are actually used during execution. The steps below describe how container reachability is determined.

  1. Dependency extraction - Endor Labs extracts all packages and dependencies present in the container image by analyzing its file system to identify installed OS packages and their file path locations within the image.

  2. Dynamic profiling - Endor Labs runs the container image in a controlled environment, monitoring which OS-level files and dependencies are accessed during execution. The profiling captures runtime behavior including system calls, process IDs, and file path access patterns. It also identifies the main process that starts the container as the entry point and uses it to determine which packages are reachable through their dependency relationships.

  3. Path matching and reachability determination - Endor Labs correlates the results from both steps by comparing the extracted dependency file paths against the file access patterns captured during profiling, then assigns each dependency a reachability status based on whether it was accessed during execution.

Run the following command with the --os-reachability flag to include container reachability analysis in the scan.

endorctl container scan \
  --namespace=<your-namespace> \
  --image=<image_name:tag> \
  --project-name=<endor_project_name> \
  --os-reachability

You can also run container scans with OS reachability using GitHub Actions. See Scan containers with OS reachability for details.

Before dynamic profiling begins, Endor Labs performs a series of image qualification checks to determine if the container image is suitable for profiling. These checks include:

  • Image size - Verifies that the uncompressed image size does not exceed the configured limit. The default limit is 10 GB. Use the --profiling-max-size flag to adjust this limit.

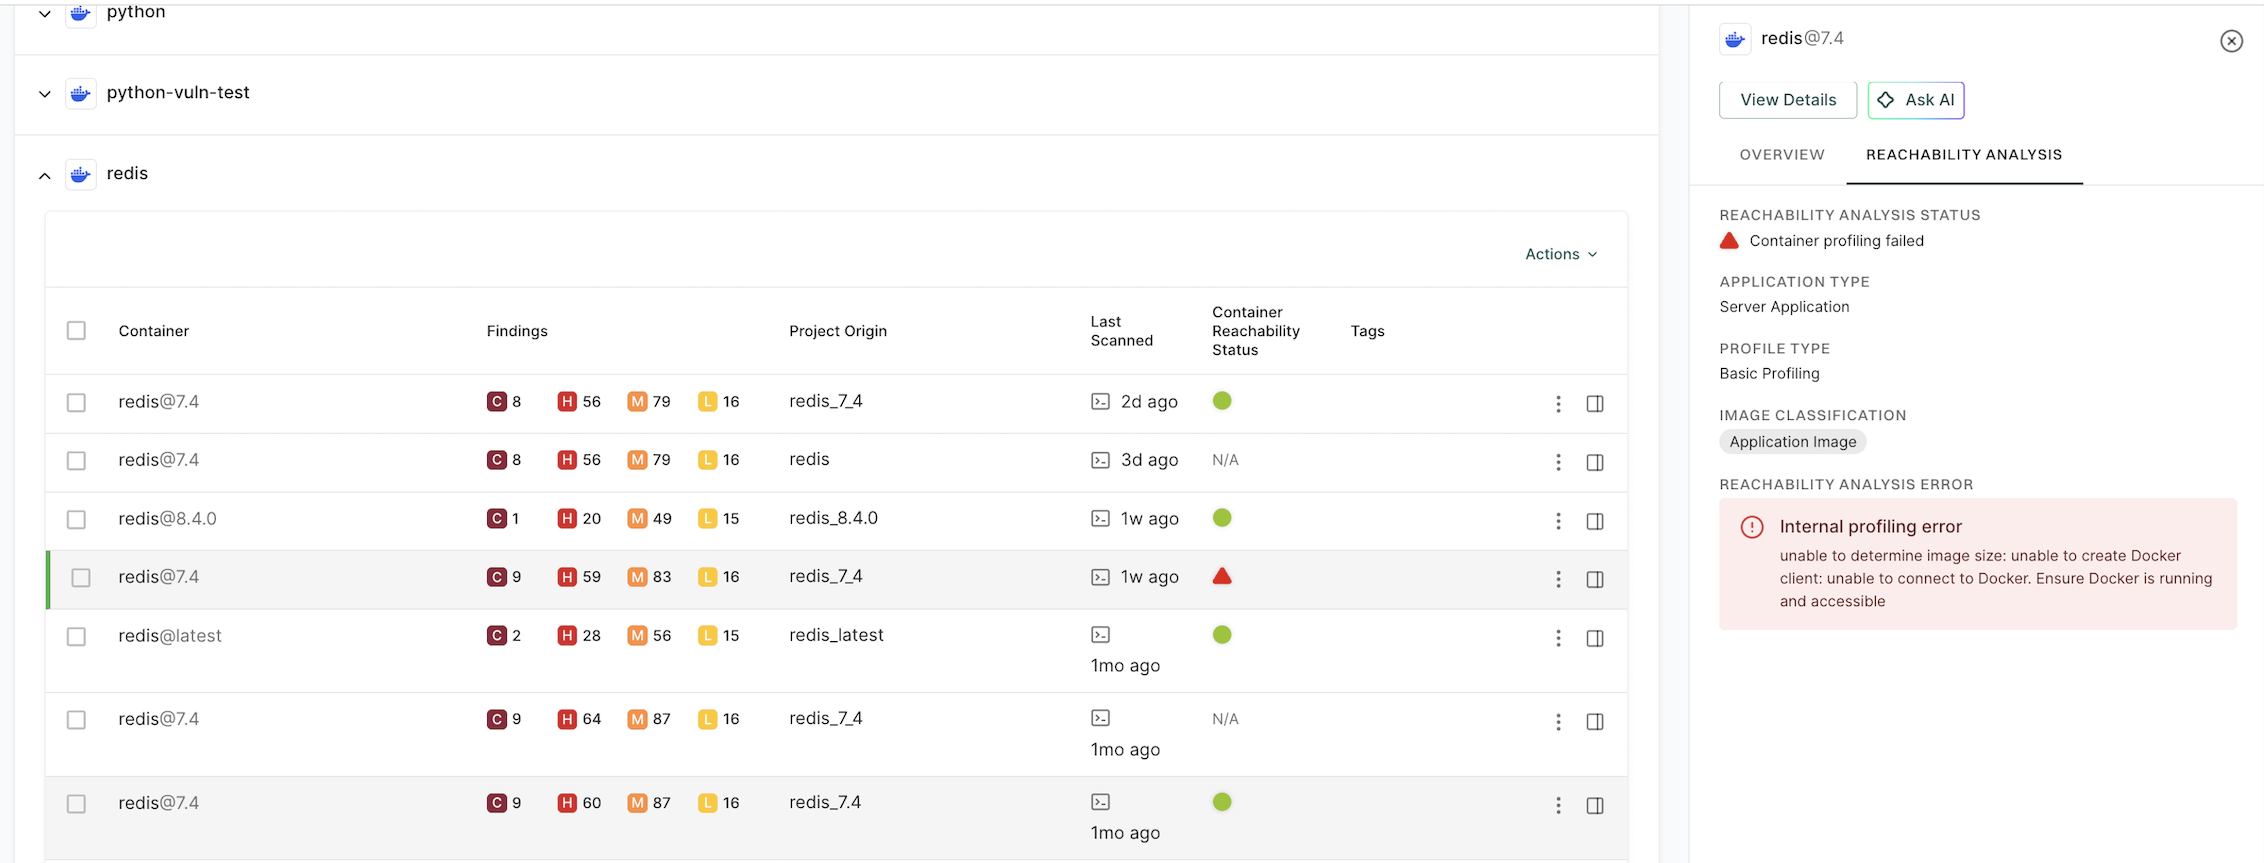
  • Runnability - Runs the container to check that it starts without errors. If the container exits with an error, the error details are shown in the CLI output and surfaced in the Endor Labs user interface.

If the image fails any of the qualification checks, dynamic profiling is skipped and the scan proceeds without reachability analysis.

You can run the endorctl container scan --os-reachability command with the following options.

Flag Environment Variable Type Description
--volume ENDOR_CONTAINER_SCAN_VOLUME string Bind mount a volume for the container during profiling, for example, --volume=/host/path:/container/path.
--publish ENDOR_CONTAINER_SCAN_PUBLISH string Publish a container’s port to the host for profiling in the format host_port:container_port, for example, --publish=8080:80.
--env ENDOR_CONTAINER_SCAN_ENV string Set environment variables for the container during profiling.
--entrypoint ENDOR_CONTAINER_SCAN_ENTRYPOINT string Override the container entry point for profiling, for example, --entrypoint=/app/start.sh.
--profiling-max-size ENDOR_CONTAINER_SCAN_PROFILING_MAX_SIZE integer Set the maximum allowed container image size in GB for dynamic profiling, for example, --profiling-max-size=15. The default is 10 GB and the minimum is 1 GB.
profiling-data-dir ENDOR_CONTAINER_SCAN_PROFILING_DATA_DIR string Path to a directory containing profiling data from an instrumented run. You can pass one or more directories. Requires --os-reachability.
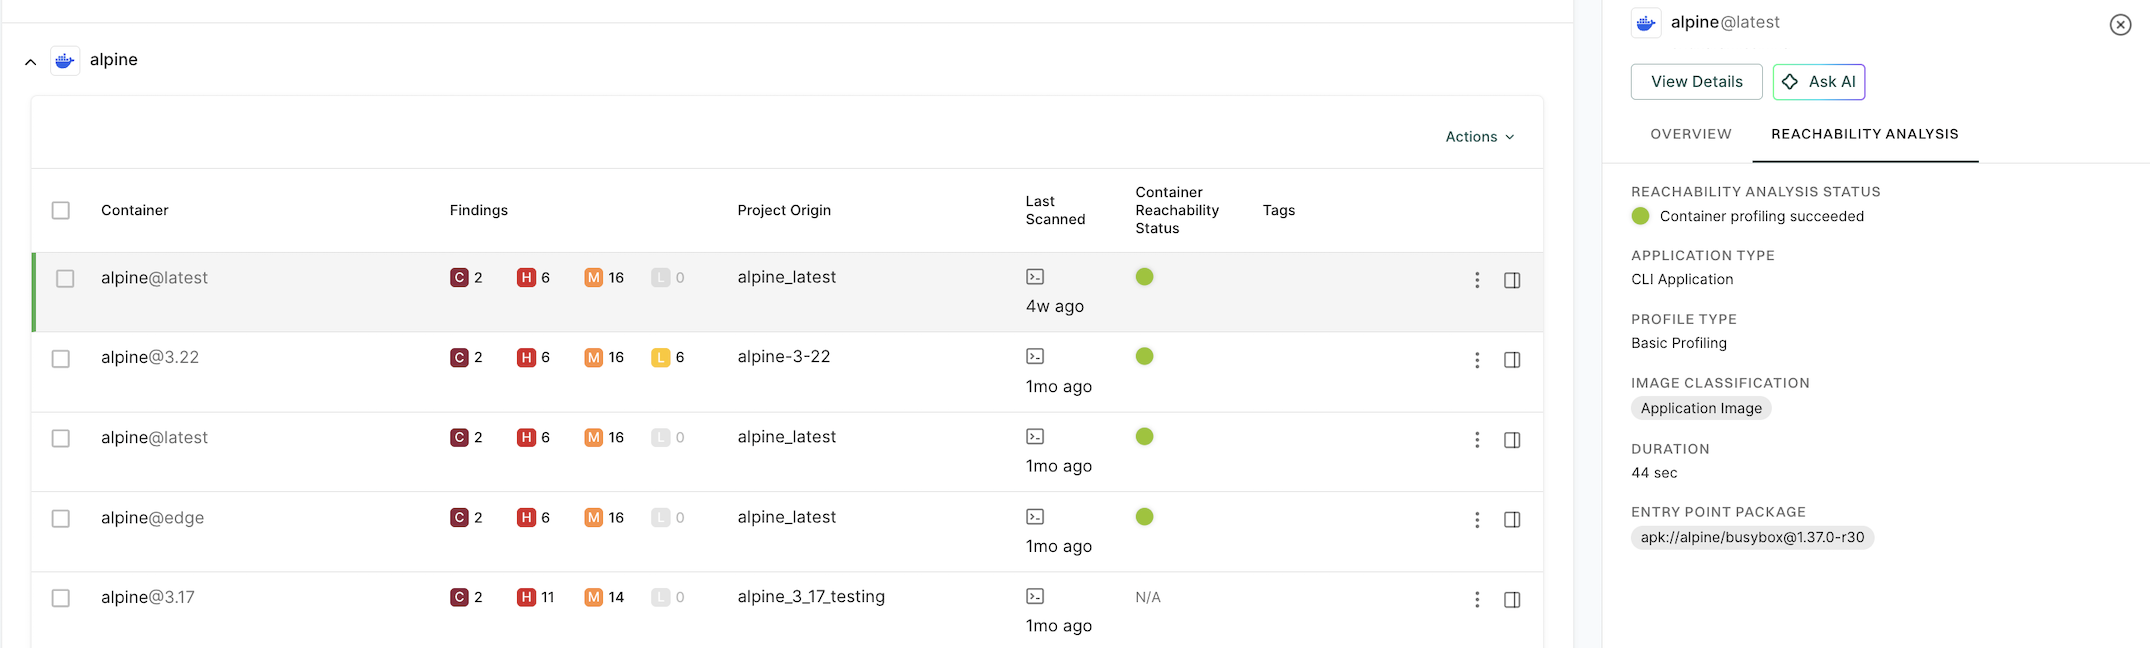
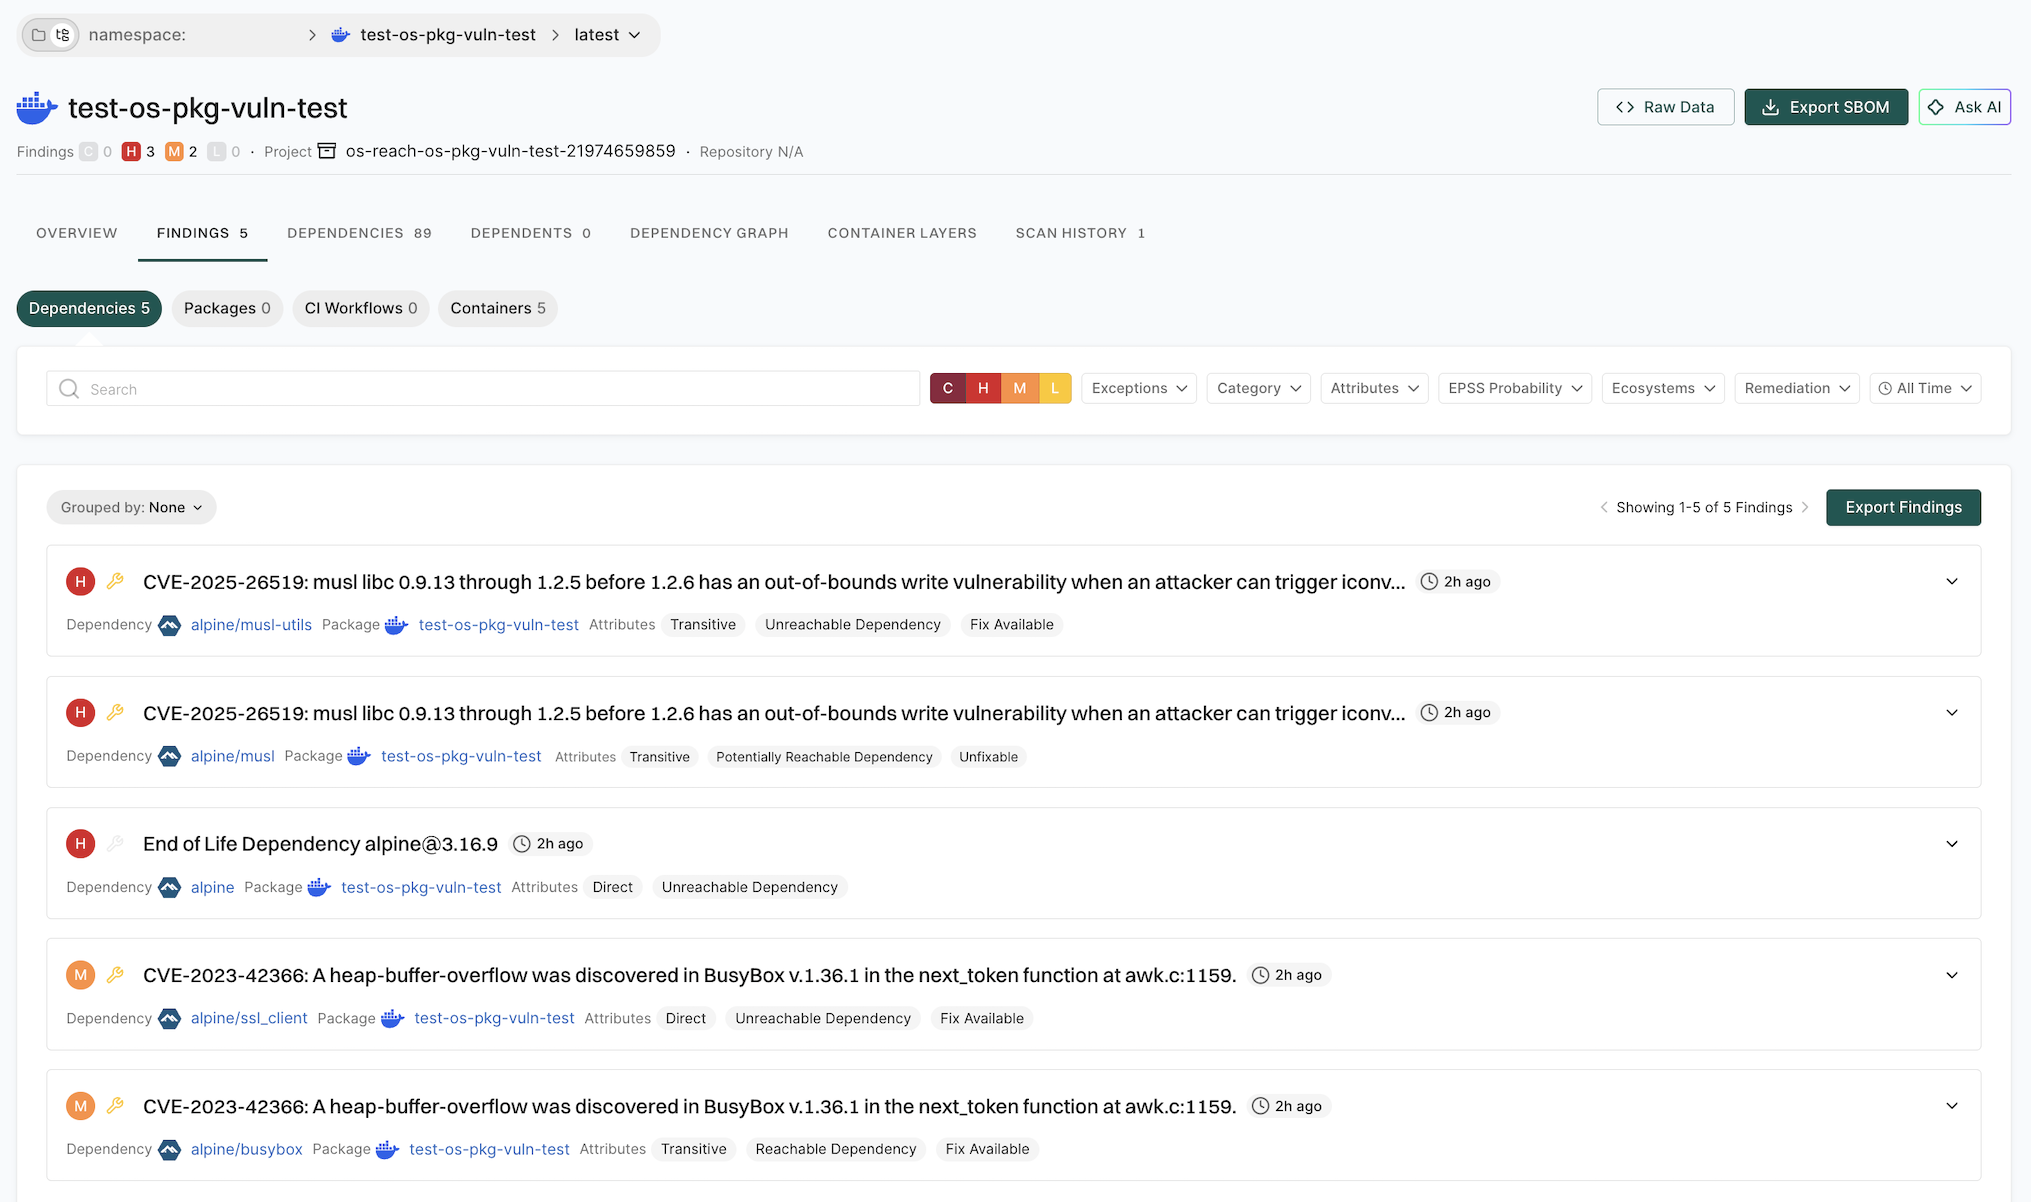
The container reachability status indicates whether a dependency was used during runtime profiling or whether its usage could not be determined.

  • Reachable - The dependency is observed in runtime signals or confidently inferred through correlation analysis.

  • Potentially reachable - The dependency has not been observed during profiling, and there is no correlation evidence of its usage. However, its usage cannot be definitively ruled out without additional analysis, such as extended runtime monitoring.

  • Unreachable - The dependency was not observed during profiling and has no path from the container image’s entry point to it.

Use reachability information to prioritize vulnerability remediation effectively. The following table provides recommended actions based on the combination of vulnerability severity and reachability status.

Severity Reachability Status Recommended Action
Critical Reachable Remediate immediately to mitigate active, high-risk vulnerabilities.
High Reachable Prioritize remediation as soon as possible.
Critical Potentially Reachable Review and verify reachability before scheduling remediation.
Medium or Low Reachable Plan remediation as part of regular maintenance activities.
Medium or Low Potentially Reachable Low priority, monitor and reassess as needed.
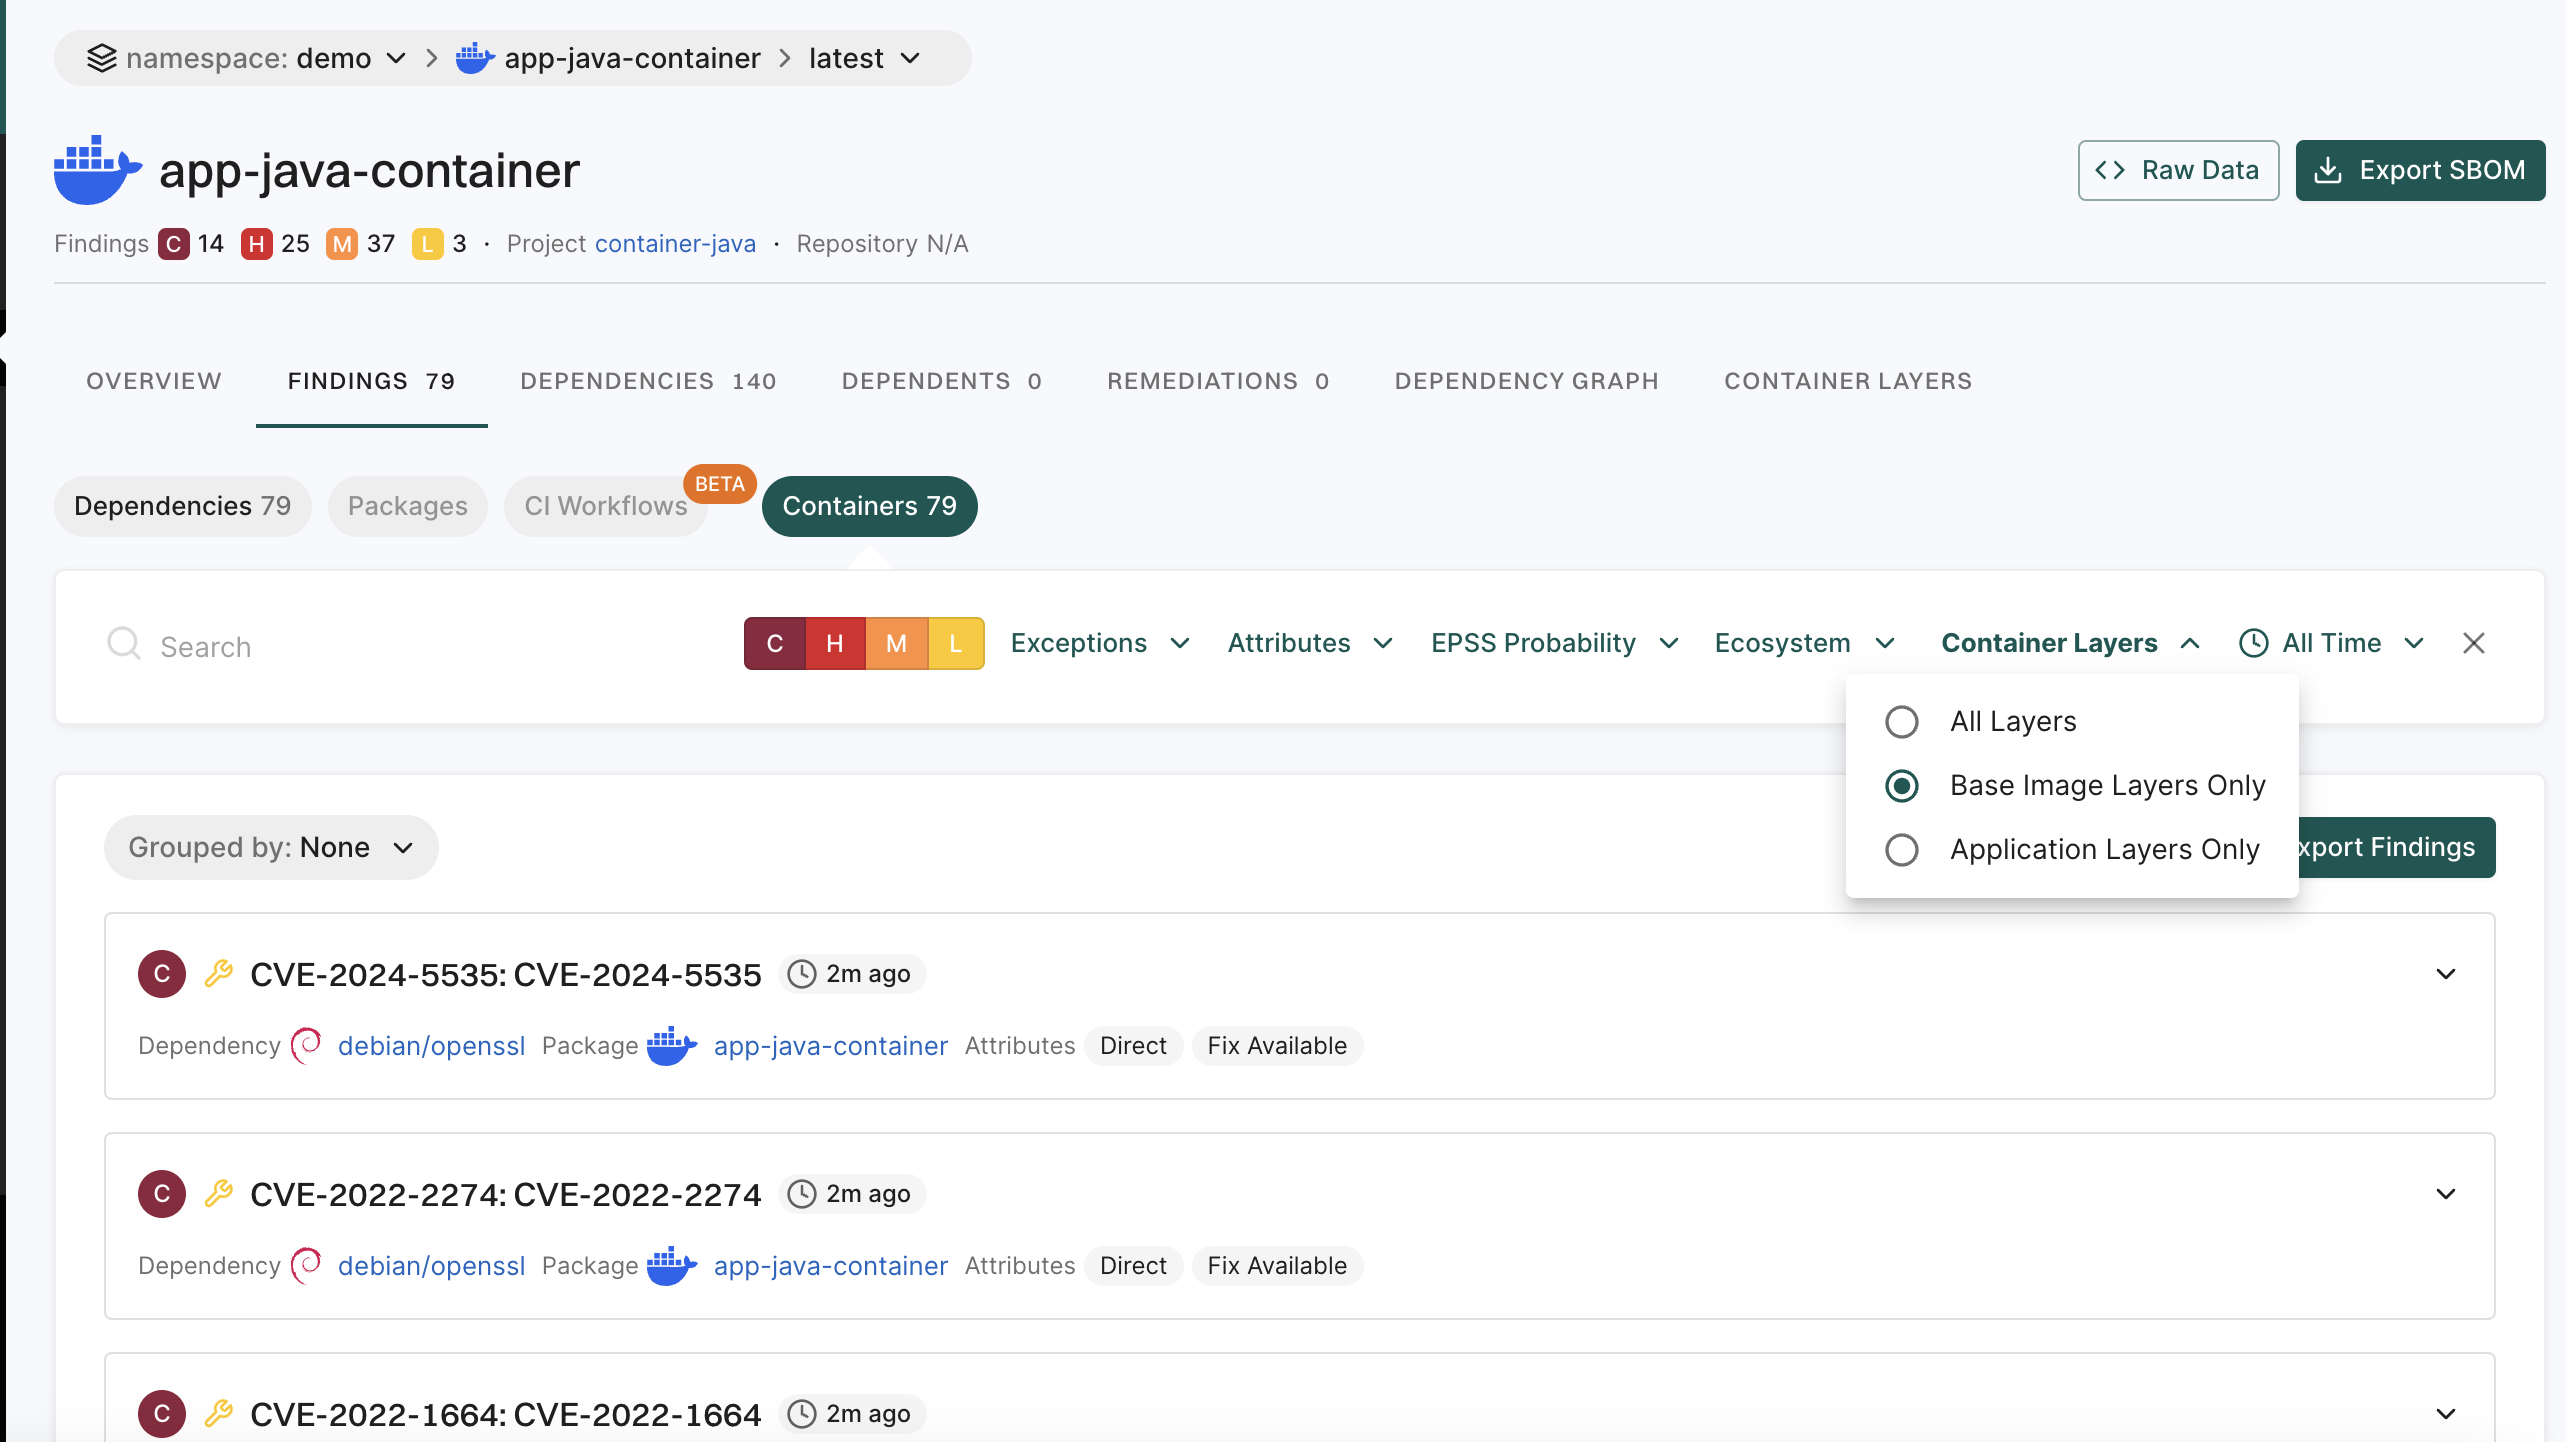
You can filter findings across all projects by their reachability status.

  1. Select Findings from the left sidebar.
  2. Select Attributes, and in the Reachable Dependency filter, select Yes, Potentially, or No to narrow down findings by reachability status.

Keep the following limitations in mind when using container reachability analysis:

  • Code coverage - The scan does not detect dependencies accessed after the profiling window ends.

  • OS packages - Container reachability analysis applies only to OS-level packages. It identifies which OS packages are used at runtime but does not analyze specific vulnerable functions within those packages. Use Software Composition Analysis reachability to assess the runtime relevance of application dependencies.

  • Windows not supported - Container scanning and reachability are not supported on Windows.

  • Tar image paths - Dynamic profiling is not supported for container images referenced with a tar path.

Container fails to start and crashes during profiling
  • Verify that the container image runs successfully by using the docker run command.

  • Check whether the container requires specific environment variables or mounted volumes to start correctly. Use the --env and --volume flags to provide them during the scan.

  • Ensure that the container does not depend on interactive input during startup or execution.

  • Use the --entrypoint flag to override the container entry point if the default entry point causes issues.

Container profiling times out due to slow container startup or execution
  • Check the container’s startup performance to ensure it initializes within the expected time frame.

  • Verify that the container has network connectivity if it depends on external services.

  • Review the container logs to identify any errors or issues that occur during startup.

Are Windows containers and container reachability on Windows supported?
No. Container reachability is not supported on Windows hosts or for Windows container images.
Profiling is skipped because the image is too large
  • Check whether the uncompressed image size exceeds the configured limit. The default limit is 10 GB.

  • Use the --profiling-max-size flag to increase the limit if needed.

Known active dependencies are shown as potentially reachable

Possible Causes:

  • The dependency might only be accessed after the profiling window ends.

  • The dependency may require specific HTTP endpoints or actions that are not triggered during profiling.

  • The dependency might be loading slowly or initialized only under specific conditions.

  • Startup optimizations may delay the actual use of the dependency until after profiling completes.

  • The dependency may not have a direct path from the container image’s entry point.

Solutions:

  • Review the typical application startup time to determine whether dependencies are loaded later in the process.

  • Consider whether specific operations or workflows trigger the use of these dependencies.

  • Use the --env, --volume, or --publish flags to provide the container with the configuration it may require to exercise more code paths during profiling.

  • Use container reachability results together with threat modeling to better assess overall security risk.

Instrumented container reachability

Beta

Instrumented container reachability is an advanced OS package reachability mode that embeds a runtime sensor in your container image to record how the image is used in a real environment. Use it when your container relies on complex external services that cannot be exercised during a short local run, so that reachability results then reflect actual usage.

Use instrumented reachability when:

  • The container has complex external dependencies such as databases, message queues, third‑party services that cannot be realistically exercised in a local ephemeral run.
  • You want profiling to happen in a realistic environment, such as staging, that mirrors production traffic.
  • You already have integration or end‑to‑end tests and want reachability to reflect those tests.
Note
Run the container scan using the new endorctl container scan command. The endorctl scan --container command does not support container reachability.

To perform instrumented container reachability analysis, ensure that:

  • Container scanning is enabled using the --os-reachability flag.
  • endorctl is installed and authenticated.
  • Docker daemon dockerd is installed on the host, runnable and accessible to the current user without elevated privileges. For example, docker images should work without sudo.
  • The negotiated Docker API version between the client and server is 1.48 or higher.
  • You must run the scan from either a Linux or a macOS host machine. Container reachability is supported for both amd64 and arm64 architectures.

To run the instrumented container images, you need either Docker or Kubernetes, based on your setup:

  • Docker: Docker daemon is available and you can run the instrumented image locally.
  • Kubernetes: kubectl is configured with access to your cluster so you can deploy and run the instrumented image in a pod.

Follow these steps to scan the original image, collect runtime profiling data, and determine reachability for containers.

  1. Run endorctl container instrument to create a new image with a lightweight sensor injected into the filesystem. The resulting image will have -instrumented appended to the tag.

    endorctl container instrument \
      --image=<image_name-tag> \
      --app-stop-signal=QUIT \
      --load-instrumented-image=true
    
    • --image: Original container image to instrument.
    • --app-stop-signal: Signal used to stop the application. This is required so that the sensor can flush profiling data before the container exits.
    • --load-instrumented-image: Loads the instrumented image into your local Docker runtime so it can be referenced by Kubernetes.
  2. Define how the instrumented image runs in a manifest. Create a manifest file such as demo-manifest-file.yaml to identify your workload. In the manifest, reference the instrumented image from step 1 and use a pod name and container name you can reuse later. You can also add env, volumes, and other options as needed for your application.

    apiVersion: v1
    kind: Pod
    metadata:
      name: <pod-name>
    spec:
      restartPolicy: OnFailure
      containers:
        - name: <container-name>
          image: <instrumented-image>
          ports:
            - containerPort: <container-port>
                hostPort: <host-port>
            securityContext:
              privileged: true
    
    • Set securityContext.privileged to true so the profiling sensor can run.
    • Set restartPolicy to OnFailure so that the pod does not restart automatically after you stop the app to generate the report.
  3. Deploy the instrumented image to Kubernetes. The application runs normally while the sensor observes file access and process activity during execution.

    kubectl apply -f <manifest-file>
    kubectl get pods <pod-name>
    

    Replace <manifest-file>, <pod-name>, and <container-name> with the values from your manifest.

  • If you need to access the application locally, run:

    kubectl port-forward pod/<pod-name> <host-port>:<container-port>
    
  • You can also run your tests or interact with the application normally. The profiling sensor will capture runtime activity.

  1. After you finish testing, send the --app-stop-signal, for example, QUIT, to stop the application gracefully. This signal triggers the profiling sensor to write the creport.json file and generate the profiling data.

    kubectl exec -it <pod-name> -c <container-name> -- sh -c "kill -QUIT 1"
    
  2. The sensor writes a profiling report to a known artifacts directory inside the container.

  • Verify that the creport.json file exists in the container:

    kubectl exec -it <pod-name> -c <container-name> -- sh -c "ls -ls /opt/_instrumented/artifacts"
    
  1. Create a local directory and copy the report to it.

    # Create output directory
    mkdir -p collect_output
    # Copy the profiling data
    kubectl cp <pod-name>:/opt/_instrumented/artifacts/creport.json collect_output/creport.json -c <container-name>
    
  • To verify that the file is copied, run:

    ls -la collect_output/
    
  • Alternatively, you can use endorctl container collect to stop the running application and retrieve the profiling report from the instrumented container into a local directory. Skip steps 4, 5, and 6 if you are using this command.

    endorctl container collect \
      --dynamic-profiling-data=true \
      --output-dir=collect_output \
      --image=<instrumented-image>
    
  • Set --dynamic-profiling-data to true to collect profiling data from the instrumented container.

  • Set --output-dir to the local directory where the collected data is saved. A subdirectory is created under this path cluster/pod/container. Use that path for --profiling-data-dir in the next step.

  1. Run endorctl container scan with the path to the directory that contains the collected profiling data, and OS reachability enabled. Endor Labs loads the report, maps runtime files to OS packages, and marks the corresponding packages as reachable.

    endorctl container scan \
      --image=<original-image:tag> \
      --profiling-data-dir=collect_output \
      --project-name=<project-name> \
      --os-reachability
    
  2. Remove the pod after completing the analysis:

    kubectl delete pod <pod-name>
    

You can run the endorctl container instrument command with the following options.

Flag Type Description
--app-stop-signal string Signal sent to the app so the sensor can flush profiling data before the container exits, for example, QUIT or TERM. Ensure the signal is compatible with your application.
--app-stop-grace-period string Grace period for app shutdown, for example 10s, 1m. Use when the app needs time to flush before exit.
--entrypoint string Override the image entrypoint (JSON array or shell string). Use when the image has a custom entrypoint.
--cmd string Override the image CMD (JSON array or shell string). Use when the image has a custom CMD.
--load-instrumented-image boolean Load the instrumented image into the local Docker daemon so Kubernetes or a registry can use it. Default false.
--output-image-tar string Output tar path for the instrumented image. Default instrumented-image.tar.

You can run the endorctl container collect command with the following options.

Flag Type Description
--output-dir string Local directory where collected profiling data is saved. A subdirectory cluster/pod/container is created. Use that path for --profiling-data-dir in the scan step.
--dynamic-profiling-data boolean Collect dynamic profiling data from the instrumented container. Default is true.
--kubeconfig-path string Path to the kubeconfig file for the target Kubernetes cluster. Use when not using the default kubeconfig.
--kubeconfig-context string Kubeconfig context to use for the target cluster. Use when you have multiple clusters.
Profiling data is not generated
  • Ensure that the QUIT signal is sent correctly.

  • Check that the container has privileged: true in security context.

  • Verify that the --app-stop-signal matches the signal your application handles.

Can’t find the image in Kubernetes
  • Run kind load docker-image <image> to load the image into kind.

  • Push the image to a container registry.

Permission denied errors
Ensure securityContext.privileged: true is set in the pod manifest.

Container registry scanning

Beta

A container registry is a centralized service that stores and distributes your container images. Endor Labs lets you scan images directly from your registry, giving you full visibility into the security posture of your containerized workloads at scale. You can discover images across repositories, control the scope of your scans, avoid redundant work by skipping images that are already scanned, and run consistent scans over time using saved scan plans.

A scan plan is a JSON file that defines the set of container images to scan, along with the registry and filters used to select them. It acts as a predefined template for selecting container images and can be verified and tested ahead of time before the actual registry scan runs. Once saved, the scan plan can be reused to scan the exact same set of images without querying the registry again, making recurring or batch scans consistent and easier to share across runs or environments.

With registry scanning, you can list all repositories and tags, or a filtered subset, in a registry without manually specifying each image. You can save an enumerated image list as a scan plan and reuse it later so the same set of images is scanned without re-querying the registry each time.

Endor Labs supports the following container registries:

  • AWS ECR
  • Azure ACR
  • Docker Hub
  • GitHub Container Registry (GHCR)
  • JFrog Artifactory
  • Quay

Use the endorctl container registry commands to list and scan images stored in your registry.

  • List images from a registry: Use endorctl container registry list to preview which images match your filters before scanning. This lets you verify the scope and adjust filtering parameters such as --include, --exclude, --recent, and --limit. You can also save the results as a scan plan for the scan step.

  • Scan images from a registry: Use endorctl container registry scan to enumerate and scan container images from a registry in a single step. You can also provide a saved scan plan from the list command instead of enumerating the registry again.

Use a scan plan when you want to review the list of images before scanning. The scan plans make it easier to reuse these pre-qualified combinations of scanned parameters and ensure consistent results.

Prerequisites for AWS ECR and Azure ACR registry scans
Install and configure the AWS CLI to use AWS ECR and the Azure CLI to use Azure ACR to authenticate and enumerate their corresponding container registries.

The list command connects to your registry, enumerates container images based on your configured filters, and prints a summary with a table of image paths. You can also save the results as a scan plan to reuse with the scan command.

endorctl container registry list --registry-type=<type> [options]

You can apply filters such as include, exclude, recent, and limit to narrow down the images returned. If you provide a namespace and API credentials, the saved plan automatically excludes already scanned images, so it is ready to scan only new or updated images.

Filters are applied in the following order:

  1. include
  2. exclude
  3. recent
  4. limit

You can use the endorctl container registry list command with the following flags.

Flag Environment Variable Type Description
--registry-type ENDOR_CONTAINER_REGISTRY_REGISTRY_TYPE string Container registry type. See supported container registries for the registries and their corresponding values.
--registry ENDOR_CONTAINER_REGISTRY_REGISTRY string Registry server or host. See the supported container registries table for example formats. Required for Azure ACR and JFrog.
--registry-namespace ENDOR_CONTAINER_REGISTRY_REGISTRY_NAMESPACE string The namespace or scope to list within. This flag is optional and is commonly used for the Docker Hub, GHCR, and JFrog Artifactory registries. For Docker Hub or GHCR, it is the organization or user name and for JFrog, it is the repository key.
--include ENDOR_CONTAINER_REGISTRY_INCLUDE string Regex to include repositories or tags. Matches the repository name without the registry server or domain, the full repository and tag, or the digest. If not set, all repositories and their tags are included.
--exclude ENDOR_CONTAINER_REGISTRY_EXCLUDE string Regex to exclude a subset of container image names by repository or by repository and tag. For example, --exclude='test-repo' excludes all tags in repositories matching test-repo, and --exclude='myapp:latest' excludes only the latest tag in repositories matching myapp.
--recent ENDOR_CONTAINER_REGISTRY_RECENT string Include only images updated within the given recent time window. Use a duration string such as 24h, 7d, or 2d7h. Applied after include and exclude.
--limit ENDOR_CONTAINER_REGISTRY_LIMIT integer Limit the number of images in the result after all filters are applied.
--include-untagged ENDOR_CONTAINER_REGISTRY_INCLUDE_UNTAGGED boolean Include untagged manifests when the registry type supports them.
--include-untagged-only ENDOR_CONTAINER_REGISTRY_INCLUDE_UNTAGGED_ONLY boolean Consider only untagged container images. Use this only when the registry type supports untagged container images.
--validate-tag-digest ENDOR_CONTAINER_REGISTRY_VALIDATE_TAG_DIGEST boolean Resolve and confirm digest through a registry HEAD request for each tag.
--architecture ENDOR_CONTAINER_REGISTRY_ARCHITECTURE string Preferred architecture for multi-architecture images, for example, amd64, arm64, or linux/arm64.
--timeout ENDOR_CONTAINER_REGISTRY_TIMEOUT string Command timeout duration, such as 30s, 1m, or 5m. Default is 30s.
--project-prefix ENDOR_CONTAINER_REGISTRY_PROJECT_PREFIX string Optional prefix for project names derived from repository path. Without a prefix, the project name uses the container image repository path.
--save-as-plan ENDOR_CONTAINER_REGISTRY_SAVE_AS_PLAN string Write the list output as a scan plan JSON file to use with endorctl container registry scan --scan-plan.
--scanned-only ENDOR_CONTAINER_REGISTRY_SCANNED_ONLY boolean Show only images that have already been scanned in Endor Labs. Requires --namespace and API credentials. Cannot be used with --save-as-plan.
--exclude-scanned ENDOR_CONTAINER_REGISTRY_EXCLUDE_SCANNED boolean Exclude images that are already scanned from the output. Without this flag, already-scanned images are still skipped during scanning. The flag only affects what appears in the list output. If a tag points to a new digest, Endor Labs treats it as a new image and scans it. When saving with --save-as-plan, the saved plan always excludes scanned images regardless of this flag. Requires --namespace and API credentials.

The scan command runs Endor Labs container scans on a set of images. You can pass a saved scan plan from the list command or enumerate the registry with the same filter flags as list. The command pulls each image if needed, runs the scan, and by default removes pulled images after scanning. The --namespace and API credentials are required. Images that are already scanned are automatically skipped.

  • Scan using a saved scan plan:

    endorctl container registry scan --namespace=<namespace> --scan-plan=<path> [options]
    
  • Scan using a registry type. When you do not use --scan-plan, pass --registry-type.

    endorctl container registry scan --namespace=<namespace> --registry-type=<type> [options]
    

You can use the endorctl container registry scan command with the following flags.

Flag Environment Variable Type Description
--namespace, -n ENDOR_NAMESPACE string Endor Labs namespace for the scan and for checking current scan status.
--scan-plan ENDOR_CONTAINER_REGISTRY_SCAN_PLAN string Path to a scan plan JSON file produced by endorctl container registry list --save-as-plan. Either --registry-type or --scan-plan is required.
--show-scan-plan ENDOR_CONTAINER_REGISTRY_SHOW_SCAN_PLAN boolean Print the scan plan including registry, filters, counts, and image list before starting scans. Set to false to skip this output and start scanning immediately.
--reauth ENDOR_CONTAINER_REGISTRY_REAUTH boolean Try to refresh registry credentials if authentication fails. For ECR and ACR, this uses the AWS CLI or Azure CLI respectively to refresh credentials.
--keep-pulled-images ENDOR_CONTAINER_REGISTRY_KEEP_PULLED_IMAGES boolean Keep pulled images in the local daemon after scanning. By default, pulled images are removed to free disk space.

The endorctl container registry list and endorctl container registry scan commands support the following container registries. Use the Registry_type value for --registry-type and the Registry_host value for --registry.

Name Registry type Registry host
AWS ECR aws.ecr <account-id>.dkr.ecr.<region>.amazonaws.com
Azure ACR azure.acr <name>.azurecr.io
Docker Hub dockerhub docker.io
GitHub Container Registry ghcr ghcr.io
JFrog Artifactory artifactory https://<org>.jfrog.io
Quay quay quay.io
Note

You must specify the registry host with --registry when you use Azure ACR or JFrog registries.

For Quay registries, set --registry only for self-hosted instances. You must also specify --registry-namespace with the Quay user or organization name to enumerate repositories.

The list and scan commands both produce output that includes summary lines and, when there are image rows, a table. The scan command shows this when --show-scan-plan is enabled.

If any image rows remain after filters, the command prints a table with the following columns:

Column Description
IMAGE Image path in tag or digest form.
DIGEST Architecture-specific image digest.
CREATED RFC3339 UTC timestamp.
UPDATED RFC3339 UTC timestamp.
MULTI-ARCH Indicates if the given container image in the registry is a multi-architecture container image represented by a manifest list.
ARCH Selected architecture when the image is multi-architecture.
LIST-DIGEST Shortened manifest list digest for multi-architecture only.

The scan plan is a JSON file written by the endorctl container registry list command with --save-as-plan and read by the scan command with --scan-plan. When list is run with --namespace and API credentials, the saved plan excludes images that are already scanned so that it is ready to scan only new or unscanned images. The structure is:

parameters:
  registry_type: string          # required
  server: string                 # optional
  namespace: string              # optional
  account: string                # optional. Used only for Docker Hub and GHCR.
  repo_key: string               # optional. Used only for JFrog.
  architecture: string           # optional
  include: string                # optional
  exclude: string                # optional
  recent: string                 # optional
  limit: integer                 # optional
  include_untagged: boolean      # optional
  include_untagged_only: boolean # optional
  validate_tag_digest: boolean   # optional
  timeout_seconds: integer      # required

counts:
  repositories: integer
  tags: integer
  untagged_manifests: integer    # optional
  matching_repositories: integer # optional
  matching_tags: integer         # optional
  matching_untagged: integer     # optional
  ignored_repositories: integer  # optional
  ignored_tags: integer          # optional
  ignored_untagged: integer      # optional
  digest_validated_tags: integer # optional
  digest_mismatch_tags: integer  # optional
  digest_lookup_errors: integer  # optional

images:                          # array
  - path: string                 # full image reference, tag or digest
    created: string
    updated: string
    multi_arch: boolean          # optional
    arch: string                 # optional
    multi_arch_digest: string    # optional

The following commands use AWS ECR to show how to list images, apply filters, save a scan plan, and run scans. Use the appropriate --registry-type, --registry, and --registry-namespace values for other registries. See supported container registries to learn more.

  • List all images in an AWS ECR registry.
endorctl container registry list --registry-type aws.ecr
  • Filter images updated in the last 7 days, include only tags matching latest, and exclude release candidate tags.
endorctl container registry list --registry-type aws.ecr --recent 7d --include '.*:latest' --exclude '.*:-rc.*'
  • Save the generated image list to a JSON scan plan file for use with the container registry scan command.
endorctl container registry list --registry-type aws.ecr --save-as-plan registry-scan-plan.json
  • List images including untagged manifests.
endorctl container registry list --registry-type aws.ecr --include-untagged
  • List only images that match a preferred architecture such as arm64 when the repository contains multi-architecture images.
endorctl container registry list --registry-type aws.ecr --architecture arm64
  • Scan images defined in a previously saved scan plan file.
endorctl container registry scan --namespace demo --registry-type=aws.ecr --reauth --scan-plan aws_ecr_scan_plan.json
Note
  • AWS ECR authenticates using the AWS SDK default credential chain, which includes environment variables, shared credential files, and IAM roles.
  • For Docker Hub, use --registry-type=dockerhub and omit --reauth because it requires access to Docker Hub credentials for automated reauthentication.
  • For Quay, use --registry-type=quay and provide --registry-namespace with your Quay user or organization name. Omit --reauth because Quay requires manual login.
Authentication fails when listing or scanning images
  • Ensure your registry credentials are valid and that the registry type and host are correct. Use --reauth to refresh credentials when using AWS ECR or Azure ECR.

  • For Docker Hub, GHCR, and Quay, verify the environment variables or log in with the registry’s CLI.

  • For Quay, use docker login with an OAuth token.

  • For Azure ACR and JFrog, verify that --registry is set.

Scan plan includes images I already scanned
  • Images that are already scanned are excluded only when you run list with --namespace and valid API credentials. Without them, the saved plan includes all matching images.

  • Re-run endorctl container registry list with --namespace and --exclude-scanned, save a new plan with --save-as-plan, then run the scan command with that plan.

How to generate a scan plan for a JFrog registry?

Run the list command with your registry details and --save-as-plan to save the enumerated images to a JSON file.

endorctl container registry list --registry-type artifactory --registry jfrog-host --registry-namespace repo-key --save-as-plan registry-scan-plan.json

Replace jfrog-host with your JFrog host and repo-key with your repository key.

How to list images for a Quay registry?

Run the list command with --registry-type=quay and --registry-namespace set to your Quay user or organization name.

endorctl container registry list --registry-type=quay --registry-namespace myorg

For a self-hosted Quay instance, set --registry to your Quay host.

endorctl container registry list --registry-type=quay --registry http://localhost:8080 --registry-namespace myorg

Replace myorg with your Quay user or organization name and http://localhost:8080 with your self-hosted Quay registry URL.

Sign artifacts

Endor Labs enhances software supply chain security by providing transparent mechanisms for signing and verifying software artifacts.

  • Integrity of container images and build artifacts: Using a cryptographic signature ensures that container images and other build artifacts are genuine and crafted by the organization. This adds an extra layer of security to the software supply chain, making sure that only authorized and unaltered items are scheduled for execution.

  • Traces across workflows: Beyond just verification, the framework offers thorough traceability. Users can trace the roots of container images and build artifacts, navigating through workflows and environments. Complete traceability ensures transparency, enabling organizations to validate the entire lifecycle of their software, from creation to deployment.

  • Certificate validity: Endor Labs uses a short-lived certificate with a validity period of 5 minutes to ensure that the build artifact has been signed during this time frame. To further guarantee the signing occurred within the valid window, a timestamp is added alongside the certificate and signature, confirming the signing within the specified time frame.

You can sign artifacts using the following methods.

Use the Endor Labs GitHub Actions to sign artifacts.

  1. Set up authentication to Endor Labs.
    • (Recommended) If you are using GitHub Action keyless authentication, set an authorization policy in Endor Labs to allow your organization or repository to authenticate. See Keyless Authentication for more information.
    • Alternatively, authenticate with a GCP service account setup for keyless authentication from GitHub Actions or an Endor Labs API key added as a repository secret.
  2. Checkout your code.
  3. Install your build toolchain.
  4. Build your code.
  5. Sign your artifacts with Endor Labs.

Use the GitHub Action endorlabs/github-action/sign@version to sign your artifacts. Set the following input parameters.

Options Description
artifact_name Name of the artifact. For example, ghcr.io/org/image@sha256:digest.
enable_github_action_token Fetches build information from the GitHub Action OIDC token. Endor Labs uses this information to build provenance metadata for the signed artifacts. Set to true by default.

See the following example workflows to sign an artifact.

- name: Sign artifacts with Endor Labs
  on: [push, workflow_dispatch]
  name: build
  jobs:
  ko-publish:
    name: Release ko artifact
    runs-on: ubuntu-latest
    permissions:
      id-token: write
      packages: write
      contents: read
    steps:
      - uses: actions/setup-go@v4
        with:
          go-version: '1.20.x'
      - uses: actions/checkout@v3
      - uses: ko-build/setup-ko@v0.6
      - run: ko build
      - name: Login to the GitHub Container Registry
        uses: docker/login-action@v3
        with:
          registry: ghcr.io
          username: ${{ github.repository_owner }}
          password: ${{ secrets.GITHUB_TOKEN }}
      - name: Publish
        run: KO_DOCKER_REPO=ghcr.io/endorlabs/hello-sign ko publish --bare github.com/endorlabs/hello-sign
      - name: Get Image Digest to Sign
        run: |
          IMAGE_SHA=$(docker inspect ghcr.io/endorlabs/hello-sign:latest | jq -r '.[].Id')
          SIGNING_TARGET="ghcr.io/endorlabs/hello-sign@$IMAGE_SHA"
          echo ARTIFACT="$SIGNING_TARGET" >> $GITHUB_ENV
      - name: Sign with Endor Labs
        uses: endorlabs/github-action/sign@version
        with:
          namespace: "example"
          artifact_name: ${{ env.ARTIFACT }}

The signed artifacts contain provenance metadata that describe the origin, history, and ownership of an artifact throughout its lifecycle. Including this information in signed artifacts enhances transparency, trustworthiness, and accountability.

The following provenance information is included in the signed artifacts.

Type Description Example
Build Config Digest Specific version of the top-level/initiating build instructions (workflow SHA) 729595ed884ce7600925633e585016a4f855929d
Build Config Name Name of the top-level/initiating build instructions (workflow) Release
Runner Environment Name of the platform-hosted or self-hosted infrastructure self-hosted
Source Repository The source repository that the build was based on endorlabs/monorepo
Source Repository Digest Specific version of the source code that the build was based on (commit SHA) 729595ed884ce7600925633e585016a4f855929d
Source Repository Owner Owner of the source repository that the build was based on endorlabs
Source Repository Ref Source repository ref that the build was based on refs/tags/v1.6.133
Certificate OIDC Issuer Issuer of the OIDC certificate used for verification
  • https://example.com/auth
  • https://token.actions.githubusercontent.com
Certificate Identity The identity expected in a valid certificate repo:org/monorepo:ref:refs/tags/v1.2.3

Use the endorctl CLI to sign an artifact. Ensure you have downloaded the latest endorctl binary.

To sign an artifact, run the following command.

endorctl artifact sign --name string --source-repository-ref string --certificate-oidc-issuer string

Specify the following options with the endorctl artifact sign command to include provenance information in your signed artifacts.

Options Required Description
--name string Mandatory Name of the artifact. For example, ghcr.io/org/image@sha256:digest.
--build-config-digest string Optional Specific version of top-level/initiating build instructions. For example, workflow sha.
--build-config-name string Optional Name of top-level/initiating build instructions. For example, workflow.
--runner-environment string Optional Name of platform-hosted or self-hosted infrastructure. For example, self-hosted.
--source-repository string Optional Source repository that the build was based upon. For example, org/repo.
--source-repository-digest string Optional Specific version of the source code that the build was based upon. For example, commit sha.
--source-repository-owner string Optional Owner of the source repository that the build was based upon. For example, my-org.
--source-repository-ref string Mandatory Source repository ref that the build run was based upon.
Certificate OIDC Issuer Mandatory Issuer of the OIDC certificate used for verification. For example,
  • https://example.com/auth
  • https://token.actions.githubusercontent.com
Certificate Identity Optional The identity expected in a valid certificate. For example, repo:org/monorepo:ref:refs/tags/v1.2.3.

To view the signed artifacts:

  1. Sign in to Endor Labs and select Inventory from the left sidebar.

  2. Select Artifacts. The list shows signed artifacts with Name, Created, and Last Updated details.

    View artifacts

  3. Use the search bar to find artifacts by name, description, or tags. You can use the following filters:

    • Artifact Types: Filter by artifact type, for example container image.
    • Created: Filter by when the artifact was created.
  4. Select an artifact to see its signed artifact digests in the list and provenance information. The list shows Artifact Digest, Reference, Created, and Last Updated for each digest.

  5. Select an artifact digest to open Artifact Digest Details and view the metadata, signature and certificate details, build configuration, and source repository information.

    View artifact digest details

When you run the endorctl artifact sign <image> command, Endor Labs initiates the following processes:

  • Authentication: Initiates regular authentication and retrieves a token from the OIDC or workflow provider while using an authentication option such as --enable-github-action-token or API keys.
  • Key Generation: Generates a public and private key using ECDSA-256.
  • Certificate Request: Sends a certificate request to the private Certificate Authority to obtain a short-lived certificate.
  • Provenance Inclusion: Incorporates provenance information from the token (if available) or provided with the CLI, adding it as a set of extensions to the certificate using ASN.1 encoding.
  • Image Signing: Uses the private key to actively sign the image.
  • Certificate Storage: Stores the certificate containing provenance information along with the signature in the database.
  • Timestamp: Adds a timestamp of the signing event.

To verify a signed artifact, use the following command:

endorctl artifact verify --name <artifact> --certificate-oidc-issuer <issuer>

Use the following command-line options with endorctl artifact verify:

Options Description
--name <name> Name of the artifact to verify. For example, ghcr.io/org/image@sha256:digest
--certificate-oidc-issuer <issuer> Issuer of the OIDC certificate used for verification. For example,
  • https://example.com/auth
  • https://token.actions.githubusercontent.com

When you run the endorctl artifact verify --name <artifact> --certificate-oidc-issuer string command, Endor Labs initiates the following verification processes:

  • Authentication: Initiates regular authentication and retrieves a token from the OIDC or workflow provider while using an authentication option such as --enable-github-action-token or API keys.
  • Signature Retrieval: Retrieves a signature entry from the database using the artifact name.
    • If the entry is not found, the verification process fails.
  • Certificate Authority Check: Checks for a trusted Certificate Authority.
  • Image Signature Validation: Validates the image signature using the public key from the certificate.
  • Timestamp Validation: Validates that the timestamp in the signature entry is within the certificate’s validity.
  • OIDC Issuer Verification: Checks whether the issuer provided matches the contents of the certificate.
  • Provenance Verification: Ensures that any provenance information from the CLI matches the ones in the certificate.

You can revoke a signature of a signed artifact for reasons such as a precautionary measure to safeguard against security risks, to maintain compliance, or to uphold trust and integrity.

To revoke a signature linked to an artifact and prevent its usage, use the following command:

endorctl artifact revoke-signature --name <image> --source-repository-ref "ref"

Specify the following command-line options for endorctl artifact revoke-signature:

Options Required Description
--name string Mandatory Name of the artifact whose signature needs to be revoked
--source-repository-ref string Mandatory Reference to the source repository of the artifact. For example, refs/tags/v1.0.1. This identifies the specific signature and revokes it.

Revoking the artifact signature invalidates the corresponding database entry and ensures that any attempts to verify the signature will fail.

  • While specifying the artifact name during the signing process, for the container images, adhere to the structure registry.example.com/repository/image@sha256:digest.
  • The signing process does not support tags. Ensure that you specify a SHA256 digest with the artifact you are signing to represent a cryptographic hash of the image’s content. This ensures a unique digest is created for every minor alteration in the image.

Migrate to new container scan commands

With the release of the new endorctl container scan commands, the old endorctl scan container commands and their related flags will be removed after a three-month deprecation period.

Use the new dedicated command to ensure continued compatibility.

Old New
endorctl scan --container <image> --path=<project_path> endorctl container scan --image <image> --path=<project_path>
endorctl scan --container <image> --project-name=<project_name> endorctl container scan --image <image> --project-name=<project_name>
endorctl scan --container-tar <file> endorctl container scan --image-tar <file>
endorctl scan --container-as-ref endorctl container scan --as-ref
  • To scan a basic container image:

    • Old: endorctl scan --container nginx:latest --namespace my-namespace
    • New: endorctl container scan --image nginx:latest --namespace my-namespace
  • To scan a container tar file:

    • Old: endorctl scan --container-tar /path/to/image.tar --namespace my-namespace
    • New: endorctl container scan --image-tar /path/to/image.tar --namespace my-namespace
  • To scan a container with a project name:

    • Old: endorctl scan --container nginx:latest --project-name my-nginx --namespace my-namespace
    • New: endorctl container scan --image nginx:latest --project-name my-nginx --namespace my-namespace
  • To scan a container in a reference context:

    • Old: endorctl scan --container nginx:latest --container-as-ref --namespace my-namespace
    • New: endorctl container scan --image nginx:latest --as-ref --namespace my-namespace