Findings
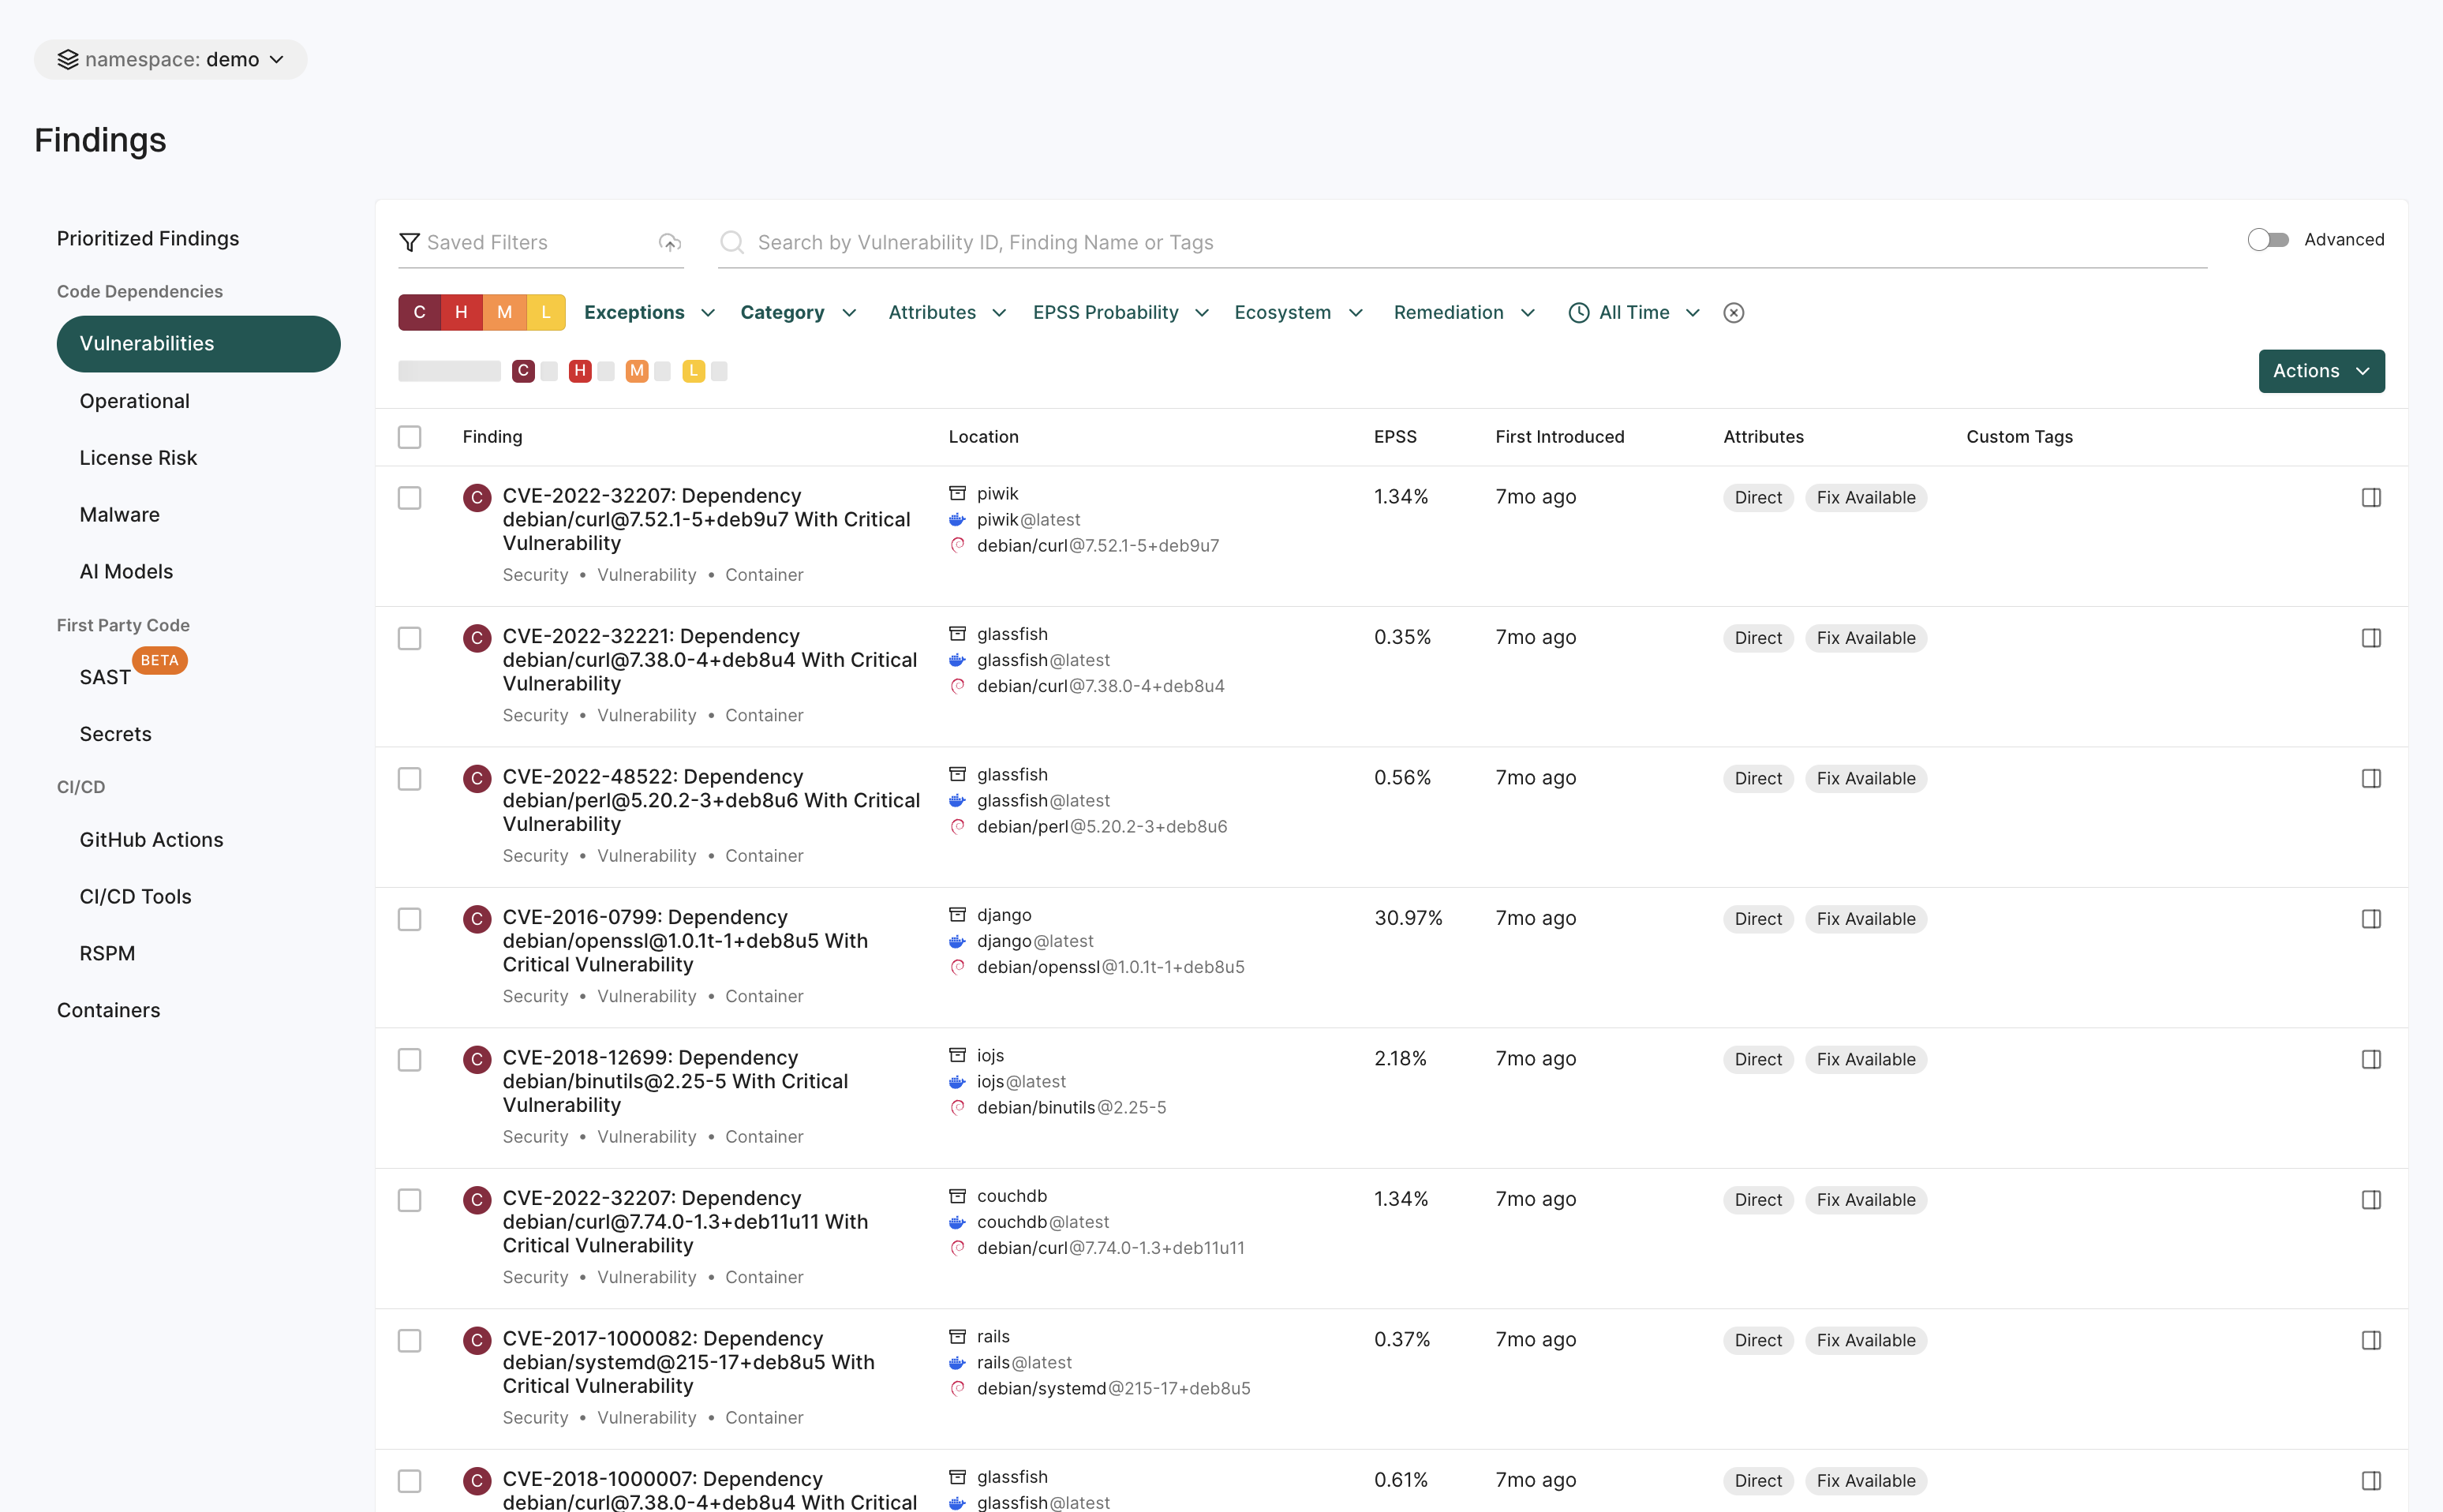
A finding is a discovery of significance made following the completion of a scan. Findings result from the default out-of-the-box implementation of rule sets called Finding policies.
View all findings
To view different types of findings associated with all projects or packages in your tenant:
-
Select Findings from the left sidebar.
-
The preset filters help you in locating the findings that matter most to you.
- Choose from a list of options under Code Dependencies to view a list of SCA, Vulnerability, Operational, License Risk, Malware or AI model findings.
- Choose Secrets to find a list of findings related to exposed secrets.
- Choose from a list of options under CI/CD to view findings related to GitHub Actions and CI/CD Tools.
- Choose RSPM to view findings related to repository’s security posture.
- Choose Containers to view container findings.
-
Use Saved Filters to create and save your frequently used searches, helping you save time.
-
Search for findings using basic filters.
-
Toggle Advanced and search for findings using advanced filters.
-
Use Table preferences to select the columns you want to view and customize the appearance of the findings table.
-
Select Notifications in Table preferences to view notifications associated with a finding.
-
Select View Details to view the following:
- Project metadata
- Risk details and remediation guidance
- Notifications associated with the finding and Jira ticket links
- Personalized notes for each finding. You can view notes on findings if you have tenant access. Only users with Admin or Code Scanner role can add or edit notes. See authorization roles to learn about roles and permissions.
-
To apply exceptions to findings, select findings and click Actions > Add Exception.
-
To export findings, select the findings, and click Actions > Export Selected or Export All.
Dismiss findings
Dismiss findings to exclude them from the active workflow. Dismissed findings are removed from active views and do not trigger policies.
You can dismiss findings in one of the following ways:
-
Exception Policy: Applies during scan execution and suppresses all findings that match the defined criteria across the selected repository versions or projects.
-
Snooze: Applies to a single finding instance for a specific target, repository version, and project. It takes effect immediately and is scoped only to the selected finding instance.
Pull request findings cannot be snoozed, as each pull request represents a new repository version. However, you can dismiss PR findings using incremental PR scans, Exception Policy, or ignore files.
-
Ignore File: Applies during scan execution and suppresses all findings matching the ignore file entries. Ignore files are part of the source code and are only applied to the parent repository version.
Dismiss findings using an exception policy
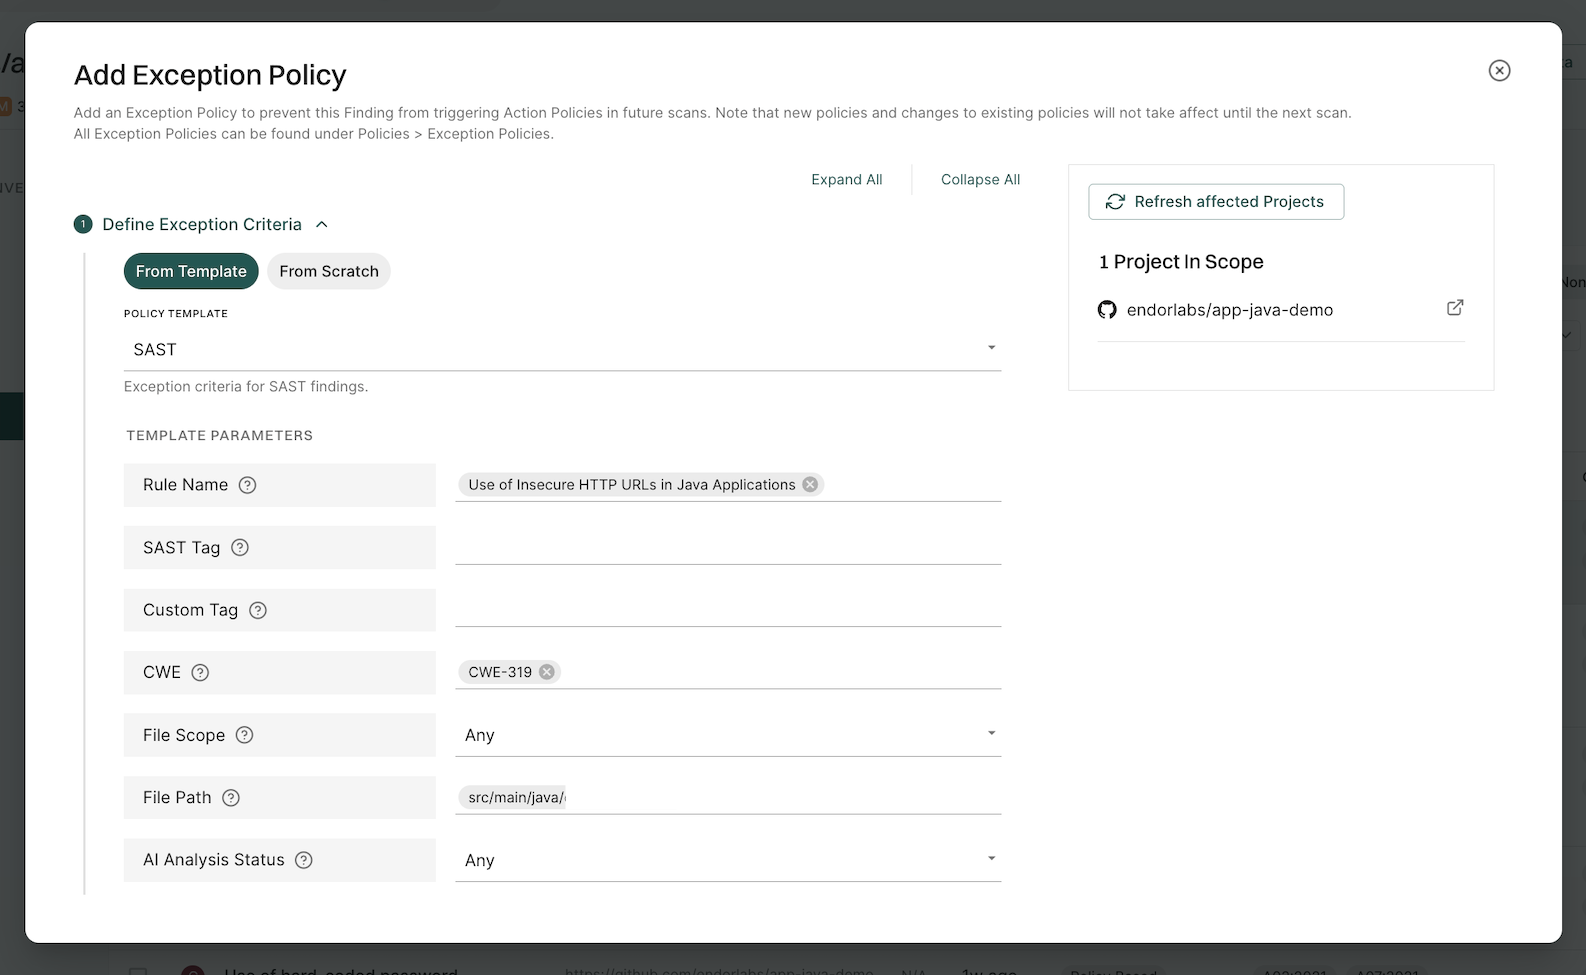
Add an exception policy to prevent a finding from triggering action policies in future scans.
- Select Projects from the left sidebar.
- Search for and select a project, and select Findings.
- Search for findings using advanced or basic filters.
- Select findings and click the vertical three dots.
- Select Add Exception.
Use the Grouped By filter to group multiple findings and apply exceptions to them at once.
See Create exception policy for details on how to create and apply exceptions.
Snooze findings
Snooze a finding to temporarily dismiss it and choose when it should reappear for findings that do not require immediate action or a permanent exception policy. To dismiss multiple findings, or a single finding across multiple repository versions or projects, create an exception policy.
To snooze a finding:
- Open the finding details.
- Click Snooze.
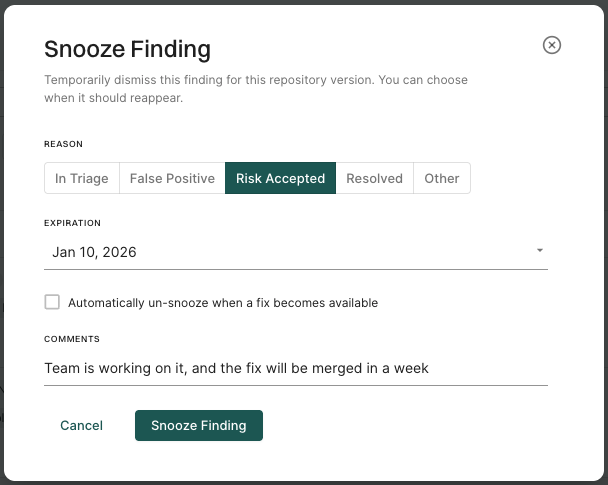
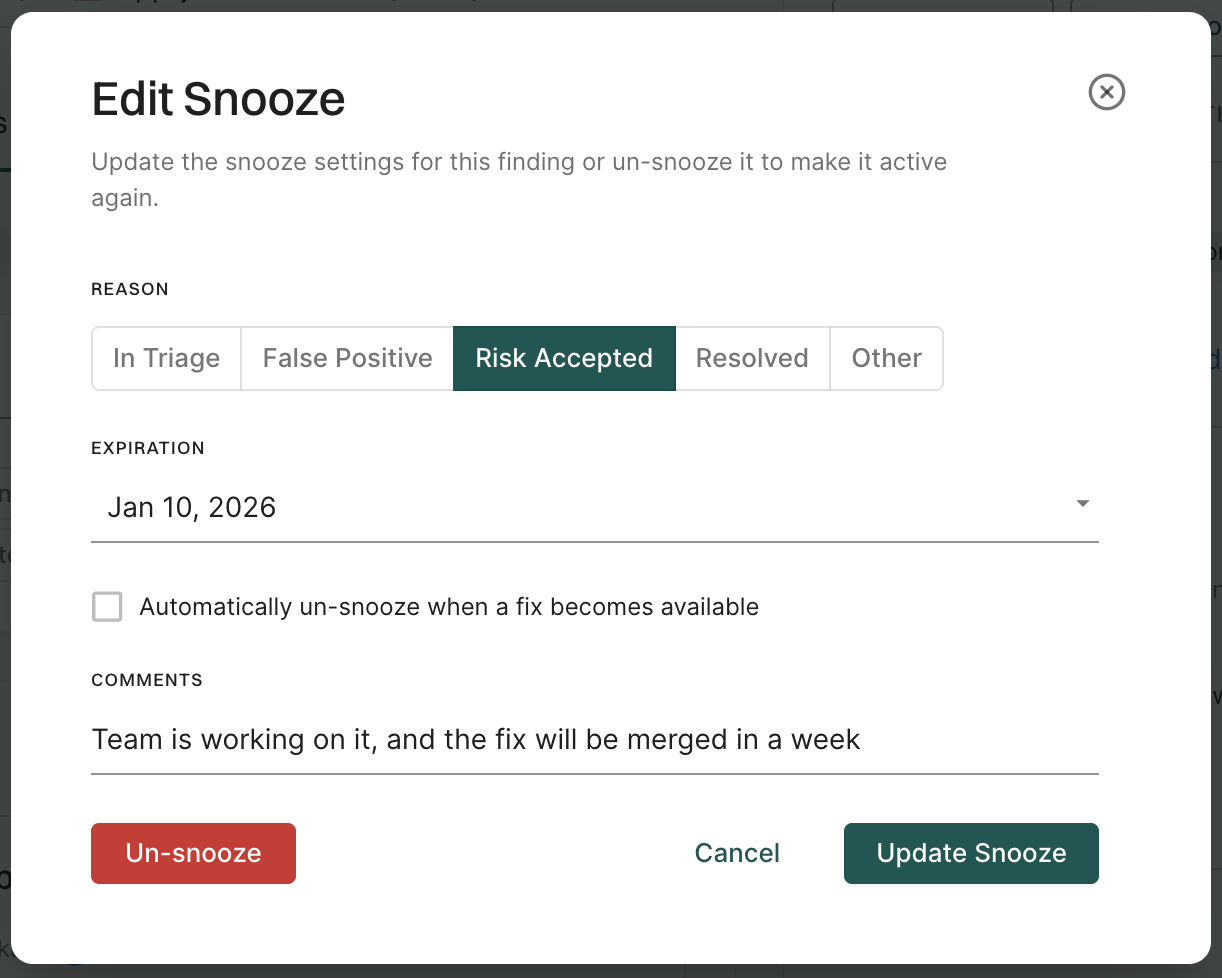
- Select the most appropriate reason to indicate why the finding is being snoozed.
- Optionally, select Expiration to specify when the finding should reappear. If you set an expiration date, the finding will be automatically un-snoozed by the first scan on the expiration date.
- Optionally, for vulnerability findings, select Automatically un-snooze when a fix becomes available to have the finding reappear after the first scan once a fix becomes available.
- Optionally, add a comment to provide context for the snooze.
- Click Snooze Finding.
A finding can be temporarily snoozed while a fix is in progress, with details such as the reason, expiration date, and remediation timeline recorded for context.
View snoozed findings
To view snoozed findings:
- Select Findings from the left sidebar.
- Select Dismissed from saved filters and select Yes.
- Select Snoozed to view snoozed findings only.
- Use the filter form to refine results by reason, or expiry range.
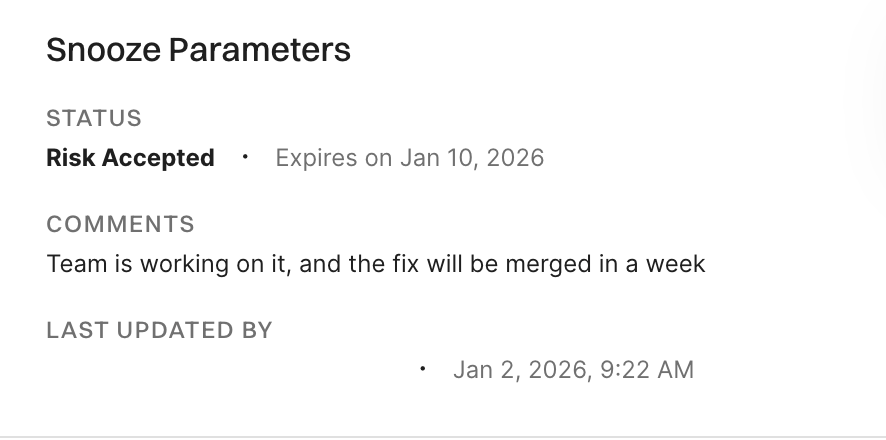
- Click on a snoozed finding to view its details.
You can view snooze parameters, including status, expiration date and time, and comments, in the finding details panel. The last updated timestamp shows when the snooze was created or last modified, which helps you track changes and verify if someone else has modified or un-snoozed the finding.
See Get finding snooze history to retrieve the snooze history of a finding via the API.
Un-snooze findings
When you un-snooze a finding, it immediately reappears in your findings list and dashboards. The finding becomes active again, and action policies will process it during the next scan.
To un-snooze a finding:
- Select Findings from the left sidebar.
- Select Dismissed from saved filters and select Yes to view snoozed findings.
- Click on a snoozed finding to view its details.
- Click Edit snooze and then click Un-snooze.
Update snoozed findings
To update snooze settings of a finding:
- Select Dismissed from saved filters and select Yes to view snoozed findings.
- Click on a snoozed finding and click Edit snooze.
- Edit snooze settings such as expiration date, reason, or comments, and click Update Snooze to save the changes.
Dismiss findings using an ignore file
Ignore files let you dismiss findings by committing a file in your repository. They are applied during scan execution and only affect the repository version that contains the file (the parent of the scan). Any finding that matches an entry in the ignore file is suppressed and does not appear in the findings list or trigger action policies.
Ignore files can be in one of two formats:
-
Yaml format: A list of ignore entries. Each entry specifies the finding by name, dependency, or other fields, plus metadata such as reason, expiration date, and comments.
-
Raw vulnerability IDs: A plain list of vulnerability identifiers (for example, CVE or GHSA), one per line, for vulnerability findings only. No yaml structure is required.
By default, the supported file name is .endorignore.yaml. Your administrator can configure additional file names in Developer Workflows. It is recommended to set up CODEOWNERS for all ignore file names so that changes require approval before merge.
Ignore file yaml syntax
The ignore file contains entries that specify the findings to suppress during scans. Use the endorctl ignore command to create the file if needed and format the yaml entries automatically. Use the endorctl validate ignore command to validate the file after changes or branch merges.
The file must include a top-level version and an ignore key whose value is a list of entries. The following fields are supported in each entry.
| Field | Description |
|---|---|
id |
Unique identifier for the entry. |
finding_name |
Name of the finding to match. At least one of finding_name or vuln_id must be specified in each entry. |
vuln_id |
Vulnerability ID to match, such as a CVE or GHSA ID. At least one of finding_name or vuln_id must be specified in each entry. |
dependency_name |
Name of the dependency to match. Partial values are supported, for example you can specify the dependency name without a version. |
parent_name |
Name of the parent package that declares or pulls in the dependency. Partial values are supported, for example you can specify the package name without a version. |
username |
Developer who requested the exception. |
reason |
Reason for ignoring the finding. Allowed values are false-positive, risk-accepted, in-triage, resolved, or other. Default is risk-accepted. |
expiration_date |
Date when the ignore entry expires, in YYYY-MM-DD format. |
expire_if_fix_available |
Indicates whether the ignore entry should be removed automatically when a fix becomes available. |
comments |
Additional comments describing the reason for the entry. |
The following example shows a valid ignore file in yaml format with a version, an ignore list, and entries that use the fields described above.
version: 1.0.0
ignore:
  - id: endorignore-1
    username: alice@corp.com
    finding_name: Unmaintained Dependency some-package@1.0
    reason: risk-accepted
    expiration_date: 2026-06-01
    comments: "Tracking upgrade in JIRA-123"
  - id: endorignore-2
    vuln_id: CVE-2025-12345
    parent_name: some-ut-package-name
    reason: other
    expire_if_fix_available: true
    comments: "No fix available and this package is only used for testing"
  - id: endorignore-3
    username: bob@corp.com
    finding_name: "Potential secret leak Generic API Key: ID #dace33"
    reason: resolved
    comments: "I revoked my token"
Ignore file plain text format
Vulnerability findings can be ignored by listing the vulnerability IDs in a plain text file.
# Ignore list for approved exceptions (AppSec-owned)
CVE-2024-12345
GHSA-xxxx-yyyy-zzzz
CVE-2023-99999
View ignored findings
To view ignored findings:
- Select Findings from the left sidebar.
- Select Dismissed from saved filters and select Yes.
- Select Ignored to view ignored findings only.
- Use the filter form to refine results by reason, or expiry range.
- Click on an ignored finding to view its details.
You can view ignore parameters, including status, expiration date and time, comments, ignore file name and entry id in the finding details panel. The ignore parameters available depend on which fields the developers are required to provide in the ignore file entries.
Filter dismissed findings
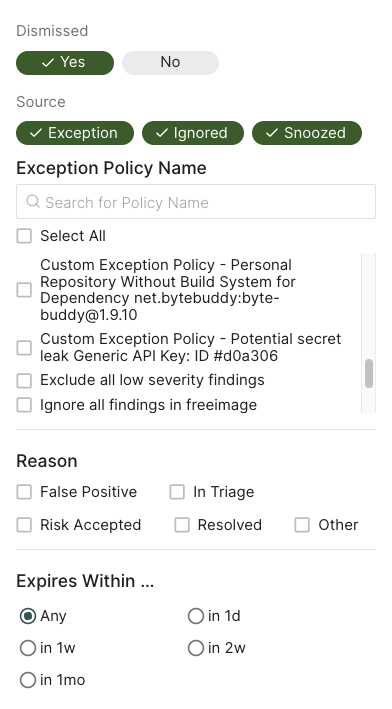
Use the following options to filter dismissed findings.
- Select Yes to view only dismissed findings in the findings table.
- Select No to hide dismissed findings from the findings table.
- Deselect both Yes and No to include dismissed findings in the findings table along with the rest of the findings.
- Select Exception, Ignored, and/or Snoozed, to filter on the method by which the finding was dismissed.
- For exception findings, choose from one of the existing exception policies in the list or search for a specific exception using Search for Policy Name.
- Select Reason to filter dismissed findings by reason.
- Select Expires Within to filter dismissed findings by expiration time-frame.
View findings associated with a project
To view the findings associated with a project:
- Select Projects from the left sidebar.
- Select the project for which you want to view the findings. The Findings page includes the list of findings specific to the project.
- Review the list of findings. Click the finding to see its details.
- Use Grouped By to group findings by attributes such as dependency, location, package, CWE, tags, code owner or rule name to filter and manage them collectively.
Finding attributes
Finding attributes are characteristics or properties associated with each discovered issue or result obtained from a scan. These attributes could include the following details and metadata.
| Attribute | Description |
|---|---|
| Blocker | Finding was marked as blocking by an action policy. |
| Direct | Finding applies to a direct dependency. |
| Disputed | The CVE reported in this finding is has been marked as ‘disputed’. |
| Exception | Finding was marked as exempt from action policies by an exception policy. |
| Exploited | The CVE reported in this finding is actively exploited and is listed in the Known Exploited Vulnerabilities (KEV) database. |
| External Path Only | Finding applies to a transitive dependency that can only be reached via external, non-OSS, project paths. |
| First Party | Finding applies to a dependency that belongs to the same namespace. |
| Fix Available | A fix is available for the CVE reported in this finding. |
| Invalid Secret | Finding applies to an invalid secret. |
| Malware | Finding applies to a malicious package. |
| Normal | Finding applies to a normal, non-test, dependency. |
| Notification | Finding triggered a notification based on an action policy. |
| Phantom | Finding applies to a phantom dependency. |
| Potentially Reachable Dependency | Finding applies to a potentially reachable dependency. |
| Potentially Reachable Function | Finding applies to a potentially reachable function. |
| Reachable Dependency | Finding applies to a reachable dependency. |
| Reachable Function | Finding applies to a reachable function. |
| Same Repository | Finding applies to a dependency that belongs to the same project. |
| Self | Finding applies only to the analyzed package version, there is no dependency involved. |
| Test | Finding applies to a dependency that is not in production code. |
| Transitive | Finding applies to a transitive (indirect) dependency. |
| Under Review | Finding applies to suspicious package under review. |
| Unfixable | There is no fix available for the CVE reported in this finding. |
| Unreachable Dependency | Finding applies to an unreachable dependency. |
| Unreachable Function | Finding applies to an unreachable function. |
| Valid Secret | Finding applies to a valid secret. |
| Warning | Finding triggered a warning based on an action policy. |
| Withdrawn | The CVE reported in this finding is has been marked as ‘withdrawn’. |
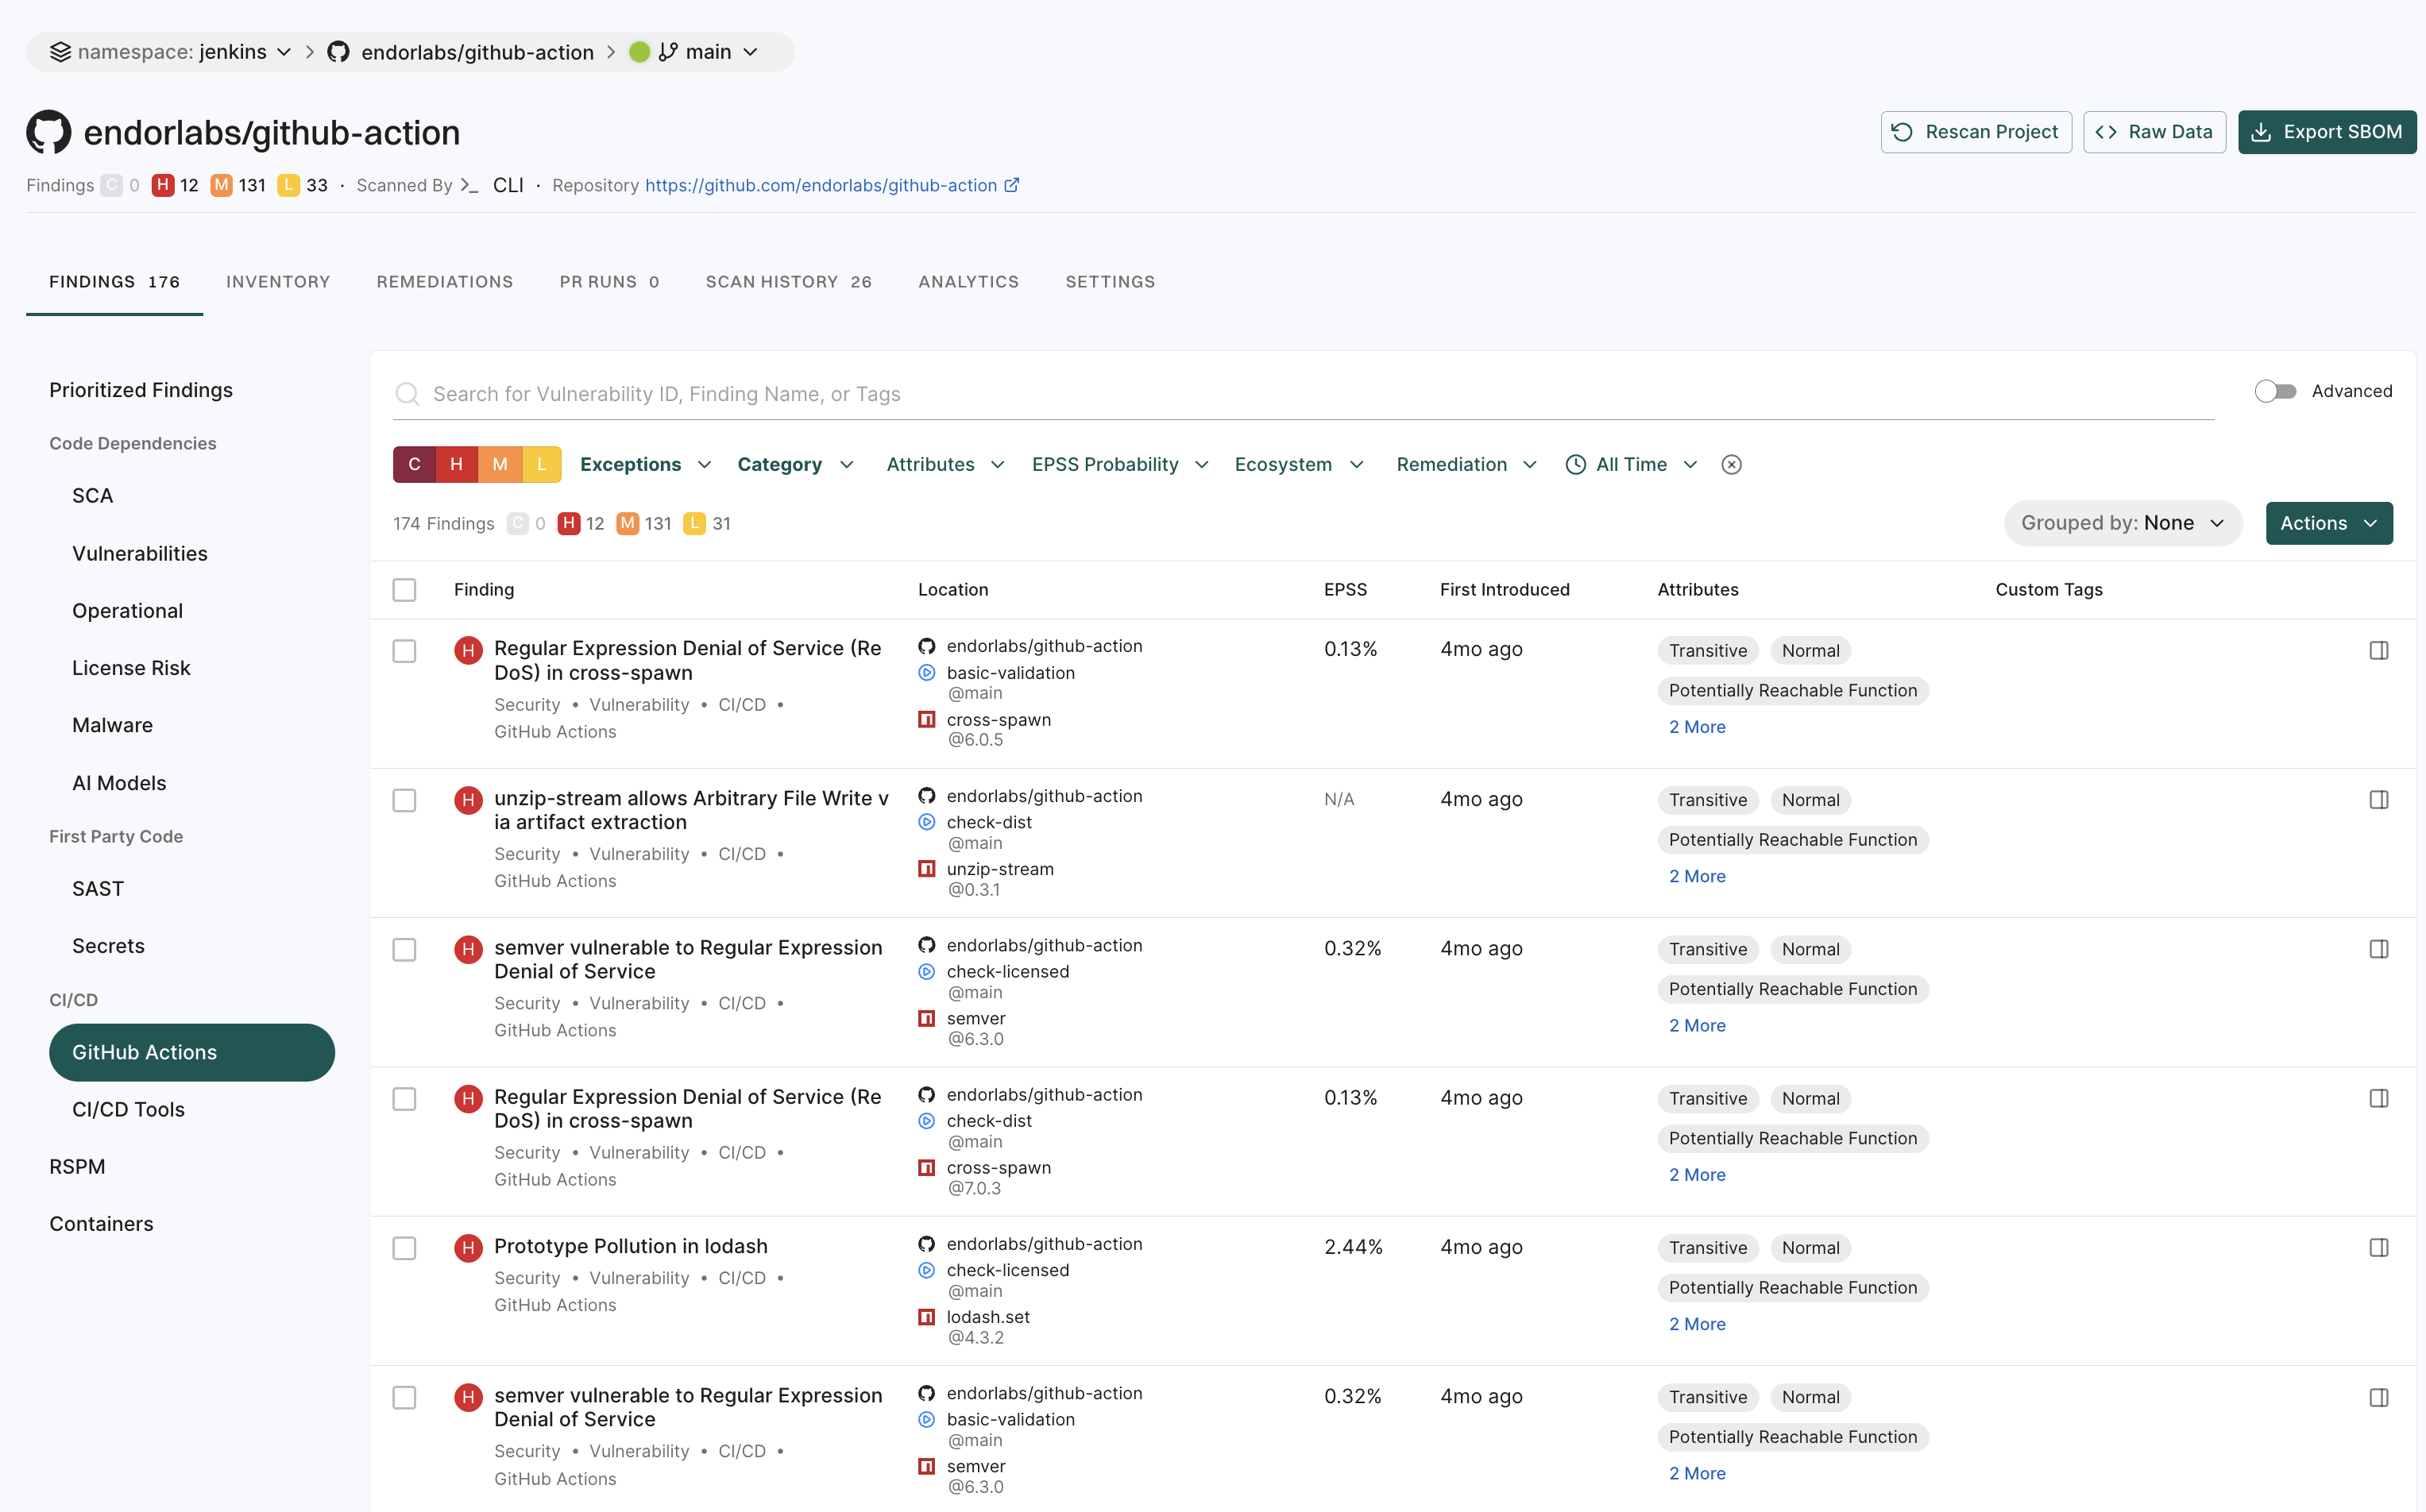
View GitHub Action findings
GitHub Actions is a CI/CD platform that allows you to automate your build, test, and deployment pipelines. You can create workflows that build and test pull requests to your repository, or deploy merged pull requests to production. To mitigate vulnerabilities within the supply chain, comprehensive visibility into GitHub Action workflows and their relationships in your repository is crucial. You can then proceed to identify and fix weak points within the system.
When you run an endorctl scan, it detects GitHub Action workflows used in your repository. It proceeds to scan all the repositories included in the detected workflows and creates findings. The GitHub Action is mapped as a package and discovers direct and transitive dependencies.
To view GitHub Action findings:
- Select Projects from the left sidebar.
- Search for and select a project and select Findings.
- Click GitHub Actions under CI/CD to view GitHub Actions findings.
- Vulnerabilities and dependencies associated with GitHub Action packages written in JavaScript or TypeScript are detected by Endor Labs.
- Private GitHub Actions and private reusable workflows referenced from other repositories are not detected.
- Test dependencies are not detected for GitHub Action packages.
Search for findings using basic filters
Use the following basic filters to search for information in your findings.
- C - Findings with critical severity.
- H - Findings with high severity.
- M - Findings with medium severity.
- L - Findings with low severity.
- Dismissed - Include or exclude dismissed findings. See Filter dismissed findings to learn more about filtering dismissed findings.
- Category - Choose from CI/CD, Malware, license risks, operational risks, RSPM, GitHub Actions, SAST, AI models, containers, secrets, security, supply chain, or vulnerability and view related findings.
- Projects - Narrow findings by one or more project names.
- Remediations - Narrow down vulnerabilities based on their fix status. Endor Patch Available filters findings where an Endor-provided patch is available to fix the vulnerability. Recommended Upgrade Available filters findings where a recommended version upgrade is available.
- Attributes - Narrow down the list based on a range of factors such as:
- if a patch is available to fix the findings
- if the vulnerable function is reachable
- if the dependency is reachable
- if the dependency originates from a current repository or a current tenant
- if the dependency is a test dependency
- if the dependency is a phantom dependency
- if the finding originates from itself, direct, or a transitive dependency
- filter the findings by the Exploited tag from CISA KEV
- filter the findings by the Warn or Break the Build options set in the action policy
- EPSS Probability - Choose the Exploit Prediction Scoring System (EPSS) score range.
- All Time - Choose a time range.
- Eco System - Choose from available options to filter based on a language or an ecosystem.
Search for findings using advanced filters
Use advanced filters to create powerful queries that drill deeper into the dataset to fetch results with a specific context.
Search using the advanced filters applies to all the branches of a repository. You can retrieve results from any branch by specifying the relevant context ID or type.
For example:
-
If the default branch for the
BenchmarkJavarepository is set tomaster, applying filters with the context ID formastershows results specific to branch.To scan from the default branch, run the following command :
endorctl scan --path=. -
Similarly, if there is another branch named
test-branch, switching to that branch shows results specific to the branch.To scan the branch, run the following command:
git checkout test-branch
endorctl scan --path=.
After running the sans, you can view the findings specific to the branches in the Endor Labs user interface.
-
Select Projects from the left sidebar.
-
Select the project for which you want to view the findings.
-
At the top left of the page, you’ll find a drop-down menu that allows you to select the specific branch. The default branch of the repository is selected by default.
In the following example,
masteris the default branch. To view findings from other branches (for example,test-branch), choose the desired branch from the drop-down menu.
--as-default-branch while performing the endorctl scan. See scanning strategies for information on testing and monitoring different versions of your code.
The Advanced Filters use the GetFinding API call to fetch results.
The following table lists some example attributes, you can use in your custom API calls. See also example combinations below.
| Attribute | API Query |
|---|---|
| Severity | spec.level in ["FINDING_LEVEL_CRITICAL","FINDING_LEVEL_HIGH"] |
| Category | spec.finding_categories contains ["FINDING_CATEGORY_VULNERABILITY"] |
| Fixable | spec.finding_tags contains ["FINDING_TAGS_FIX_AVAILABLE"] |
| Reachability | spec.finding_tags contains ["FINDING_TAGS_REACHABLE_FUNCTION"] |
| Ecosystem | spec.ecosystem in ["ECOSYSTEM_MAVEN"] |
| EPSS score greater than 10% | spec.finding_metadata.vulnerability.spec.epss_score.probability_score > 0.1 |
| EPSS score less than or equal to 100 | spec.finding_metadata.vulnerability.spec.epss_score.probability_score <= 1 |
| Only query a given project | spec.project_uuid=="UUID of the project" |
Examples
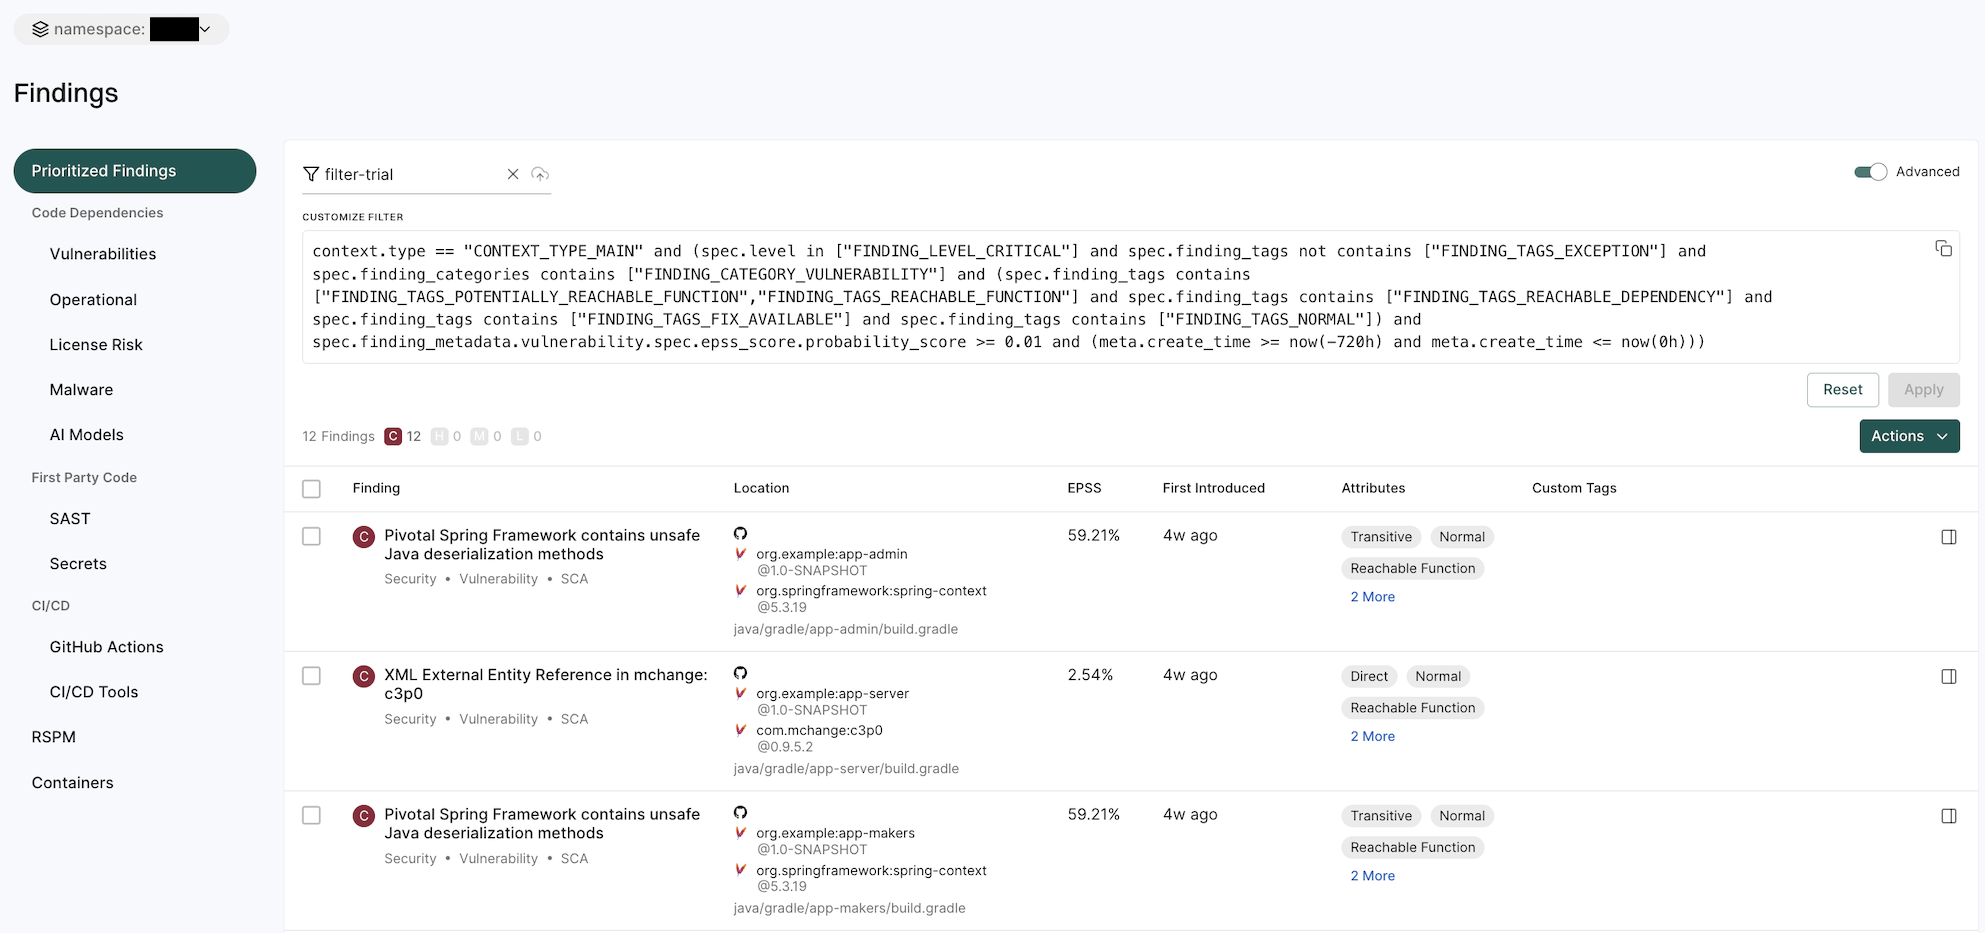
Show all findings of critical vulnerability and high severity that have a fix available, with a reachable function and EPSS score greater than 10%.
spec.level in ["FINDING_LEVEL_CRITICAL","FINDING_LEVEL_HIGH"] and spec.finding_tags contains ["FINDING_TAGS_FIX_AVAILABLE"] and spec.finding_tags contains ["FINDING_TAGS_REACHABLE_FUNCTION"] and spec.finding_metadata.vulnerability.spec.epss_score.probability_score > 0.1
Show vulnerabilities for a specific project.
spec.finding_categories contains ["FINDING_CATEGORY_VULNERABILITY"] and spec.project_uuid == "660e2bc48c7d4e60a5fc692f"
Show vulnerabilities for a specific language in a specific project.
spec.finding_categories contains ["FINDING_CATEGORY_VULNERABILITY"] and spec.ecosystem in ["ECOSYSTEM_PYPI"] and spec.project_uuid == "660e2bc48c7d4e60a5fc692f"
Saved filters
Saved filters are customizable filter settings that users can create and reuse across projects in Endor Labs. They improve efficiency by eliminating the need to manually recreate filters. You can save the advanced search filters that you created to fetch curated search results. Saved queries are visible in the drop-down list.
To create a saved filter:
- Select Findings from the left sidebar.
- Toggle Advanced in the top right corner.
- Type the query in CUSTOMIZE FILTER.
- Enter a title in the field with the filter icon.
- Click Save New Filter.
Manage saved filters
To delete a saved filter:
- Select Settings from the left sidebar.
- Select SAVED FILTERS.
- Click the vertical three dots on the right side of the filter you want to delete and click Delete.
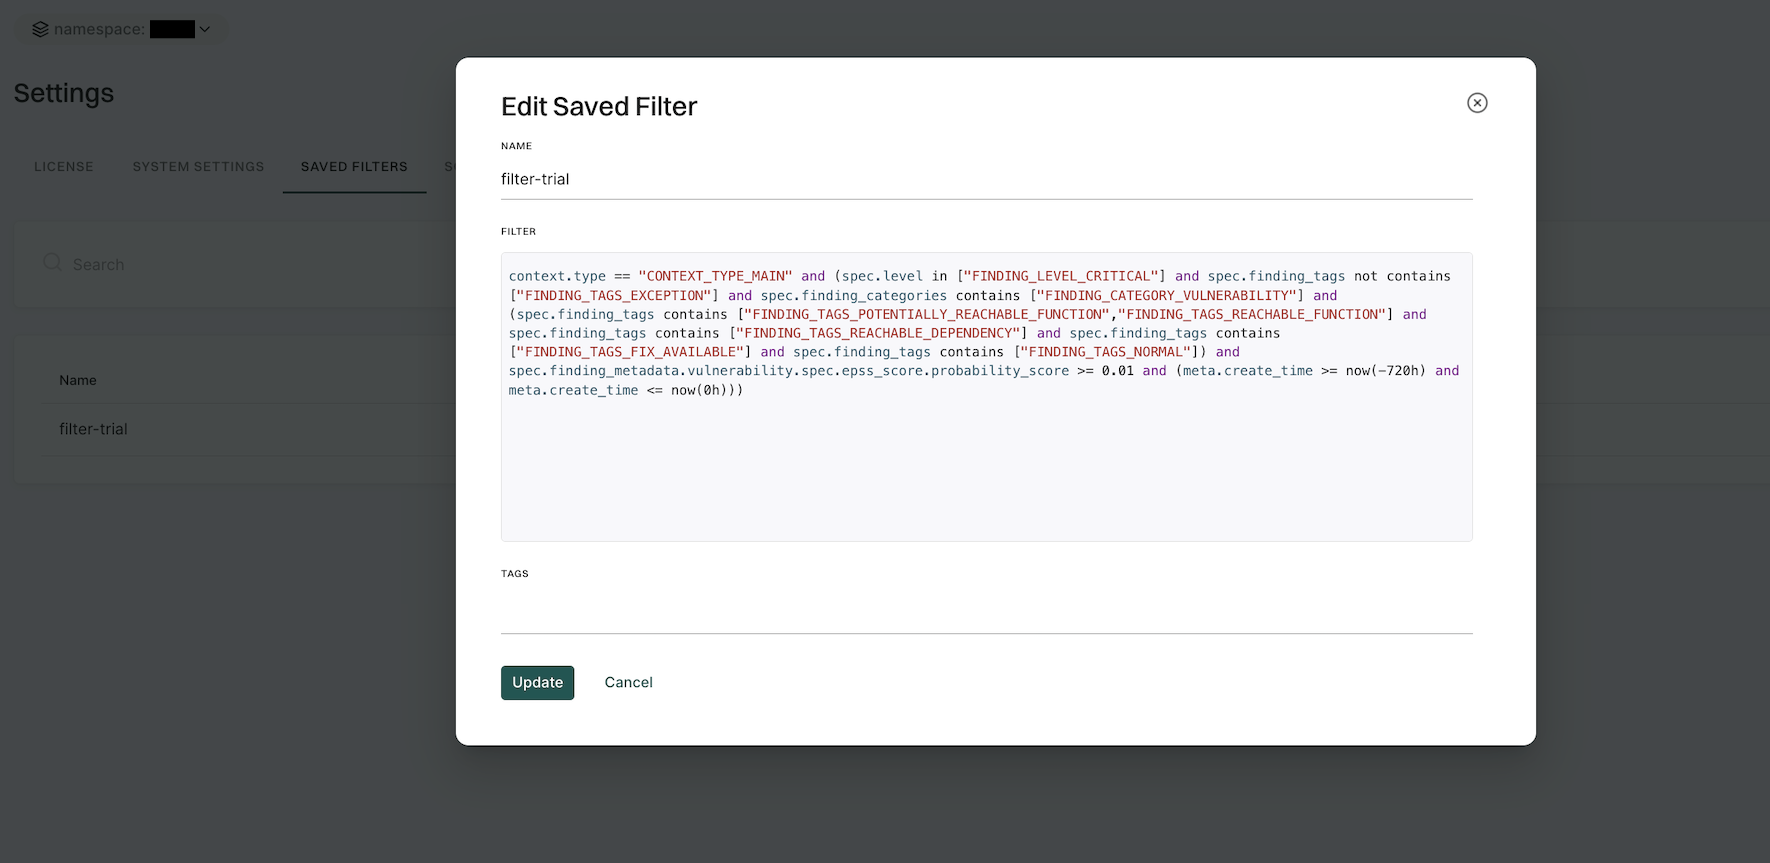
To edit a saved filter:
- Select Settings from the left sidebar.
- Select SAVED FILTERS.
- Click the vertical three dots on the right side of the filter you want to edit and click Edit
- You can update the name, query, and tags.
- Click Update to save the updated changes.
Search for exceptions
Findings that are associated with exception policies do not trigger notifications.
To search for findings that are associated with exceptions,
- Select Projects from the left sidebar.
- Search for and select a project, and select Findings.
- Click Exceptions and select Yes.
- Use the filter form to refine results by exception policy name, reason, or expiry range.
Manage findings
See Finding policies for details on how to configure findings.
Act on findings
See Action policies for details on how to define and trigger workflows based on findings that meet a given set of criteria.
Export findings
Users can export finding details to a CSV file for offline analysis.
- Select Projects from the left sidebar.
- Search for and select a project and select Findings.
- Search for findings using advanced or basic filters.
- Select the findings and click the vertical three dots.
- Choose Export Selected or Export All and select the fields that you want to include in the CSV file.
- Click Export to CSV. The file is downloaded to your system.
Apply tags to findings
Tagging findings helps you organize, prioritize, and filter issues efficiently. You can tag findings in a finding policy or while running the endorctl scan.
Using finding policies
You can define custom tags in a finding policy, which automatically apply to findings that match its conditions. See Finding policies for more information.
To add custom tags:
- Select Policies & Rules from the left sidebar.
- Follow the steps to create a finding policy. Ensure to add your choice of custom tags in Finding Custom Tags. You can also update an existing policy.
- Click Create Finding Policy.
After you create or update a finding policy, rescan your project to apply the custom tags to your findings.
Through the CLI
When scanning projects using endorctl, you can tag all the findings generated within the scan scope using the --finding-tags flag.
To scan and tag all findings of a endorctl scan:
endorctl scan --finding-tags=findings-tag-name
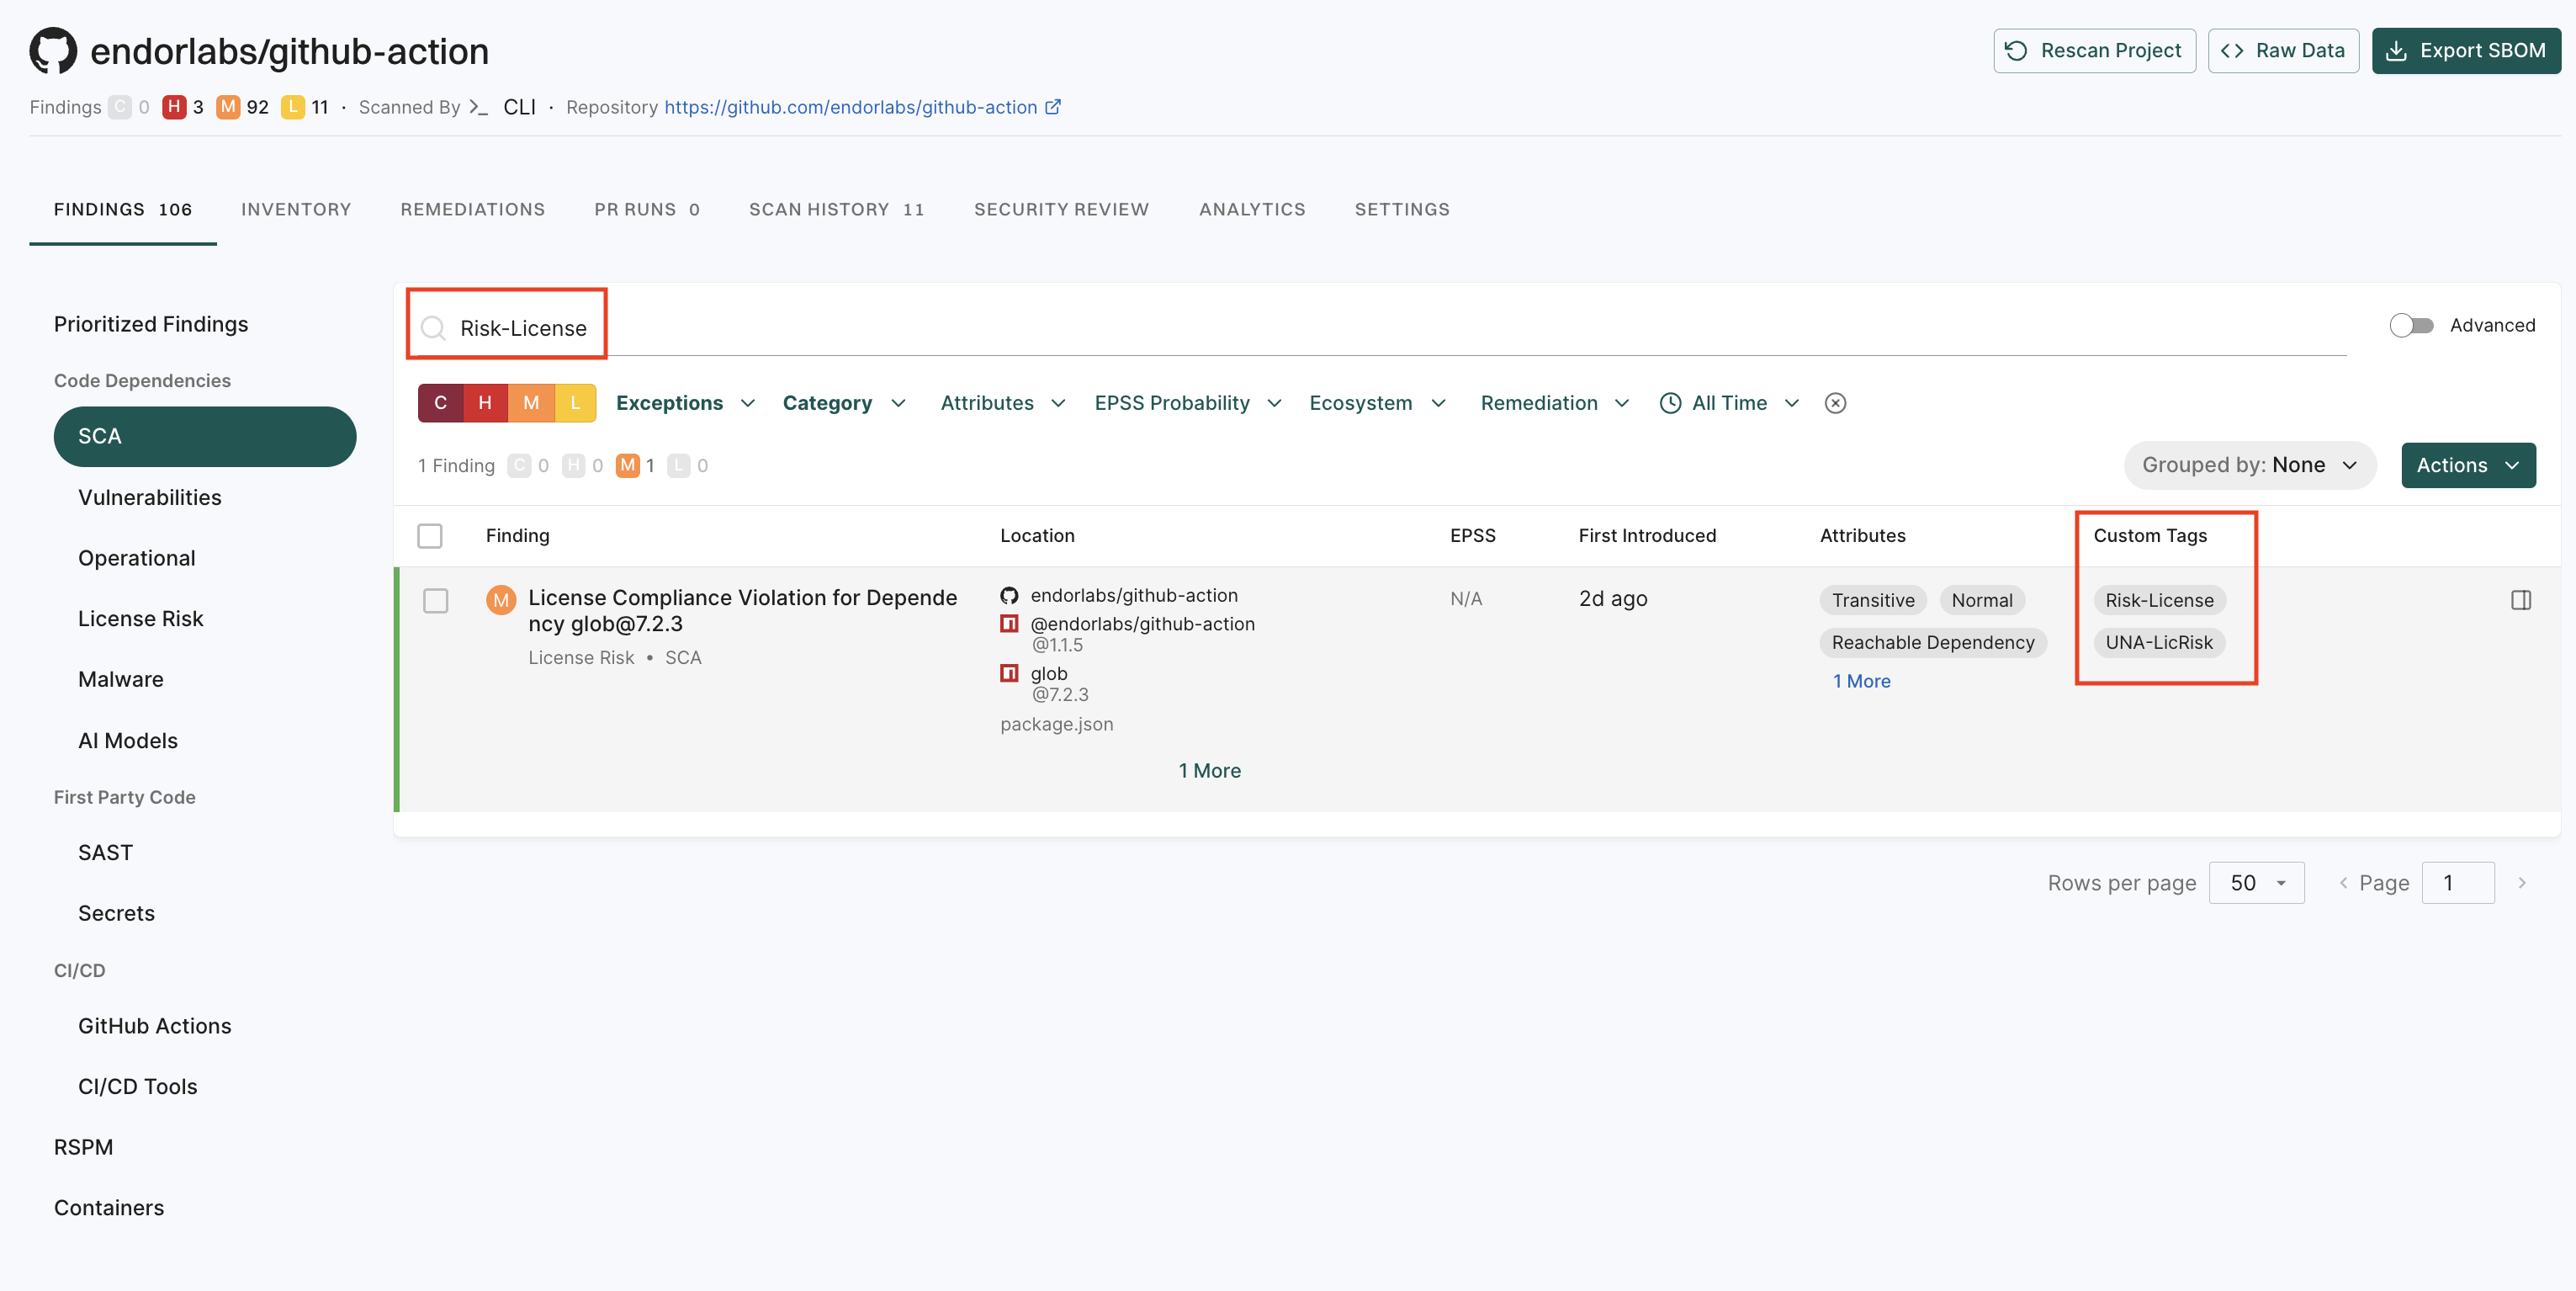
View tagged findings
To filter and view the findings by their tags:
-
Select Projects > Findings from the left sidebar.
-
Enter the tag in the search bar to filter and view findings by tag name.
View Remediations
If you enable upgrade impact analysis, you can view the remediation recommendation when you select a finding, if available.
Click View Details to view the details of the remediation recommendation.
Click View Full Recommendation to view all available upgrade paths.
Feedback
Was this page helpful?
Thanks for the feedback. Write to us at support@endor.ai to tell us more.
Thanks for the feedback. Write to us at support@endor.ai to tell us more.