Bitbucket Data Center App PR scans
You can configure PR scans while creating a new Bitbucket Data Center App installation or for existing Bitbucket Data Center integrations. You must configure webhooks manually in your Bitbucket instance to scan your pull requests. See configure the webhook to learn more.
You can also choose to receive PR comments on your pull requests. After you configure PR comments, Endor Labs posts a comment on the pull request if any issues are detected during the PR scan. See Bitbucket Data Center PR comments for more information.
Create an HTTP access token
To enable PR scans and PR comments, you must provide an HTTP access token with at least write access for Repositories and read access for Projects.
To create an HTTP access token:
-
Sign in to your Bitbucket Data Center instance and create an HTTP access token.
-
When creating the token, ensure you select the following permissions:
- Projects: Read
- Repository: Write
-
Copy the generated token and store it in a secure location. You need it when configuring the Bitbucket Data Center integration in Endor Labs.
Configure PR scans during a Bitbucket Data Center App installation
After you complete the initial installation of the Bitbucket Data Center App in Endor Labs, you can configure PR scans. At this point, the Bitbucket Data Center App will be operational.
You can also choose to apply PR scans to specific repositories rather than all the projects through a scan profile. See Configure PR scans for specific repositories for more information.
-
Toggle Enable Pull Request Scans and Expand Webhook Configuration on Bitbucket’s UI to view the webhook settings required to configure a webhook in your Bitbucket Data Center project. See configure the webhook for PR scans for manual setup instructions.
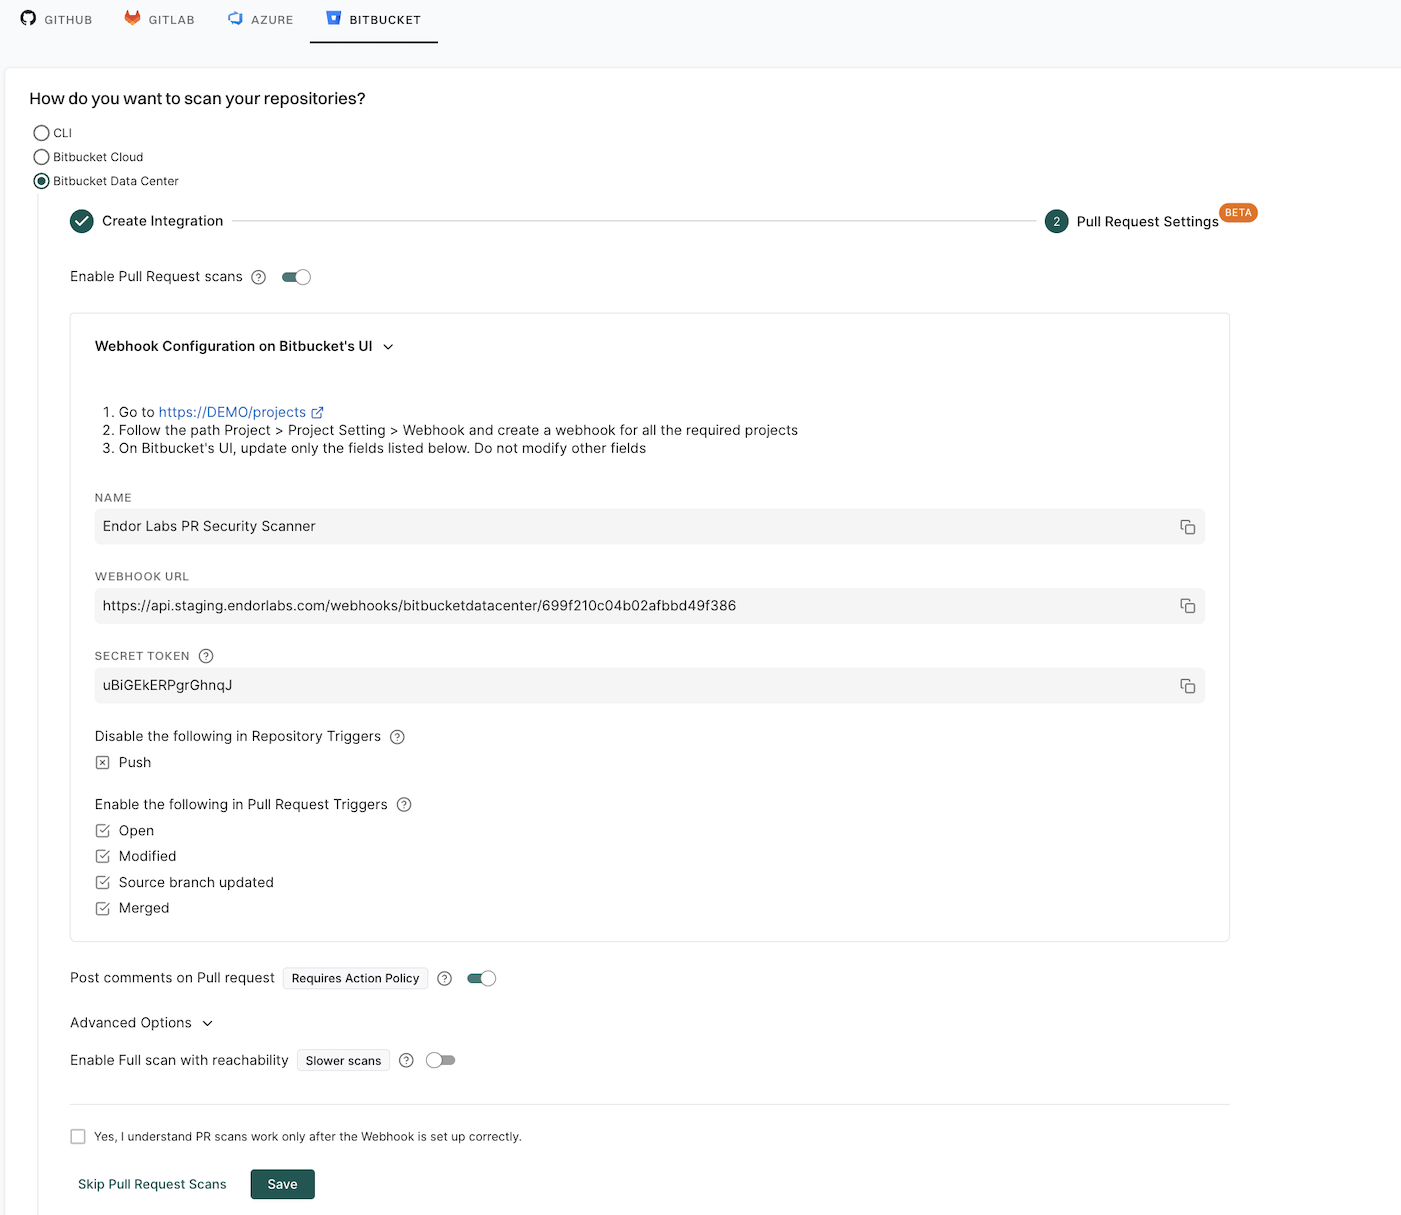
-
Optionally, toggle Post comments on Pull Request to allow Endor Labs to comment on PRs for policy violations. You must configure an action policy to view the PR comments.
When you enable PR comments, Endor Labs posts a comment on the pull request if any issues are detected during the PR scan. See Bitbucket Data Center PR comments for more information.
-
Optionally, expand Advanced Options and toggle Enable Full Scan with reachability for scans with dependency resolution, reachability analysis, and call graph generation for supported languages. Full scans provide total visibility but may take longer to complete.
By default, a quick scan is performed which provides rapid visibility into potential vulnerabilities for faster merges.
-
Select the checkbox Yes, I understand PR scans work only after the Webhook is set up correctly to acknowledge the webhook requirement.
-
Click Save.
Once the webhooks are set up in your Bitbucket Data Center projects, Endor Labs automatically runs a PR scan whenever a pull request is opened or updated.
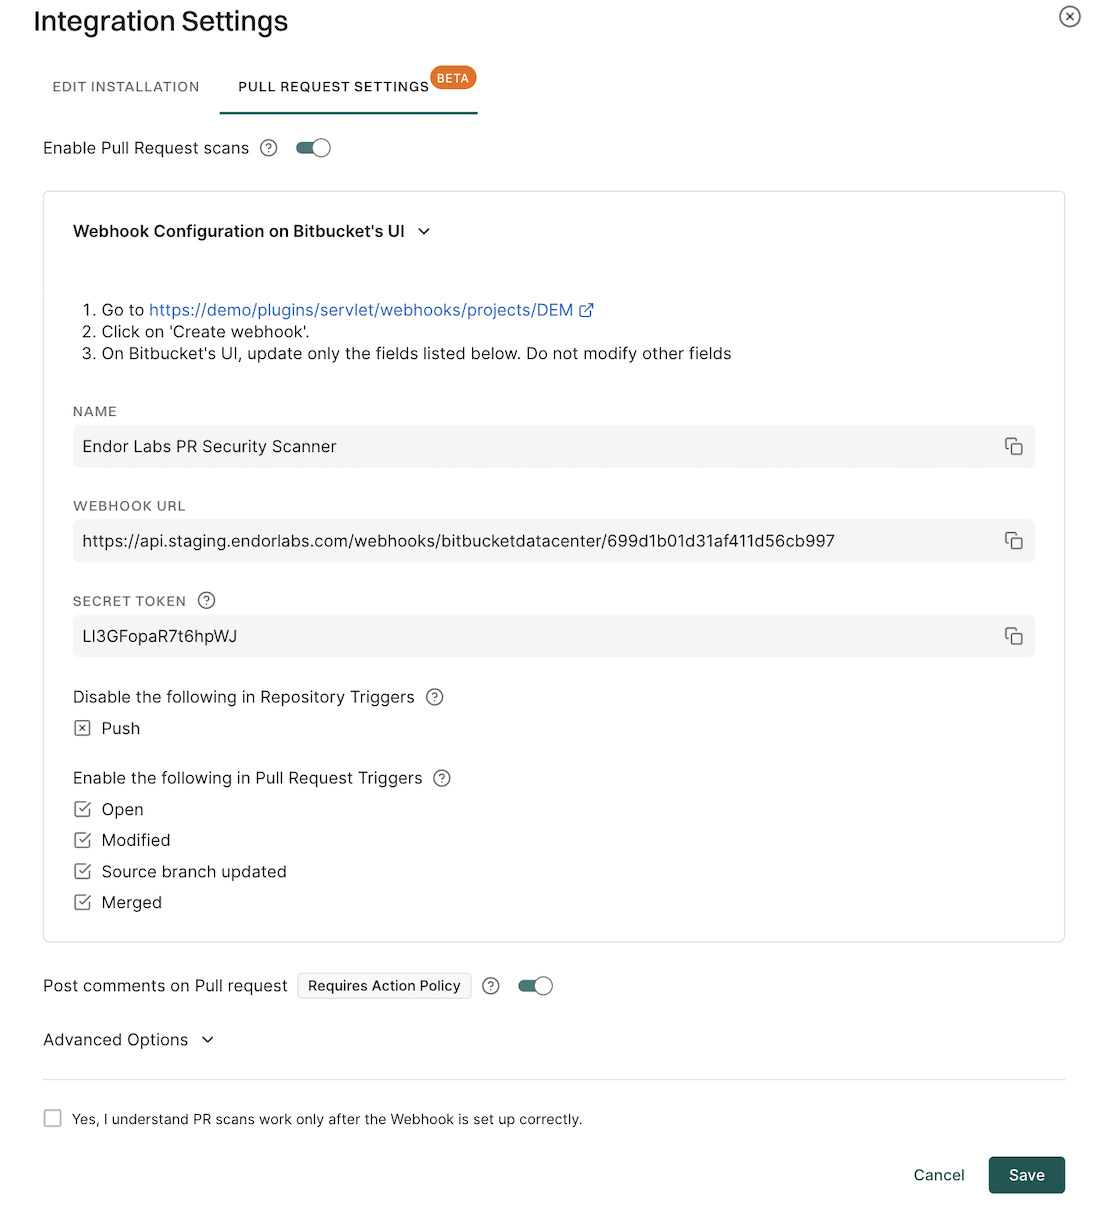
Configure PR scans for existing Bitbucket Data Center integrations
You can configure PR scans for existing Bitbucket Data Center integrations or after creating a new Bitbucket Data Center integration.
-
Sign in to Endor Labs and select Integrations from the left sidebar.
-
Click Manage in Bitbucket Data Center under Source Control Managers.
-
Click the vertical three dots next to the Bitbucket Data Center integration that you want to update.
-
Select Edit Integration.
-
Select Pull Request Settings in Integration Settings.
-
Toggle Enable Pull Request Scans.
-
Expand Webhook Configuration on Bitbucket’s UI to configure the webhook in Bitbucket. See configure the webhook for PR scans to learn more.
-
Optionally, toggle Post comments on Pull Request to allow Endor Labs to comment on PRs for policy violations. You must configure an action policy to view the PR comments.
When you enable PR comments, Endor Labs posts a comment on the pull request if any issues are detected during the PR scan. See Bitbucket Data Center PR comments for more information.
-
Optionally, under the Advanced section, you can toggle Enable Full scan with reachability.
-
Select the checkbox Yes, I understand PR scans work only after the Webhook is set up correctly to acknowledge the webhook requirement.
-
Click Save.
The changes are applied from the next scanning cycle.
Configure the webhook on the Bitbucket Data Center’s UI
After you enable PR scans in Endor Labs, you must configure a webhook in your Bitbucket Data Center instance to allow Endor Labs to receive pull request events. Ensure that you have Project admin permissions in your Bitbucket Data Center instance to configure the webhook.
-
Sign in to your Bitbucket Data Center instance and navigate to your project.
-
Create a project level webhook. You can also click the link provided by Endor Labs to go to your project’s webhooks page.
-
Enter the following details and configure the webhook in your Bitbucket instance.
- Name: Name of the webhook.
- URL: Enter the webhook URL.
- Secret Token: The secret token from Endor Labs.
Copy the values from the Endor Labs user interface. Do not modify other fields on the Bitbucket webhook form.
-
Under Events, enable only the following Pull request event triggers. Ensure that all other triggers disabled.
- Opened
- Modified
- Source Branch Updated
- Merged
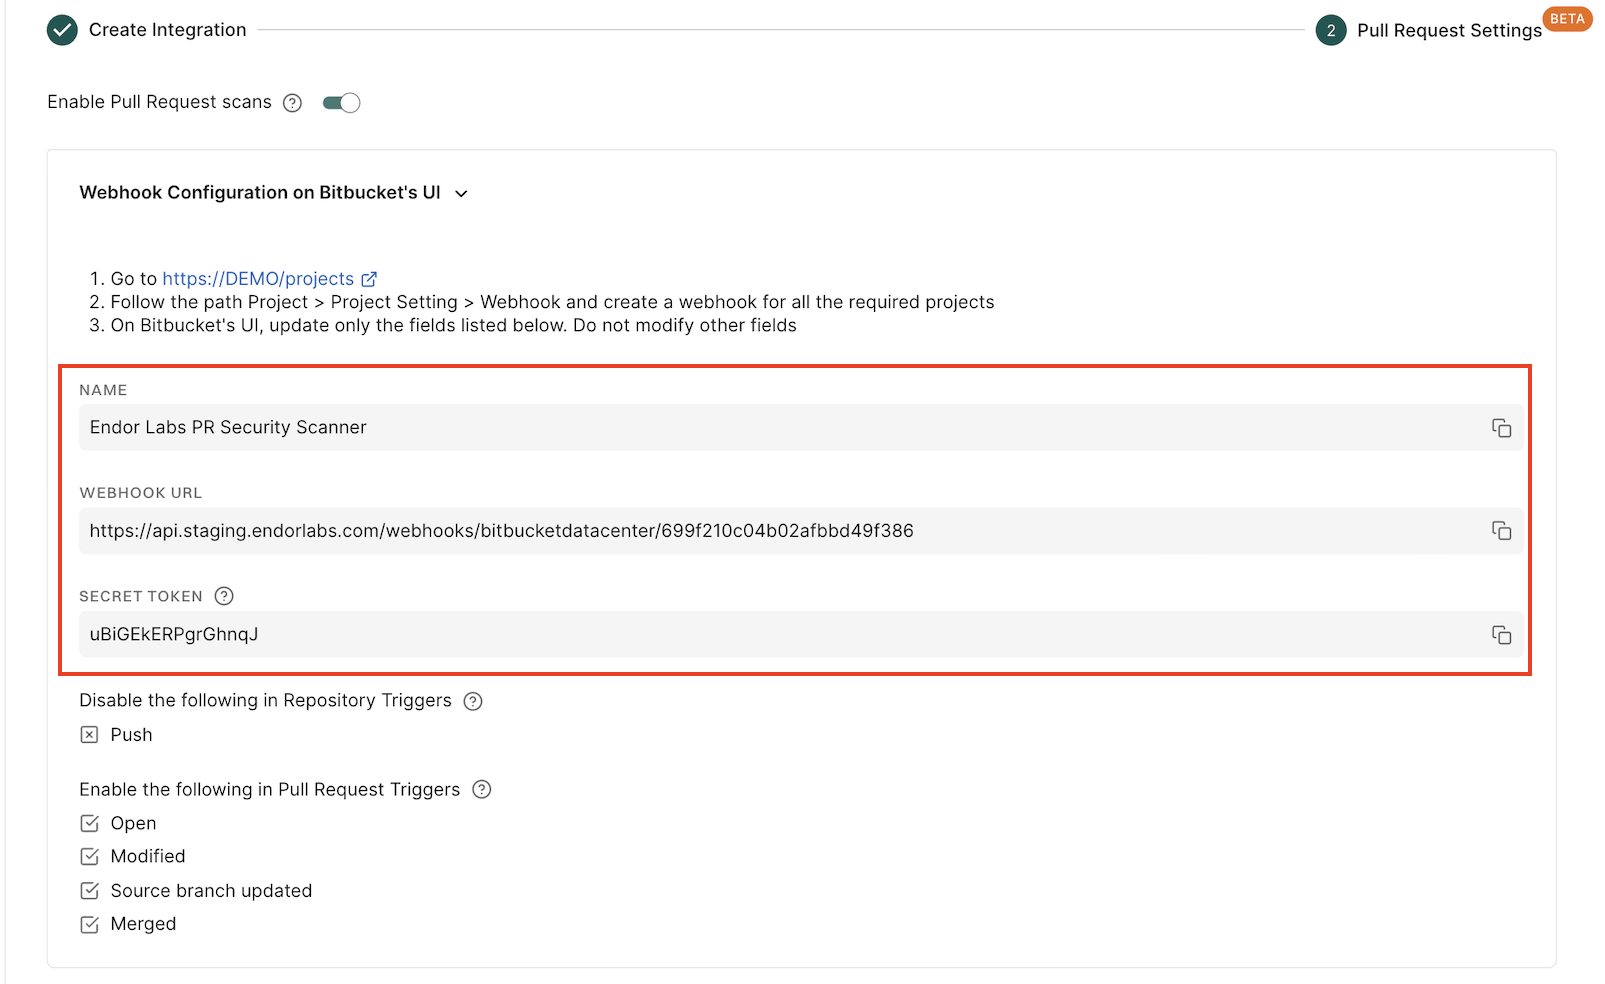
- Click Save.
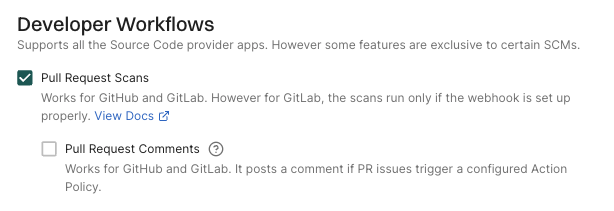
Configure PR scans for specific repositories
You can configure PR scans and PR comments only for specific repositories. If you select the option to configure PR scans in your Bitbucket Data Center App integration, pull requests for all the repositories in your projects are scanned. Instead, you can choose to configure PR scans and PR comments for selected repositories using scan profiles.
-
Enable PR scans and PR comments during the initial Bitbucket Data Center App installation. This ensures that the webhooks are properly configured and recognized by Endor Labs.
-
Edit the Bitbucket Data Center App integration and disable Pull Request Scans and Pull Request Comments. This prevents PR scans from running for all repositories in the projects, while retaining the webhook settings in Endor Labs to listen for PR events from the repositories you select through the scan profile.
-
Create a scan profile with Pull Request Scans and optionally Pull Request Comments enabled under Developer Workflow.
-
Associate the scan profile with the specific repository where you want PR scans to run.
This approach allows you to control which repositories have PR scans enabled while ensuring that the webhook is properly configured during the initial installation.
Bitbucket Data Center PR comments
PR comments are automated comments added to pull requests when Endor Labs detects policy violations or security issues during scans. When a PR is raised or updated, Endor Labs runs scans on the proposed changes and adds a comment if any violations are detected based on the configured action policies.
After you enable PR comments, you need to set up an action policy to allow comments to be posted on pull requests.
Configure action policy for PR comments
PR comments template
Endor Labs provides a default template for PR comments that you can use out-of-the-box. You can also create custom templates using Go Templates.
The following section shows the default template for PR comments.
{{- /* Do not modify the placement of the CommentHeader.
It is being used to identify the comments generated by Endor Labs. */ -}}
{{ .CommentHeader.Value }}

{{ $policiesTriggeredNumber := len .PolicyFindingsMap }}
{{ $dataMap := .DataMap }}
{{ $findingsMap := .FindingsMap }}
{{ $packageVersionsMap := .PackageVersionsMap }}
{{ $apiURL := .ApiEndpoint.Value }}
{{ $totalFindings := getTotalFindingsCount $dataMap }}

{{/* ALERT BANNER */}}
> **:warning: WARNING**
> Endor Labs detected {{ $policiesTriggeredNumber }} policy violations associated with this pull request.

Please review the findings that caused the policy violations.

## Summary

- **Policies:** {{ $policiesTriggeredNumber }}
- **Total Findings:** {{ $totalFindings }}

---

{{ range $policyUUID, $policyName := .PoliciesMap }}
{{ $policyFindings := index $dataMap $policyUUID }}
{{/* POLICY HEADER */}}
## :clipboard: Policy: {{ $policyName }} ({{ getFindingsCountString $policyFindings }})

{{ range $packageVersionUUID, $packageVersionFindings := $policyFindings.PackageToDependencies }}
{{ if ne getOtherFindingsPackageMarker $packageVersionUUID }}
{{ $packageVersionObject := index $packageVersionsMap $packageVersionUUID }}
{{ if $packageVersionObject }}
{{/* PACKAGE HEADER */}}
- **:inbox_tray: Package:** [{{ $packageVersionObject.Meta.Name.Value }}]({{ getPackageVersionURL $apiURL $packageVersionObject }})
{{ range $dependencyName, $dependencyFindings := $packageVersionFindings.DependencyToFindings }}

{{/* DEPENDENCY HEADER */}}
  - **:arrow_heading_down: Dependency:** [{{ $dependencyName }}]({{ $dependencyName }})
{{ range $findingCounter, $findingUUID := $dependencyFindings.Uuids }}
{{ $findingObj := index $findingsMap $findingUUID }}

{{/* FINDING HEADER */}}
    - **:triangular_flag_on_post: Finding:** [{{ $findingObj.Meta.Description.Value }}]({{ getFindingURL $apiURL $findingObj }})

{{/* FINDING DETAILS */}}
      - **[Details]({{ getFindingURL $apiURL $findingObj }})**
      - **Severity:** ` + "`" + `{{ enumToString $findingObj.Spec.Level }}` + "`" + `
      - **Tags:** {{ range $i, $t := $findingObj.Spec.FindingTags }}` + "`" + `{{ enumToString $t }}` + "`" + ` {{ end }}
      - **Categories:** {{ range $i, $c := $findingObj.Spec.FindingCategories }}` + "`" + `{{ enumToString $c }}` + "`" + ` {{ end }}
{{- with getFirstPartyReachableFunctions $findingObj }}
      - **Reachable via:** ` + "`" + `{{ . }}` + "`" + `
{{- end }}
      - **Remediation:** {{ indentMultiline (fixBackticks $findingObj.Spec.Remediation.Value) "        " }}

{{ end }} {{/*range $findingCounter, $findingUUID...*/}}
{{ end }} {{/*range $dependencyName, $depend...*/}}
{{ end }}  {{/* if $packageVersionObject */}}
{{ else }} {{/* if ne getOtherFindingsPackageMarker... */}}
{{ $depMarker := getOtherFindingsDependencyMarker }}
{{ $otherFindings := index $packageVersionFindings.DependencyToFindings $depMarker }}
{{ $otherFindingsLen := len $otherFindings.Uuids }}
{{ if ne $otherFindingsLen 0 }}
{{/* OTHER FINDINGS HEADER */}}
- **:mag: Findings**
{{ range $findingCounter, $findingUUID := $otherFindings.Uuids }}
{{ $findingObj := index $findingsMap $findingUUID }}

{{/* FINDING HEADER */}}
   - **:triangular_flag_on_post: Finding:** [{{ $findingObj.Meta.Description.Value }}]({{ getFindingURL $apiURL $findingObj }})

{{/* FINDING DETAILS */}}
		- **[Link To Finding]({{ getFindingURL $apiURL $findingObj }})**
		- **Severity:** ` + "`" + `{{ enumToString $findingObj.Spec.Level }}` + "`" + `
		- **Tags:** {{ range $i, $t := $findingObj.Spec.FindingTags }}` + "`" + `{{ enumToString $t }}` + "`" + ` {{ end }}
		- **Categories:** {{ range $i, $c := $findingObj.Spec.FindingCategories }}` + "`" + `{{ enumToString $c }}` + "`" + ` {{ end }}
		- **Summary:** {{ indentMultiline $findingObj.Spec.Summary.Value "      " }}
		- **Remediation:** {{ indentMultiline (fixBackticks $findingObj.Spec.Remediation.Value) "      " }}

{{- if hasFindingCategory $findingObj "SAST" }}
    	- **Location:** {{ getCustomLocation $findingObj }}
{{- if isNotEmptyString (getCustomCodeSnippet $findingObj) }}
    	- **Code Snippet:**
` + "```" + `
{{ getCustomCodeSnippet $findingObj }}
` + "```" + `
{{- end }}
{{- end }}

{{ end }} {{/*range $findingCounter, $findingUUID...*/}}
{{ end }} {{/*{{ if ne $otherFindingsLen 0*/}}
{{ end }} {{/* if ne getOtherFindingsPackageMarker... */}}
{{ end }} {{/* range $packageVersionUUID, $packageVersionFindings := $policyFindings */}}
{{ end}}  {{/* {{ range $policyUUID, $policyObj := .PoliciesMap */}}

{{ .CommentFooter.Value }}
_Scanned @ {{ now }} UTC_
You can create your custom template by editing the default template and saving the changes.
The following specification shows the additional functions that you can use in your custom template. You can access these functions by using their corresponding keys.
// FuncMap contains additional template functions used in GitLab comment templates.
var FuncMap = template.FuncMap{
	"now":                              utils.ToTime,
	"enumToString":                     utils.EnumToString,
	"getFindingURL":                    utils.GetFindingURL,
	"getPackageVersionURL":             utils.GetPackageVersionURL,
	"getPullRequestURL":                getEndorLabsPullRequestRunURL,
	"getFindingsCountString":           utils.GetFindingsCountString,
	"hasOtherFindings":                 hasOtherFindings,
	"getOtherFindingsPackageMarker":    getOtherFindingsPackageMarker,
	"getOtherFindingsDependencyMarker": getOtherFindingsDependencyMarker,
	"fixBackticks":                     utils.FixUnclosedBackticks,
	"indentMultiline":                  utils.IndentMultiline,
	"getFirstPartyReachableFunctions":  utils.GetFirstPartyReachableFunctions,
	"hasFindingCategory":               utils.HasFindingCategory,
	// isNotEmptyString checks if a string is not empty
	"isNotEmptyString": utils.IsNotEmptyString,
	// getCustomLocation extracts the location from Custom field
	"getCustomLocation": func(finding *endorpb.Finding) string {
		return utils.GetCustomFieldValue(finding, "location")
	},
	// getCustomCodeSnippet extracts the code snippet from Custom field
	"getCustomCodeSnippet": func(finding *endorpb.Finding) string {
		return utils.GetCustomFieldValue(finding, "code_snippet")
	},
	// add returns the sum of two integers
	"add": func(n int, incr int) int {
		return n + incr
	},
	// getTotalFindingsCount returns the total count of unique findings across all policies
	"getTotalFindingsCount": getTotalFindingsCount,
}
To edit the default template:
-
Select Manage > Integrations from the left sidebar.
-
Click Edit Template next to Bitbucket under Template for PR Comments.
Bitbucket only supports markdown in PR comments and does not support HTML tags.
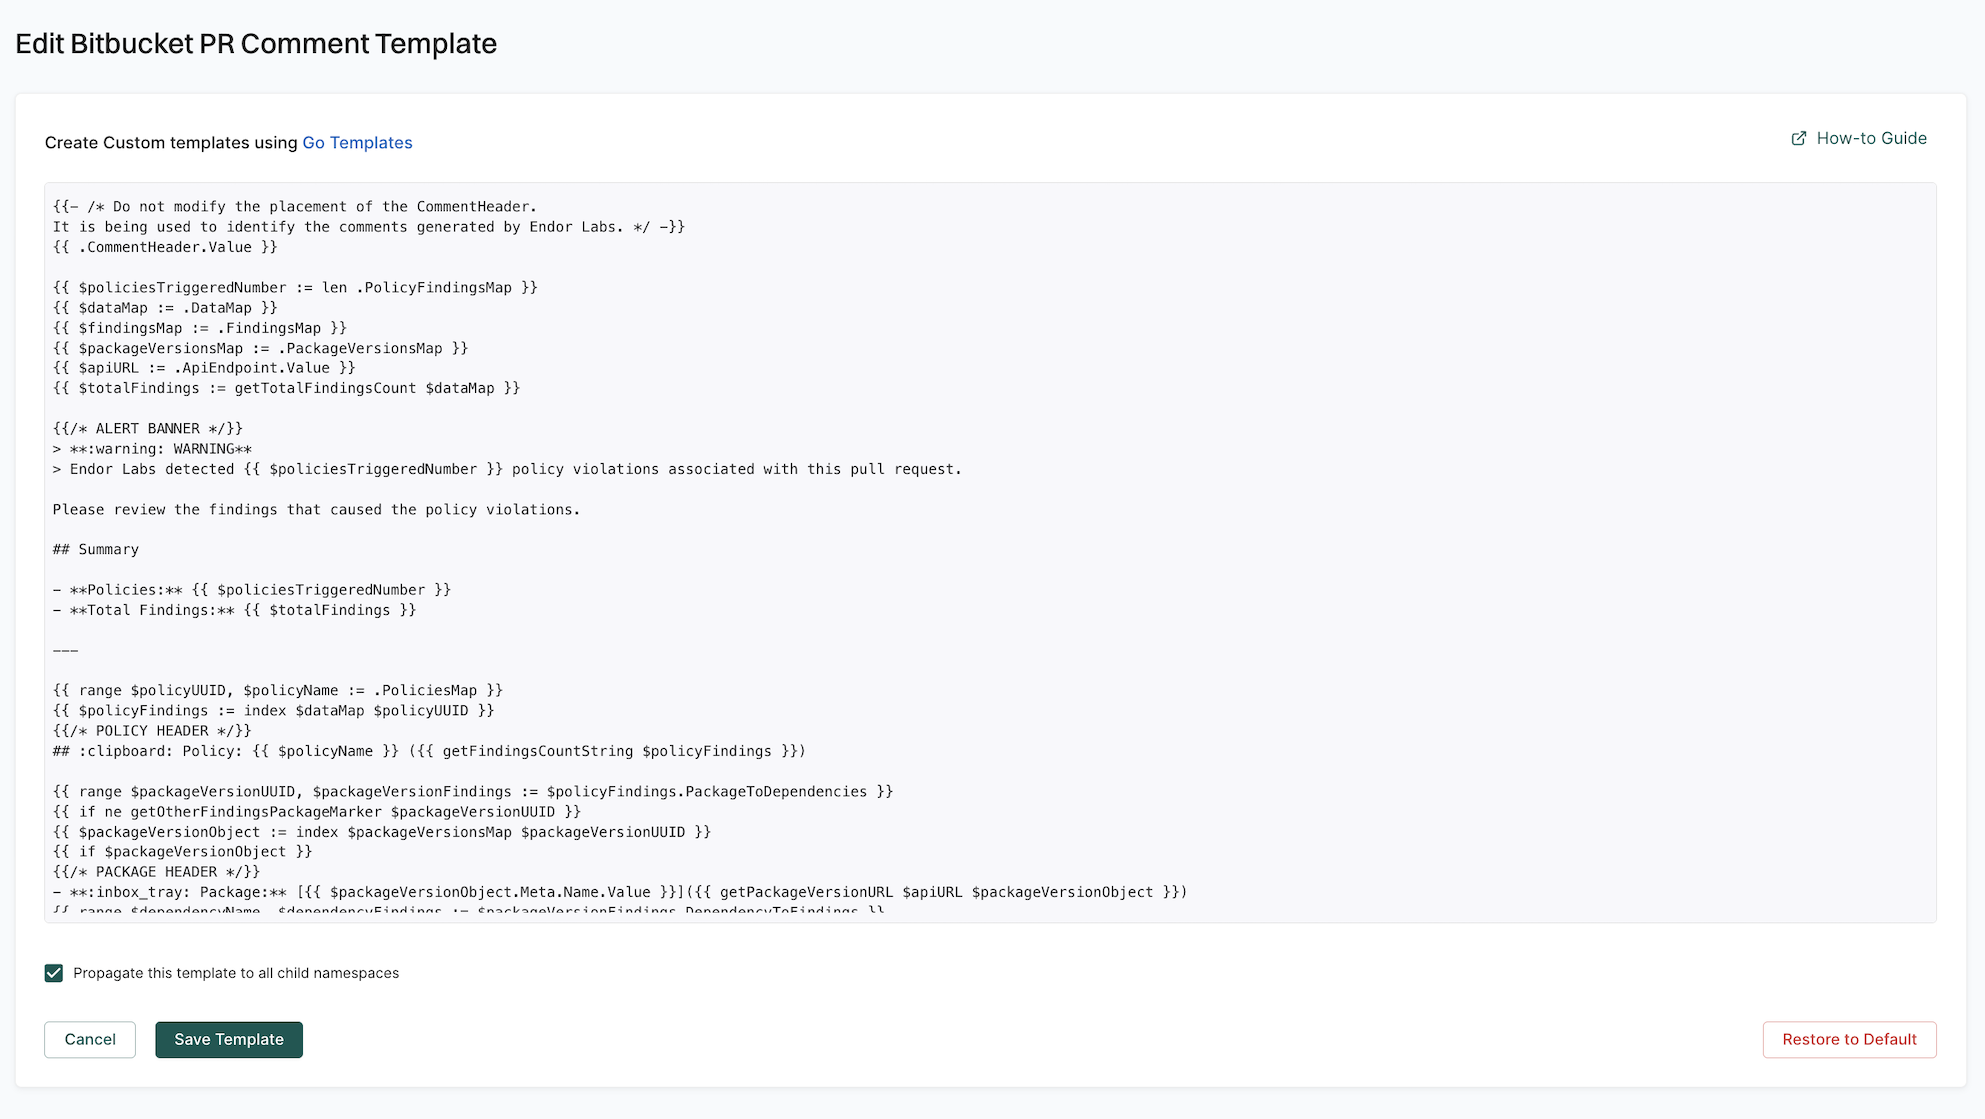
-
Update the template with the required changes.
-
Select Propagate this template to all child namespaces if you want to apply the template to all child namespaces.
-
Click Save Template to save the changes.
PR scan comments in Bitbucket Data Center
After you enable PR comments, Endor Labs posts a comment on the pull request if any issues are detected during the PR scan based on the action policies.
The following example shows a comment on the pull request as a result of the action policy for identifying leaked secrets.
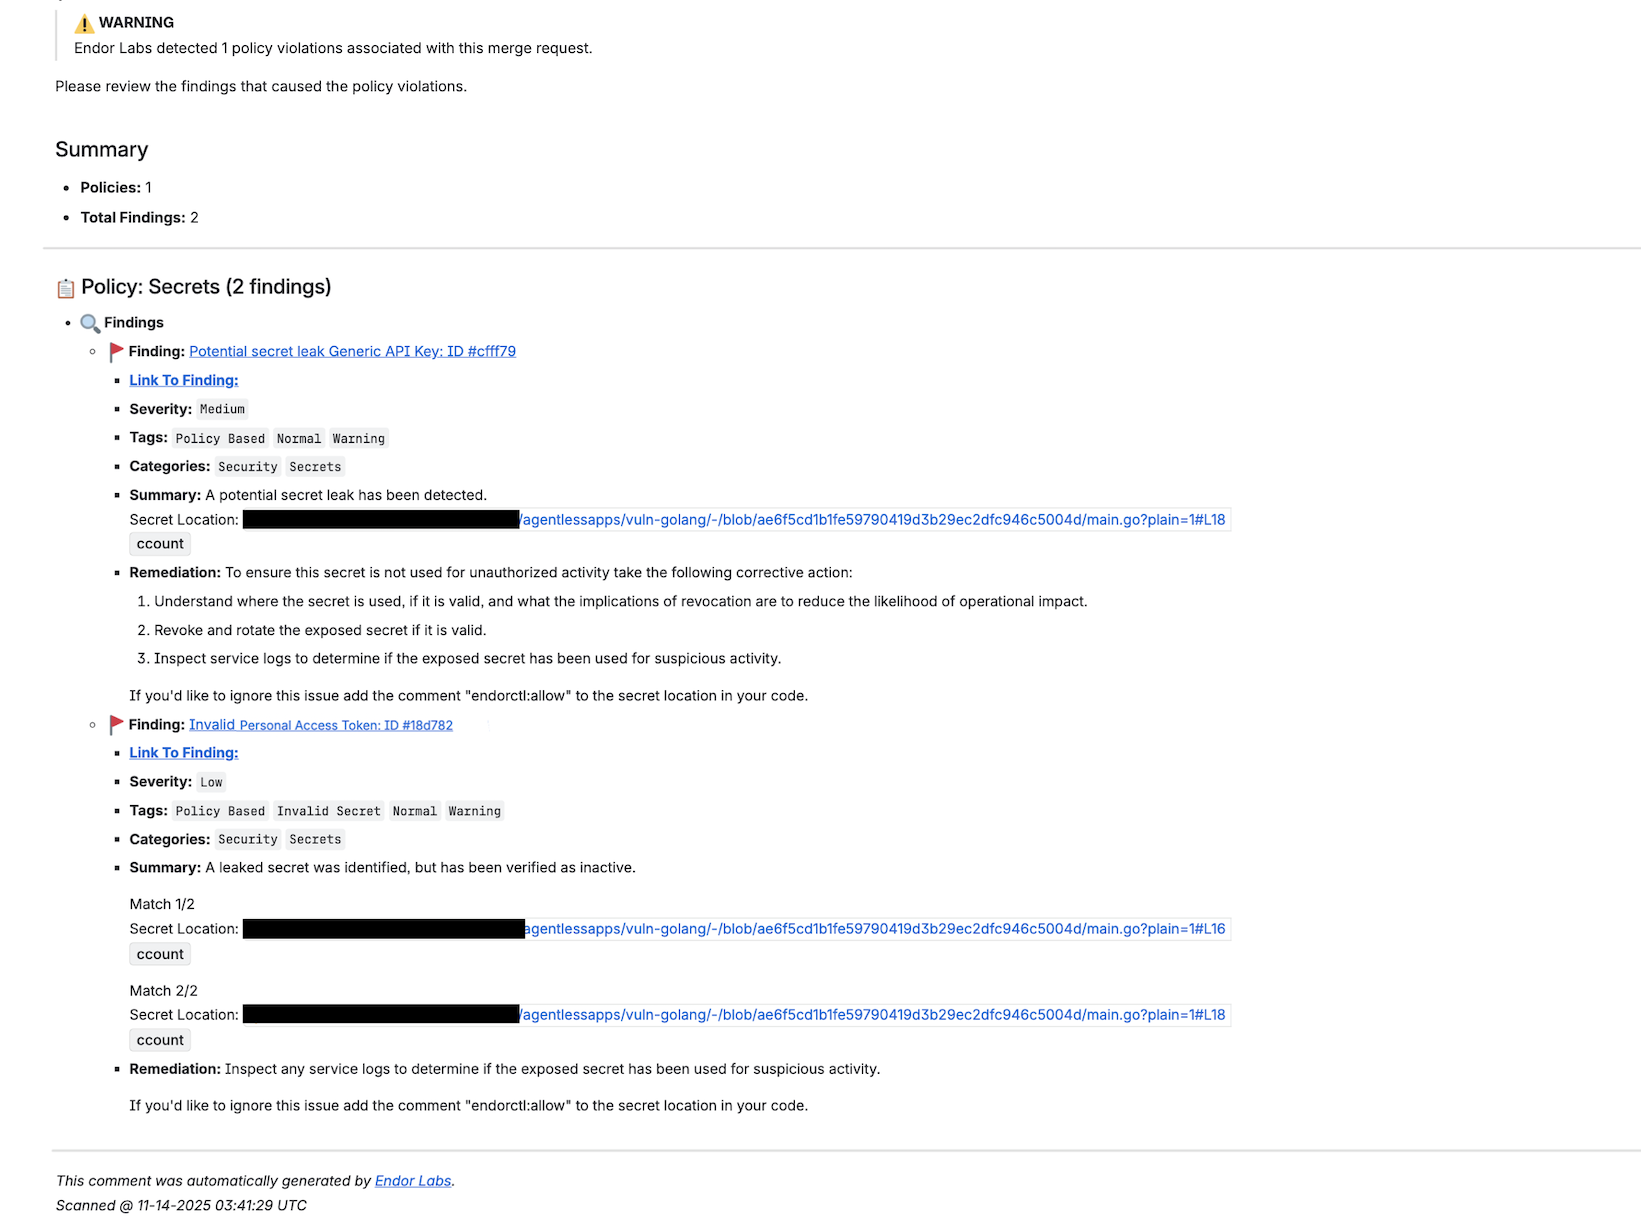
Click Link to Finding to view the details of the finding in Endor Labs.
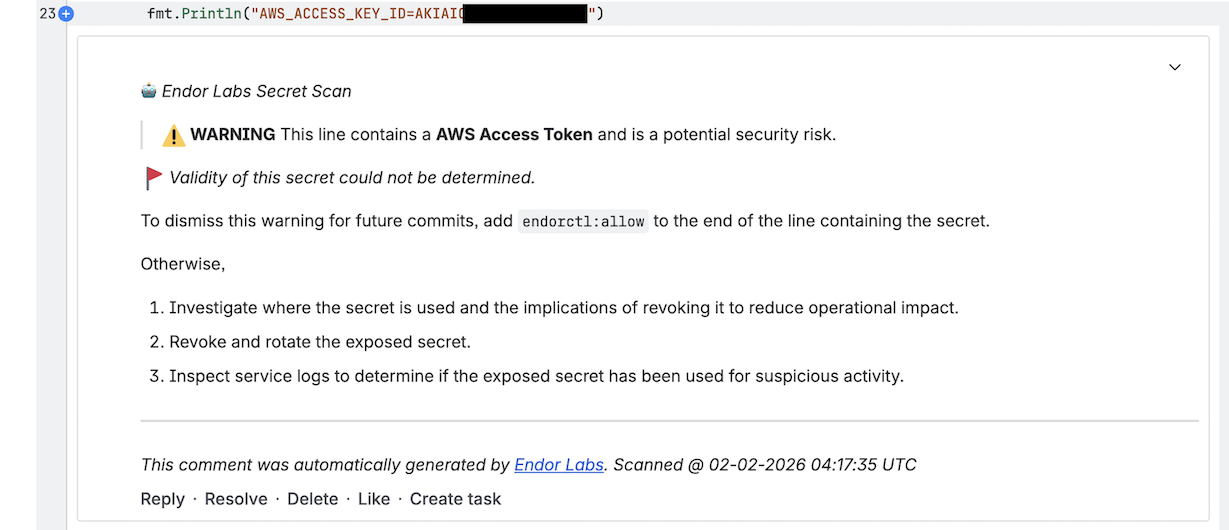
For secrets, Endor Labs also generates a comment with the line number where the secret is detected.
View PR scan findings
When you create a new pull request, the Endor Labs Bitbucket Data Center App scans the pull request. Endor Labs generates findings based on the finding policy.
-
Sign in to Endor Labs and select Projects from the left sidebar.
-
Select the project for which you want to view the PR scan findings.
-
Select PR runs to view the PR scan findings.
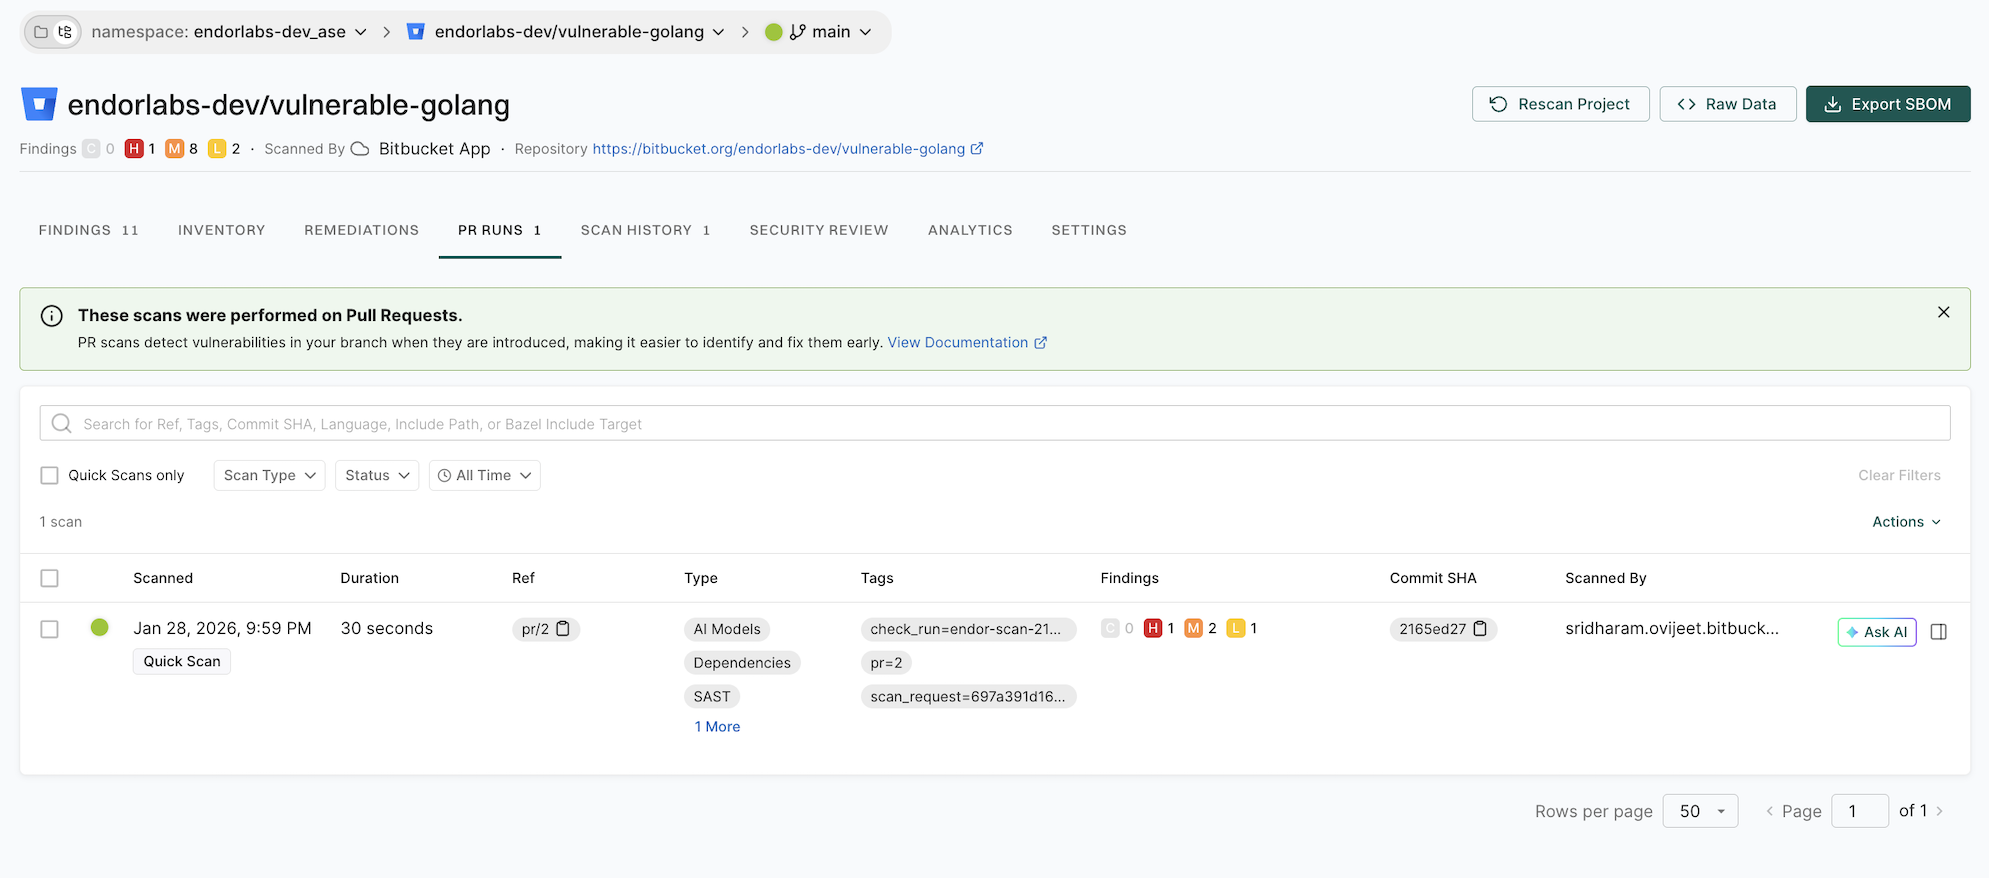
-
Select the PR for which you want to view the findings.
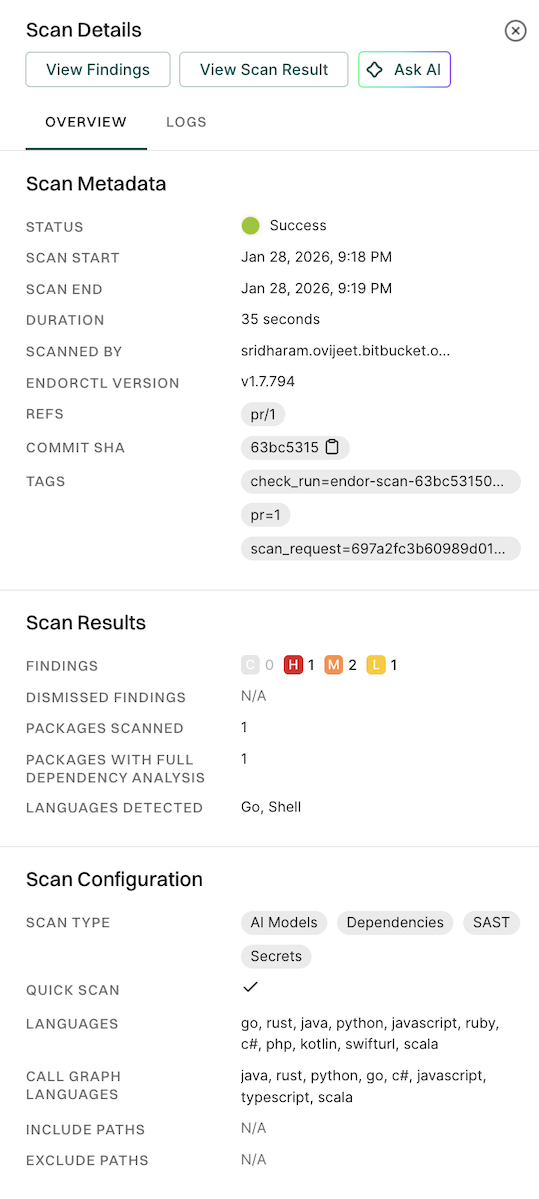
-
Click View Findings to view the findings on the PR.
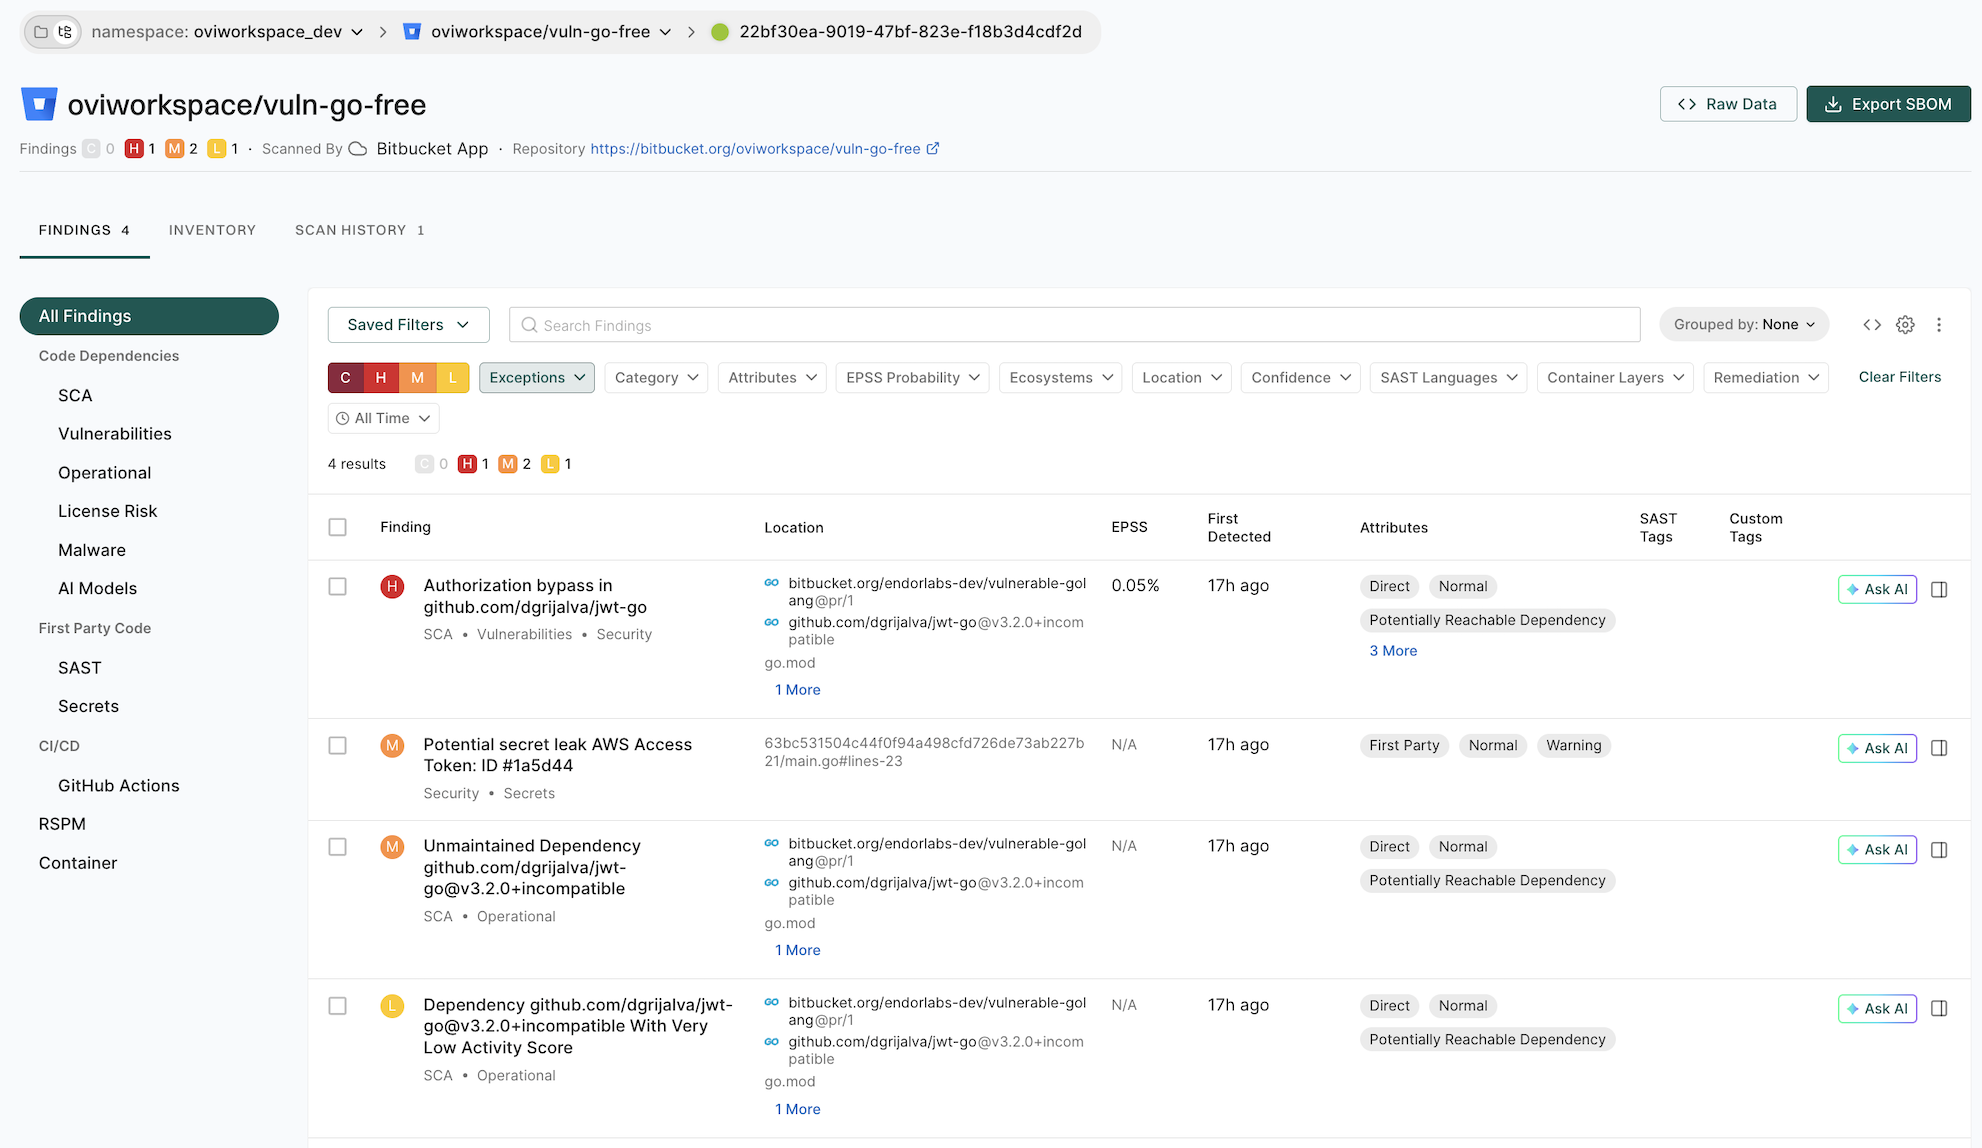
See View Findings for more information on Findings in Endor Labs.
Feedback
Was this page helpful?
Thanks for the feedback. Write to us at support@endor.ai to tell us more.
Thanks for the feedback. Write to us at support@endor.ai to tell us more.
The action policy that you create triggers the posting of comments on your pull request after a scan is complete. See Action policy for more information. You can create multiple action policies based on your requirements, which the PR scan can trigger. If you create action policy with the
Secrettemplate, you get an inline comment with the line number where the secret is detected.Ensure that you configure the following important settings in the action policy:
Choose an appropriate action policy template or create a custom action policy.
You can choose an action policy template like Containers or create a custom action policy.
Under Action, select Enforce Policy, then choose:
Define the scope of the policy using tags. Only projects that match the specified tags will receive PR comments.
Select Propagate this policy to all child namespaces if you want to apply the policy to all child namespaces.